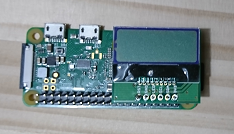
〇「Raspberry Pi キャラクタ液晶ディスプレイモジュールキット バックライト付」のパーツ
https://akizukidenshi.com/catalog/g/gK-11354/
〇組み立て後のRaspberry Pi Zeroとキャラクタ液晶ディスプレイモジュール
実行手順
1. pipenvの導入pipenvをインストールしていない場合は、以下のコマンドを実行します。
sudo apt-get update

sudo apt-get -y install python3-pip python3-distutils python3-dev

sudo pip3 install --upgrade pip

sudo pip3 install --upgrade setuptools

sudo pip3 install pipenv

echo "export PIPENV_VENV_IN_PROJECT=true" >> ~/.bashrc

source ~/.bashrc
2. pipenvでsmbusをインストール
以下のコマンドでsmbusモジュールをインストールした仮想環境を構築します。また、raspi-configコマンドでi2cを有効化しておきます。
mkdir smbus

cd smbus

pipenv --python 3

pipenv install smbus

pipenv shell
3. プログラミングとファイルの実行
以下のファイルをtest.pyとして保存して、実行します。
test.py
# coding: utf-8
import smbus
import time

i2c = smbus.SMBus(1)
addr_lcd=0x3e

# Initialize
# Function Set
i2c.write_byte_data(addr_lcd, 0x00, 0x38)
time.sleep(0.01)

# Function Set
i2c.write_byte_data(addr_lcd, 0x00, 0x39)
time.sleep(0.01)

# Internal OSC frequency
i2c.write_byte_data(addr_lcd, 0x00, 0x14)
time.sleep(0.01)

# Contrast set
i2c.write_byte_data(addr_lcd, 0x00, 0x70)
time.sleep(0.01)

# Power/ICON/Constrast control
i2c.write_byte_data(addr_lcd, 0x00, 0x56)
time.sleep(0.01)

# Follower control
i2c.write_byte_data(addr_lcd, 0x00, 0x6c)
time.sleep(0.01)

# Function set
i2c.write_byte_data(addr_lcd, 0x00, 0x38)
time.sleep(0.01)

# Display ON/OFF control
i2c.write_byte_data(addr_lcd, 0x00, 0x0c)
time.sleep(0.01)

# Clear Display
i2c.write_byte_data(addr_lcd, 0x00, 0x01)
time.sleep(0.1)

# show message on 1st line
#for ch in "Test".encode("ascii"):
for ch in "Test.テスト".encode("shift_jis"):
    i2c.write_byte_data(addr_lcd, 0x40, ch)
    time.sleep(0.01)

# show message on 2nd line
i2c.write_byte_data(addr_lcd, 0x00, 0xc0)
for ch in "コンニチハ.".encode("shift_jis"):
    i2c.write_byte_data(addr_lcd, 0x40, ch)
    time.sleep(0.01)
実行コマンド
python3 test.py

0 件のコメント:
コメントを投稿