2022年4月30日土曜日

PySimpleGUIとOpenCVでwebカメラ画像上に文字列を描画する

OpenCVで文字列を描画するにはputText関数を使用します。引数には以下を指定します
・描画先イメージ
・文字列
・org : 文字列の左下座標
・fontFace: FONT_HERSHEY_SIMPLEX/FONT_HERSHEY_PLAIN/FONT_HERSHEY_DUPLEX/FONT_HERSHEY_COMPLEX/FONT_HERSHEY_TRIPLEX/FONT_HERSHEY_COMPLEX_SMALL/FONT_HERSHEY_SCRIPT_SIMPLEX/FONT_HERSHEY_SCRIPT_COMPLEX/FONT_ITALIC
・fontScale:フォントの大きさの倍率
・color: 描画色
・thickness: 線の太さ

サンプルコードの実行手順

1. PySimpleGUIとOpenCVがインストールされた環境の構築
以下のページを参照して、環境を構築します。
PySimpleGUIとOpenCVをインストールしてwebカメラの映像をウインドウを表示する

2. サンプルプログラムの作成と実行
以下のファイルを保存して、実行します。
psgui_opencv_puttext.py
import PySimpleGUI as sg
import cv2


sg.theme('SystemDefault')
layout = [
  [sg.Image(key='img1')]
]

# webカメラをキャプチャー
capture = cv2.VideoCapture(0)

# webカメラの解像度を取得
width = int(capture.get(cv2.CAP_PROP_FRAME_WIDTH))
height = int(capture.get(cv2.CAP_PROP_FRAME_HEIGHT))
window = sg.Window("webカメラ画面", layout=layout, finalize=True)
# イベントループ
while True:
  event, values = window.read(timeout=50)
  if event == sg.WIN_CLOSED:
    break
  rv, frame = capture.read()
  if rv is True:
    # 文字列描画
    ti = cv2.putText(frame,
      "Width: {}, Height:{}".format(width, height),
      org=(10, int(height/10)*9),
      fontFace=cv2.FONT_HERSHEY_SCRIPT_SIMPLEX,
      fontScale=1,
      color=(0, 0, 0),
      thickness=3
    )
    # pngに変換して、Image更新
    img = cv2.imencode('.png', ti)[1].tobytes()
    window['img1'].update(data=img)


capture.release()
window.close()

・実行方法
以下のコマンドを実行します。
python3 psgui_opencv_puttext.py

関連情報

PySimpleGUIで画像を表示する

・OpenCVに関する他の記事はこちらを参照してください。

Kubernetes python clientでMicrok8sの永続ボリュームを削除する

以下のようなKubernetes python clientサンプルプログラムでMicrok8sの永続ボリュームを削除することが出来ます。

実行手順

1. 実行環境の構築・設定
以下のページを参照して、実行環境の構築・設定を行います。
Kubernetes python clientでMicrok8sのnamespaceを列挙する

2. サンプルプログラムの作成と実行
以下のサンプルプログラムで永続ボリュームを削除することが出来ます。
delete-pv.py
from kubernetes import config, client
from kubernetes.client.exceptions import ApiException

# configを読み込み
cfg = config.load_kube_config()

# クライアントを作成
with client.ApiClient(cfg) as api_client:
  api = client.CoreV1Api(api_client)
  namespace = 'default'
  pv_name = 'local-httpd-pv'
  # 永続ボリュームの削除
  try:
    api.delete_persistent_volume(pv_name)
  except ApiException as ex:
    print(ex)

・実行コマンド
python3 delete-pv.py

関連情報

・Kubernetes Python Clientのリポジトリ
https://github.com/kubernetes-client/python

2022年4月29日金曜日

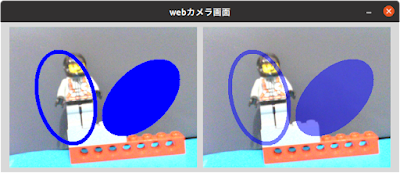
PySimpleGUIとOpenCVでwebカメラ画像上に不透明・半透明の楕円を描画する

OpenCVで楕円を描画するにはellipse関数を使用します。thicknessパラメータにcv2.FILLEDを指定すると塗りつぶしになります。
楕円はboxパラメータに((楕円の中心X座標, 楕円の中心Y座標), (幅, 高さ), 角度)というタプルで指定します。
半透明の円を描画するには、描画先の画像を複製して片方にのみ楕円を描画してcv2.addWeighted関数でalpha/betaパラメータを指定して重ね合わせます。

サンプルコードの実行手順

1. PySimpleGUIとOpenCVがインストールされた環境の構築
以下のページを参照して、環境を構築します。
PySimpleGUIとOpenCVをインストールしてwebカメラの映像をウインドウを表示する

2. サンプルプログラムの作成と実行
以下のファイルを保存して、実行します。
psgui_opencv_ellipse.py
import PySimpleGUI as sg
import cv2
import numpy as np

sg.theme('SystemDefault')
layout = [
  [sg.Image(key='img1'), sg.Image(key='img2')]
]

# webカメラをキャプチャー
capture = cv2.VideoCapture(0)

# webカメラの解像度を取得
width = int(capture.get(cv2.CAP_PROP_FRAME_WIDTH)/2)
height = int(capture.get(cv2.CAP_PROP_FRAME_HEIGHT)/2)
window = sg.Window("webカメラ画面", layout=layout, finalize=True)
ac = 0
# イベントループ
while True:
  event, values = window.read(timeout=50)
  if event == sg.WIN_CLOSED:
    break
  ac = ac+1
  rv, frame = capture.read()
  if rv is True:
    # 左右に並べるために縦横のサイズを半分にリサイズ
    resized = cv2.resize(frame, (width, height))
    # 半透明描画用に複製
    semitr1 = resized.copy()
    semitr2 = resized.copy()
    # 不透明の楕円を描画
    dx = int(width/10)
    dy = int(height/10)
    cv2.ellipse(resized, ((dx*3, dy*5), (dx*5, dy*4), int(np.mod(30+ac, 360))), (255, 0, 0), 6)
    cv2.ellipse(resized, ((dx*7, dy*5), (dx*5, dy*4), int(np.mod(90+ac, 360))), (255, 0, 0), cv2.FILLED)
    # 半透明の楕円を描画
    cv2.ellipse(semitr2, ((dx*3, dy*5), (dx*5, dy*4), int(np.mod(30+ac, 360))), (255, 0, 0), 6)
    cv2.ellipse(semitr2, ((dx*7, dy*5), (dx*5, dy*4), int(np.mod(90+ac, 360))), (255, 0, 0), cv2.FILLED)
    alpha=0.5
    semitr = cv2.addWeighted(semitr2, alpha, semitr1, 1-alpha, 0)
    # pngに変換して、Image更新
    img = cv2.imencode('.png', resized)[1].tobytes()
    img2 = cv2.imencode('.png', semitr)[1].tobytes()
    window['img1'].update(data=img)
    window['img2'].update(data=img2)


capture.release()
window.close()

・実行方法
以下のコマンドを実行します。
python3 psgui_opencv_ellipse.py

関連情報

PySimpleGUIで画像を表示する

・OpenCVに関する他の記事はこちらを参照してください。

Kubernetes python clientでMicrok8sの永続ボリューム要求を削除する

以下のようなKubernetes python clientサンプルプログラムでMicrok8sの永続ボリューム要求を削除することが出来ます。

実行手順

1. 実行環境の構築・設定
以下のページを参照して、実行環境の構築・設定を行います。
Kubernetes python clientでMicrok8sのnamespaceを列挙する

2. サンプルプログラムの作成と実行
以下のサンプルプログラムで永続ボリューム要求を削除することが出来ます。
delete-pvc.py
from kubernetes import config, client
from kubernetes.client.exceptions import ApiException

# configを読み込み
cfg = config.load_kube_config()

# クライアントを作成
with client.ApiClient(cfg) as api_client:
  api = client.CoreV1Api(api_client)
  namespace = 'default'
  pvc_name = 'local-httpd-pvc'
  # 永続ボリューム要求の削除
  try:
    api.delete_namespaced_persistent_volume_claim(pvc_name, namespace)
  except ApiException as ex:
    print(ex)

・実行コマンド
python3 delete-pvc.py

関連情報

・Kubernetes Python Clientのリポジトリ
https://github.com/kubernetes-client/python

2022年4月28日木曜日

PySimpleGUIとOpenCVでwebカメラの映像上にマーカーを描画する

PySimpleGUIとOpenCVでwebカメラの映像上にマーカーを描画するには、以下のサンプルプログラムのようにdrawMarker関数を使用します。
マーカーには以下のような種類をmarkerTypeパラメータで指定できます
・MARKER_CROSS : 十字形
・MARKER_TILTED_CROSS : 45度傾いた十字
・MARKER_STAR : 十字と45度傾いた十字を重ね合わせた形
・MARKER_DIAMOND : ダイヤモンド形
・MARKER_SQUARE : 四角
・MARKER_TRIANGLE_UP : 上向き三角
・MARKER_TRIANGLE_DOWN : 下向き三角
また、サンプルではスライダーでmarkerSizeのサイズを調整できます。

サンプルコードの実行手順

1. PySimpleGUIとOpenCVがインストールされた環境の構築
以下のページを参照して、環境を構築します。
PySimpleGUIとOpenCVをインストールしてwebカメラの映像をウインドウを表示する

2. サンプルプログラムの作成と実行
以下のファイルを保存して、実行します。ラジオボタンをクリックすると回転角度が変化します。
psgui_opencv_marker.py
import PySimpleGUI as sg
import cv2


sg.theme('SystemDefault')
layout = [
  [
    sg.Radio(key = 'MARKER_CROSS', text='MARKER_CROSS', group_id='f', default=True),
    sg.Radio(key = 'MARKER_TILTED_CROSS', text='MARKER_TILTED_CROSS', group_id='f'),
    sg.Radio(key = 'MARKER_STAR', text='MARKER_STAR', group_id='f'),
    sg.Radio(key = 'MARKER_DIAMOND', text='MARKER_DIAMOND', group_id='f'),
    sg.Radio(key = 'MARKER_SQUARE', text='MARKER_SQUARE', group_id='f'),
    sg.Radio(key = 'MARKER_TRIANGLE_UP', text='MARKER_TRIANGLE_UP', group_id='f'),
    sg.Radio(key = 'MARKER_TRIANGLE_DOWN', text='MARKER_TRIANGLE_DOWN', group_id='f')
  ],
  [
    sg.Text("markerSize"),
    sg.Slider(key='markerSize', range=(0, 100), resolution=1, default_value=20, orientation='horizontal', expand_x=True)
  ],
  [sg.Image(key='img1')]
]

# webカメラをキャプチャー
capture = cv2.VideoCapture(0)

# webカメラの解像度から画面中心の位置
cx = int(capture.get(cv2.CAP_PROP_FRAME_WIDTH)/2)
cy = int(capture.get(cv2.CAP_PROP_FRAME_HEIGHT)/2)
window = sg.Window("webカメラ画面", layout=layout, finalize=True)
# イベントループ
while True:
  event, values = window.read(timeout=50)
  if event == sg.WIN_CLOSED:
    break
  rv, frame = capture.read()
  if rv is True:
    markerType = cv2.MARKER_CROSS
    if values is not None and values["MARKER_TILTED_CROSS"] == True:
      markerType = cv2.MARKER_TILTED_CROSS
    if values is not None and values["MARKER_STAR"] == True:
      markerType = cv2.MARKER_STAR
    if values is not None and values["MARKER_DIAMOND"] == True:
      markerType = cv2.MARKER_DIAMOND
    if values is not None and values["MARKER_SQUARE"] == True:
      markerType = cv2.MARKER_SQUARE
    if values is not None and values["MARKER_TRIANGLE_UP"] == True:
      markerType = cv2.MARKER_TRIANGLE_UP
    if values is not None and values["MARKER_TRIANGLE_DOWN"] == True:
      markerType = cv2.MARKER_TRIANGLE_DOWN
    mi = cv2.drawMarker(frame, (cx, cy), color=(0, 0, 255), 
      markerType=markerType, 
      markerSize=int(values['markerSize']),
      thickness=3
    )

    # pngに変換してImage更新
    img = cv2.imencode('.png', mi)[1].tobytes()
    window['img1'].update(data=img)

capture.release()
window.close()

・実行方法
以下のコマンドを実行します
python3 psgui_opencv_marker.py

関連情報

PySimpleGUIで画像を表示する

PySimpleGUIでラジオボタン要素の初期選択状態を設定する

・OpenCVに関する他の記事はこちらを参照してください。

Kubernetes python clientでMicrok8sのServiceを削除する

以下のようなKubernetes python clientサンプルプログラムでMicrok8sのServiceを削除することが出来ます。

実行手順

1. 実行環境の構築・設定
以下のページを参照して、実行環境の構築・設定を行います。
Kubernetes python clientでMicrok8sのnamespaceを列挙する

2. サンプルプログラムの作成と実行
以下のサンプルプログラムでServiceを削除することが出来ます。
delete-service.py
from kubernetes import config, client
from kubernetes.client.exceptions import ApiException

# configを読み込み
cfg = config.load_kube_config()

# クライアントを作成
with client.ApiClient(cfg) as api_client:
  api = client.CoreV1Api(api_client)
  namespace = 'default'
  service_name = 'httpd-service'
  # Serviceの削除
  try:
    api.delete_namespaced_service(service_name, namespace)
  except ApiException as ex:
    print(ex)

・実行コマンド
python3 delete-service.py

関連情報

・Kubernetes Python Clientのリポジトリ
https://github.com/kubernetes-client/python

2022年4月27日水曜日

PySimpleGUIとOpenCVでwebカメラ画像の輪郭線を描画する

OpenCVで輪郭線を描画するには画像を以下の順序で処理します。
1. threshold関数などで画像を二値化します
2. findContours関数で輪郭線検出を行う
3. drawContours関数で輪郭線を描画

サンプルコードの実行手順

1. PySimpleGUIとOpenCVがインストールされた環境の構築
以下のページを参照して、環境を構築します。
PySimpleGUIとOpenCVをインストールしてwebカメラの映像をウインドウを表示する

2. サンプルプログラムの作成と実行
以下のファイルを保存して、実行します。
psgui_opencv_contours.py
import PySimpleGUI as sg
import cv2

sg.theme('SystemDefault')
layout = [
  [sg.Slider(key='slider', range=(0, 255), default_value=128, orientation='horizontal')],
  [sg.Image(key='img1'), sg.Image(key='img2')]
]

# webカメラをキャプチャー
capture = cv2.VideoCapture(0)

# webカメラの解像度を取得
width = int(capture.get(cv2.CAP_PROP_FRAME_WIDTH)/2)
height = int(capture.get(cv2.CAP_PROP_FRAME_HEIGHT)/2)
window = sg.Window("webカメラ画面", layout=layout, finalize=True)
# イベントループ
while True:
  event, values = window.read(timeout=50)
  print(event, values)
  if event == sg.WIN_CLOSED:
    break
  rv, frame = capture.read()
  if rv is True:
    # 左右に並べるために縦横のサイズを半分にリサイズ
    resized = cv2.resize(frame, (width, height))
    # グレースケールに変換
    gray = cv2.cvtColor(resized, cv2.COLOR_BGR2GRAY)
    # 2値化
    slider = values['slider']
    threshold, binary = cv2.threshold(gray, slider, 255, cv2.THRESH_BINARY)
    # 輪郭抽出
    (contours, hierarchy) = cv2.findContours(binary,cv2.RETR_TREE,cv2.CHAIN_APPROX_SIMPLE)
    # 輪郭描画
    cnt = resized.copy()
    cnt = cv2.drawContours(resized, contours, -1, (0,192,0), 2)

    # pngに変換して、Image更新
    img = cv2.imencode('.png', gray)[1].tobytes()
    img2 = cv2.imencode('.png', cnt)[1].tobytes()
    window['img1'].update(data=img)
    window['img2'].update(data=img2)

capture.release()
window.close()

・実行方法
以下のコマンドを実行します。
python3 psgui_opencv_contours.py

関連情報

PySimpleGUIで画像を表示する

・OpenCVに関する他の記事はこちらを参照してください。

Kubernetes python clientでMicrok8sの永続ボリューム/永続ボリューム要求/Deployment/Serviceを作成する

以下のようなKubernetes python clientサンプルプログラムでMicrok8sの永続ボリューム/永続ボリューム要求/Deployment/Serviceを作成することが出来ます。

実行手順

1. 実行環境の構築・設定
以下のページを参照して、実行環境の構築・設定を行います。
Kubernetes python clientでMicrok8sのnamespaceを列挙する

2. サンプルプログラムの作成と実行
以下のサンプルプログラムでMicrok8sの永続ボリューム/永続ボリューム要求/Deployment/Serviceを作成することが出来ます。ローカルストレージの永続ボリュームを使用するApache Httpdをデプロイ&サービス作成しています。
deploy-httpd.py
from kubernetes import config, client
from kubernetes.client.exceptions import ApiException

# 永続ボリュームの作成
def create_pv(api):
  pv = client.V1PersistentVolume()
  # 永続ボリューム名
  pv.metadata = client.V1ObjectMeta(
    name="local-httpd-pv"
  )
  pv.spec = client.V1PersistentVolumeSpec(
    # 容量
    capacity = {"storage":"50Mi"},
    # local volume
    local = client.V1LocalVolumeSource(path="/var/mywww/html"),
    # アクセスモード
    access_modes = [
      "ReadOnlyMany"
    ],
    # node affinityの設定
    node_affinity = client.V1VolumeNodeAffinity(
      required = client.V1NodeSelector(
        node_selector_terms = [
          client.V1NodeSelectorTerm(
            match_expressions = [
              client.V1NodeSelectorRequirement(
                key = "kubernetes.io/hostname",
                operator = "In",
                values = ["ub2004server1"] # 適宜ホスト名を変更してください
              )
            ]
          )
        ]
      )
    ),
    # storage class設定
    storage_class_name = "local-storage",
  )
  # 永続ボリュームを作成
  api.create_persistent_volume(pv)

# 永続ボリューム要求の作成
def create_pvc(api, namespace):
  pv = client.V1PersistentVolumeClaim()
  pv.metadata = client.V1ObjectMeta(
    name="local-httpd-pvc"
  )
  pv.spec = client.V1PersistentVolumeClaimSpec(
    access_modes = [
      "ReadOnlyMany"
    ],
    resources = client.V1ResourceRequirements(
      requests = {"storage": "50Mi"}
    ),
    storage_class_name = "local-storage",
  )
  api.create_namespaced_persistent_volume_claim(namespace, pv)

# Deploymentの作成
def create_deployment(api, namespace):
  dp = client.V1Deployment()
  dp.metadata = client.V1ObjectMeta(
    name="httpd-deployment",
    labels={"app":"myhttpd"}
  )
  dp.spec = client.V1DeploymentSpec(
    replicas = 1,
    selector = client.V1LabelSelector(
      match_labels = {"app":"myhttpd"}
    ),
    template = client.V1PodTemplateSpec(
      metadata = client.V1ObjectMeta(
        labels={"app":"myhttpd"}
      ),
      spec = client.V1PodSpec(
        containers = [
          client.V1Container(
            name = "myhttpd",
            image = "httpd:2.4-alpine",
            ports = [
              client.V1ContainerPort(container_port=80)
            ],
            volume_mounts = [
              client.V1VolumeMount(
                name = "documentroot",
                mount_path = "/usr/local/apache2/htdocs"
              )
            ]
          )
        ],
        volumes = [
          client.V1Volume(
            name = "documentroot",
            persistent_volume_claim = client.V1PersistentVolumeClaimVolumeSource(
              claim_name = "local-httpd-pvc"
            )
          )
        ]
      )
    )
  )
  api.create_namespaced_deployment(namespace, dp)

# Serviceの作成
def create_service(api, namespace):
  sv = client.V1Service()
  sv.metadata = client.V1ObjectMeta(
    name="httpd-service"
  )
  sv.spec = client.V1ServiceSpec(
    selector = {"app":"myhttpd"},
    type = "LoadBalancer",
    external_i_ps = ["192.168.1.10"], # 適宜IPアドレスを変更してください
    ports = [
      client.V1ServicePort(
        port = 8080,
        target_port = 80,
        protocol = "TCP"
      )
    ]
  )
  api.create_namespaced_service(namespace, sv)


# configを読み込み
cfg = config.load_kube_config()

# クライアントを作成
with client.ApiClient(cfg) as api_client:
  api = client.CoreV1Api(api_client)
  namespace = 'default'
  # 永続ボリュームの作成
  try:
    create_pv(api)
  except ApiException as ex:
    if ex.reason == 'Conflict':
      print("already exists.")
    else:
      print(ex)

  # 永続ボリューム要求の作成
  try:
    create_pvc(api, namespace)
  except ApiException as ex:
    if ex.reason == 'Conflict':
      print("already exists.")
    else:
      print(ex)

  # Deploymentの作成
  try:
    apps_api = client.AppsV1Api(api_client)
    create_deployment(apps_api, namespace)
  except ApiException as ex:
    if ex.reason == 'Conflict':
      print("already exists.")
    else:
      print(ex)

  # Serviceの作成
  try:
    create_service(api, namespace)
  except ApiException as ex:
    if ex.reason == 'Conflict':
      print("already exists.")
    else:
      print(ex)

・実行コマンド
python3 deploy-httpd.py

関連情報

・Kubernetes Python Clientのリポジトリ
https://github.com/kubernetes-client/python

・kubectlを使用して同様のデプロイを行う場合は、以下のページを参照してください。
Microk8sでlocal永続ボリュームを使用するApache Httpdをデプロイする

2022年4月26日火曜日

Ubuntu 22.04にArduino IDEをインストールする

Arduino IDEでArduino Unoなどの様々なボードのプログラミングをする事ができます。

〇Arduino IDEの画面

インストール方法

以下のコマンドを実行します。liblistSerialsj.soのエラーが発生するので、前もってpatchifを使用して対策します。
sudo apt-get -y install libserialport0 patchelf

sudo patchelf --add-needed /usr/lib/x86_64-linux-gnu/libserialport.so.0 /usr/lib/x86_64-linux-gnu/liblistSerialsj.so.1.4.0

sudo apt-get -y install arduino

sudo usermod -a -G dialout $USER

PySimpleGUIとOpenCVでwebカメラ画像上に不透明・半透明の矢印線を描画する

OpenCVで矢印線を描画するにはarrowedLine関数を使用します。半透明の矢印線を描画するには、描画先の画像を複製して片方にのみ矢印線を描画してcv2.addWeighted関数でalpha/betaパラメータを指定して重ね合わせます。
thicknessパラメータは線の太さ、tipLengthは矢印の先の長さを、矢印線の長さの相対で指定します。

サンプルコードの実行手順

1. PySimpleGUIとOpenCVがインストールされた環境の構築
以下のページを参照して、環境を構築します。
PySimpleGUIとOpenCVをインストールしてwebカメラの映像をウインドウを表示する

2. サンプルプログラムの作成と実行
以下のファイルを保存して、実行します。
psgui_opencv_arrowedline.py
import PySimpleGUI as sg
import cv2


sg.theme('SystemDefault')
layout = [
  [sg.Image(key='img1'), sg.Image(key='img2')]
]

# webカメラをキャプチャー
capture = cv2.VideoCapture(0)

# webカメラの解像度を取得
width = int(capture.get(cv2.CAP_PROP_FRAME_WIDTH)/2)
height = int(capture.get(cv2.CAP_PROP_FRAME_HEIGHT)/2)
window = sg.Window("webカメラ画面", layout=layout, finalize=True)
# イベントループ
while True:
  event, values = window.read(timeout=50)
  if event == sg.WIN_CLOSED:
    break
  rv, frame = capture.read()
  if rv is True:
    # 左右に並べるために縦横のサイズを半分にリサイズ
    resized = cv2.resize(frame, (width, height))
    # 半透明描画用に複製
    semitr1 = resized.copy()
    semitr2 = resized.copy()
    # 不透明の矢印線を描画
    dx = int(width/10)
    dy = int(height/10)
    cv2.arrowedLine(resized, (dx*5, dy*5), (dx*2, dy*5), (255, 255, 255), thickness=5, tipLength=0.1)
    # 半透明の矢印線を描画
    cv2.arrowedLine(semitr2, (dx*5, dy*5), (dx*8, dy*5), (255, 255, 255), thickness=8, tipLength=0.4)
    alpha=0.5
    semitr = cv2.addWeighted(semitr2, alpha, semitr1, 1-alpha, 0)

    # pngに変換して、Image更新
    img = cv2.imencode('.png', resized)[1].tobytes()
    img2 = cv2.imencode('.png', semitr)[1].tobytes()
    window['img1'].update(data=img)
    window['img2'].update(data=img2)


capture.release()
window.close()

・実行方法
以下のコマンドを実行します。
python3 psgui_opencv_arrowedline.py

関連情報

PySimpleGUIで画像を表示する

・OpenCVに関する他の記事はこちらを参照してください。

Kubernetes python clientでMicrok8sのNodeを列挙する

以下のようなKubernetes python clientサンプルプログラムでMicrok8sのNodeを列挙することが出来ます。

実行手順

1. 実行環境の構築・設定
以下のページを参照して、実行環境の構築・設定を行います。
Kubernetes python clientでMicrok8sのnamespaceを列挙する

2. サンプルプログラムの作成と実行
以下のサンプルプログラムでNodeを列挙することが出来ます。
list-node.py
from kubernetes import config, client

# configを読み込み
cfg = config.load_kube_config()

# クライアントを作成
with client.ApiClient(cfg) as api_client:
  api = client.CoreV1Api(api_client)
  # Nodeの列挙
  nodes = api.list_node(watch=False)
  for node in nodes.items:
    # node名を表示
    print("node name: {}".format(node.metadata.name))
    # conditionsを表示
    for condition in node.status.conditions:
      if condition.status == 'True':
        print("  condition: {}".format(condition.type))
    # address
    for address in node.status.addresses:
      print("  address:{}".format(address))

・実行コマンド
python3 list-node.py

関連情報

・Kubernetes Python Clientのリポジトリ
https://github.com/kubernetes-client/python

2022年4月25日月曜日

PySimpleGUIとOpenCVでwebカメラ画像上に不透明・半透明の円を描画する

OpenCVで円を描画するにはcircle関数を使用します。thicknessパラメータにcv2.FILLEDを指定すると塗りつぶしになります。
半透明の円を描画するには、描画先の画像を複製して片方にのみ円を描画してcv2.addWeighted関数でalpha/betaパラメータを指定して重ね合わせます。

サンプルコードの実行手順

1. PySimpleGUIとOpenCVがインストールされた環境の構築
以下のページを参照して、環境を構築します。
PySimpleGUIとOpenCVをインストールしてwebカメラの映像をウインドウを表示する

2. サンプルプログラムの作成と実行
以下のファイルを保存して、実行します。
psgui_opencv_circle.py
import PySimpleGUI as sg
import cv2


sg.theme('SystemDefault')
layout = [
  [sg.Image(key='img1'), sg.Image(key='img2')]
]

# webカメラをキャプチャー
capture = cv2.VideoCapture(0)

# webカメラの解像度を取得
width = int(capture.get(cv2.CAP_PROP_FRAME_WIDTH)/2)
height = int(capture.get(cv2.CAP_PROP_FRAME_HEIGHT)/2)
window = sg.Window("webカメラ画面", layout=layout, finalize=True)
# イベントループ
while True:
  event, values = window.read(timeout=50)
  if event == sg.WIN_CLOSED:
    break
  rv, frame = capture.read()
  if rv is True:
    # 左右に並べるために縦横のサイズを半分にリサイズ
    resized = cv2.resize(frame, (width, height))
    # 半透明描画用に複製
    semitr1 = resized.copy()
    semitr2 = resized.copy()
    # 不透明の円を描画
    dx = int(width/10)
    dy = int(height/10)
    cv2.circle(resized, (dx*3, dy*5), dy*4, (255, 0, 0), 6)
    cv2.circle(resized, (dx*7, dy*5), dy*4, (255, 0, 0), cv2.FILLED)
    # 半透明の円を描画
    cv2.circle(semitr2, (dx*3, dy*5), dy*4, (255, 0, 0), 6)
    cv2.circle(semitr2, (dx*7, dy*5), dy*4, (255, 0, 0), cv2.FILLED)
    alpha=0.5
    semitr = cv2.addWeighted(semitr2, alpha, semitr1, 1-alpha, 0)
    # pngに変換して、Image更新
    img = cv2.imencode('.png', resized)[1].tobytes()
    img2 = cv2.imencode('.png', semitr)[1].tobytes()
    window['img1'].update(data=img)
    window['img2'].update(data=img2)

capture.release()
window.close()

・実行方法
以下のコマンドを実行します。
python3 psgui_opencv_circle.py

関連情報

PySimpleGUIで画像を表示する

・OpenCVに関する他の記事はこちらを参照してください。

Kubernetes python clientでMicrok8sの永続ボリューム要求を列挙する

以下のようなKubernetes python clientサンプルプログラムでMicrok8sの永続ボリューム要求(Persistent volume claim)を列挙することが出来ます。

実行手順

1. 実行環境の構築・設定
以下のページを参照して、実行環境の構築・設定を行います。
Kubernetes python clientでMicrok8sのnamespaceを列挙する

2. サンプルプログラムの作成と実行
以下のサンプルプログラムで永続ボリュームを列挙することが出来ます。
list-pvc.py
from kubernetes import config, client

# configを読み込み
cfg = config.load_kube_config()

# クライアントを作成
with client.ApiClient(cfg) as api_client:
  api = client.CoreV1Api(api_client)
  # Persistent Volume Claimの列挙
  pvcs = api.list_persistent_volume_claim_for_all_namespaces(watch=False)
  for pvc in pvcs.items:
    # Persistent volume Claim名を表示
    print("persistent volume claim name: {}".format(pvc.metadata.name))
    # phaseを表示
    print("  phase: {}".format(pvc.status.phase))
    # access mode
    for access_mode in pvc.spec.access_modes:
      print("  access mode:{}".format(access_mode))
    # 容量を表示
    print("  capacity: {}".format(pvc.status.capacity))
    # Persistent volume nameを表示
    print("  persistent volume name: {}".format(pvc.spec.volume_name))

・実行コマンド
python3 list-pvc.py

関連情報

・Kubernetes Python Clientのリポジトリ
https://github.com/kubernetes-client/python

2022年4月24日日曜日

PySimpleGUIとOpenCVでwebカメラ画像上に不透明・半透明の直線を描画する

OpenCVで直線を描画するにはline関数を使用します。半透明の直線を描画するには、描画先の画像を複製して片方にのみ直線を描画してcv2.addWeighted関数でalpha/betaパラメータを指定して重ね合わせます。

サンプルコードの実行手順

1. PySimpleGUIとOpenCVがインストールされた環境の構築
以下のページを参照して、環境を構築します。
PySimpleGUIとOpenCVをインストールしてwebカメラの映像をウインドウを表示する

2. サンプルプログラムの作成と実行
以下のファイルを保存して、実行します。
psgui_opencv_line.py
import PySimpleGUI as sg
import cv2


sg.theme('SystemDefault')
layout = [
  [sg.Image(key='img1'), sg.Image(key='img2')]
]

# webカメラをキャプチャー
capture = cv2.VideoCapture(0)

# webカメラの解像度を取得
width = int(capture.get(cv2.CAP_PROP_FRAME_WIDTH)/2)
height = int(capture.get(cv2.CAP_PROP_FRAME_HEIGHT)/2)
window = sg.Window("webカメラ画面", layout=layout, finalize=True)
# イベントループ
while True:
  event, values = window.read(timeout=50)
  if event == sg.WIN_CLOSED:
    break
  rv, frame = capture.read()
  if rv is True:
    # 左右に並べるために縦横のサイズを半分にリサイズ
    resized = cv2.resize(frame, (width, height))
    # 半透明描画用に複製
    semitr1 = resized.copy()
    semitr2 = resized.copy()
    # 不透明の直線を描画
    dx = int(width/10)
    dy = int(height/10)
    cv2.line(resized, (0, dy), (width, dy), (255, 255, 255), 6)
    cv2.line(resized, (0, height-dy), (width, height-dy), (255, 255, 255), 6)
    cv2.line(resized, (dx, 0), (dx, height), (255, 255, 255), 6)
    cv2.line(resized, (width-dx, 0), (width-dx, height), (255, 255, 255), 6)

    # 半透明の直線を描画
    cv2.line(semitr2, (0, dy), (width, dy), (255, 255, 255), 6)
    cv2.line(semitr2, (0, height-dy), (width, height-dy), (255, 255, 255), 6)
    cv2.line(semitr2, (dx, 0), (dx, height), (255, 255, 255), 6)
    cv2.line(semitr2, (width-dx, 0), (width-dx, height), (255, 255, 255), 6)
    alpha=0.5
    semitr = cv2.addWeighted(semitr2, alpha, semitr1, 1-alpha, 0)
    # pngに変換して、Image更新
    img = cv2.imencode('.png', resized)[1].tobytes()
    img2 = cv2.imencode('.png', semitr)[1].tobytes()
    window['img1'].update(data=img)
    window['img2'].update(data=img2)

capture.release()
window.close()

・実行方法
以下のコマンドを実行します。
python3 psgui_opencv_line.py

関連情報

PySimpleGUIで画像を表示する

・OpenCVに関する他の記事はこちらを参照してください。

Kubernetes python clientでMicrok8sの永続ボリュームを列挙する

以下のようなKubernetes python clientサンプルプログラムでMicrok8sの永続ボリュームを列挙することが出来ます。

実行手順

1. 実行環境の構築・設定
以下のページを参照して、実行環境の構築・設定を行います。
Kubernetes python clientでMicrok8sのnamespaceを列挙する

2. サンプルプログラムの作成と実行
以下のサンプルプログラムで永続ボリュームを列挙することが出来ます。
list-pv.py
from kubernetes import config, client

# configを読み込み
cfg = config.load_kube_config()

# クライアントを作成
with client.ApiClient(cfg) as api_client:
  api = client.CoreV1Api(api_client)
  # Persistent Volumeの列挙
  volumes = api.list_persistent_volume(watch=False)
  for volume in volumes.items:
    # volume名を表示
    print("volume name: {}".format(volume.metadata.name))
    # phaseを表示
    print("  phase: {}".format(volume.status.phase))
    # access mode
    for access_mode in volume.spec.access_modes:
      print("  access mode:{}".format(access_mode))
    # 容量を表示
    print("  capacity: {}".format(volume.spec.capacity))
    # storage class nameを表示
    print("  storage class name: {}".format(volume.spec.storage_class_name))
    # local volume path
    if volume.spec.local is not None:
      print("  local volume path: {}".format(volume.spec.local.path))

・実行コマンド
python3 list-pv.py

関連情報

・Kubernetes Python Clientのリポジトリ
https://github.com/kubernetes-client/python

2022年4月23日土曜日

Ubuntu 22.04にflowbladeをインストールする

flowbladeは動画編集アプリケーションです。動画を切り取ったり連結したりするだけでなく、効果をつけて動画を加工することも出来ます。

〇flowbladeの画面

Ubuntu Softwareによるインストール方法

1. Ubuntu Softwareを起動して、flowbladeを検索します

2.flowbladeのインストールボタンをクリックします

コマンドによるインストール方法

以下のコマンド実行します
sudo apt-get update

sudo apt-get -y install flowblade

Flatpakでのインストール方法

sudo apt-get update

sudo apt-get -y install flatpak

sudo flatpak remote-add --if-not-exists flathub https://flathub.org/repo/flathub.flatpakrepo

sudo flatpak -y install --from https://flathub.org/repo/appstream/io.github.jliljebl.Flowblade.flatpakref

関連情報

・プロジェクトgithubリポジトリ
https://github.com/jliljebl/flowblade

・編集方法や効果を使用して加工するには、以下のページを参照してください。
動画編集アプリケーションFlowbladeのまとめ

・様々な動画に関するアプリケーションについては、以下のまとめを参照してください。
動画関連アプリケーションのまとめ

PySimpleGUIとOpenCVでwebカメラ画像上に不透明・半透明の四角を描画する

OpenCVで四角形を描画するにはrectangle関数を使用します。thicknessパラメータにcv2.FILLEDを指定すると塗りつぶしになります。
半透明の四角形を描画するには、描画先の画像を複製して片方にのみ四角を描画してcv2.addWeighted関数でalpha/betaパラメータを指定して重ね合わせます。

サンプルコードの実行手順

1. PySimpleGUIとOpenCVがインストールされた環境の構築
以下のページを参照して、環境を構築します。
PySimpleGUIとOpenCVをインストールしてwebカメラの映像をウインドウを表示する

2. サンプルプログラムの作成と実行
以下のファイルを保存して、実行します。
psgui_opencv_rect.py
import PySimpleGUI as sg
import cv2

sg.theme('SystemDefault')
layout = [
  [sg.Image(key='img1'), sg.Image(key='img2')]
]

# webカメラをキャプチャー
capture = cv2.VideoCapture(0)

# webカメラの解像度を取得
width = int(capture.get(cv2.CAP_PROP_FRAME_WIDTH)/2)
height = int(capture.get(cv2.CAP_PROP_FRAME_HEIGHT)/2)
window = sg.Window("webカメラ画面", layout=layout, finalize=True)
# イベントループ
while True:
  event, values = window.read(timeout=50)
  if event == sg.WIN_CLOSED:
    break
  rv, frame = capture.read()
  if rv is True:
    # 左右に並べるために縦横のサイズを半分にリサイズ
    resized = cv2.resize(frame, (width, height))
    # 半透明描画用に複製
    semitr1 = resized.copy()
    semitr2 = resized.copy()
    # 不透明矩形を描画
    dx = int(width/10)
    dy = int(height/10)
    cv2.rectangle(resized, (0, 0), (width, dy), (0, 0, 0), cv2.FILLED)
    cv2.rectangle(resized, (dx, dy*2), (width-dx, height-dy*2), (0, 192, 0), 4)
    cv2.rectangle(resized, (0, height-dy), (width, height), (0, 0, 0), cv2.FILLED)

    # 半透明矩形を描画
    cv2.rectangle(semitr2, (0, 0), (width, dy), (0, 0, 0), cv2.FILLED)
    cv2.rectangle(semitr2, (dx, dy*2), (width-dx, height-dy*2), (0, 192, 0), 4)
    cv2.rectangle(semitr2, (0, height-dy), (width, height), (0, 0, 0), cv2.FILLED)
    alpha=0.5
    semitr = cv2.addWeighted(semitr2, alpha, semitr1, 1-alpha, 0)

    # pngに変換して、Image更新
    img = cv2.imencode('.png', resized)[1].tobytes()
    img2 = cv2.imencode('.png', semitr)[1].tobytes()
    window['img1'].update(data=img)
    window['img2'].update(data=img2)

capture.release()
window.close()

・実行方法
以下のコマンドを実行します。
python3 psgui_opencv_rect.py

関連情報

PySimpleGUIで画像を表示する

・PySimpleGUIに関する他の記事はこちらを参照してください。

・OpenCVに関する他の記事はこちらを参照してください。

Microk8sとKubernetes python clientでServiceを列挙する

以下のようなMicrok8sとKubernetes python clientサンプルプログラムでServiceを列挙することが出来ます。

実行手順

1. 実行環境の構築・設定
以下のページを参照して、実行環境の構築・設定を行います。
Kubernetes python clientでMicrok8sのnamespaceを列挙する

2. サンプルプログラムの作成と実行
以下のサンプルプログラムでServiceを列挙することが出来ます。
list-service.py
from kubernetes import config, client

# configを読み込み
cfg = config.load_kube_config()

# クライアントを作成
with client.ApiClient(cfg) as api_client:
  api = client.CoreV1Api(api_client)
  # serviceの列挙
  services = api.list_namespaced_service('default', watch=False)
  for service in services.items:
    # service名を表示
    print("service name: {}".format(service.metadata.name))
    print("type: {}".format(service.spec.type))
    # ポート
    for port in service.spec.ports:
      print("  port: {} -> target port: {}".format(port.port, port.target_port))

・実行コマンド
python3 list-service.py

関連情報

・Kubernetes Python Clientのリポジトリ
https://github.com/kubernetes-client/python

2022年4月22日金曜日

PySimpleGUIとOpenCVでwebカメラ画像を回転拡大縮小する

PySimpleGUIとOpenCVでwebカメラ画像を回転拡大縮小するには、以下の手順を実行します。
1. 回転の中心点・角度・スケールからgetRotationMatrix2D関数を使用してRotation Matrixを取得します
2. affineWarp関数を使用してアフィン変換を行い、画像の回転拡大縮小を行います

サンプルコードの実行手順

1. PySimpleGUIとOpenCVがインストールされた環境の構築
以下のページを参照して、環境を構築します。
PySimpleGUIとOpenCVをインストールしてwebカメラの映像をウインドウを表示する

2. サンプルプログラムの作成と実行
以下のファイルを保存して、実行します。
psgui_opencv_affine.py
import PySimpleGUI as sg
import cv2


sg.theme('SystemDefault')
layout = [
  [
    sg.Text("angle"),
    sg.Slider(key='angle', range=(0, 359), resolution=1, default_value=45, orientation='horizontal', expand_x=True)
  ],
  [
    sg.Text("scale"),
    sg.Slider(key='scale', range=(0, 200), resolution=1, default_value=120, orientation='horizontal', expand_x=True)
  ],
  [sg.Image(key='img1'), sg.Image(key='img2')]
]

# webカメラをキャプチャー
capture = cv2.VideoCapture(0)

# webカメラの解像度を取得
width = int(capture.get(cv2.CAP_PROP_FRAME_WIDTH)/2)
height = int(capture.get(cv2.CAP_PROP_FRAME_HEIGHT)/2)
window = sg.Window("webカメラ画面", layout=layout, finalize=True)
# イベントループ
while True:
  event, values = window.read(timeout=50)
  if event == sg.WIN_CLOSED:
    break
  rv, frame = capture.read()
  if rv is True:
    # 左右に並べるために縦横のサイズを半分にリサイズ
    resized = cv2.resize(frame, (width, height))
    # Rotation Matrixを取得
    angle = values['angle']
    scale = values['scale']
    rm = cv2.getRotationMatrix2D((int(width/2), int(height/2)), angle, scale/100)
    # アフィン変換
    ati = cv2.warpAffine(resized, rm, (width, height))
    # pngに変換して、Image更新
    img = cv2.imencode('.png', resized)[1].tobytes()
    img2 = cv2.imencode('.png', ati)[1].tobytes()
    window['img1'].update(data=img)
    window['img2'].update(data=img2)


capture.release()
window.close()

・実行方法
以下のコマンドを実行します。
python3 psgui_opencv_affine.py

関連情報

PySimpleGUIで画像を表示する

・PySimpleGUIに関する他の記事はこちらを参照してください。

・OpenCVに関する他の記事はこちらを参照してください。

Kubernetes python clientでMicrok8sのPodを列挙する

以下のようなKubernetes python clientサンプルプログラムでMicrok8sのPodを列挙することが出来ます。

実行手順

1. 実行環境の構築・設定
以下のページを参照して、実行環境の構築・設定を行います。
Kubernetes python clientでMicrok8sのnamespaceを列挙する

2. サンプルプログラムの作成と実行
以下のサンプルプログラムでPodを列挙することが出来ます。
list-pod.py
from kubernetes import config, client

# configを読み込み
cfg = config.load_kube_config()

namespace = 'default'
# クライアントを作成
with client.ApiClient(cfg) as api_client:
  api = client.CoreV1Api(api_client)
  # podの列挙
  pods = api.list_namespaced_pod(namespace, watch=False)
  for pod in pods.items:
    # print(type(pod))
    print("-----------")
    # pod名とphase
    print("{}:{}".format(pod.metadata.name, pod.status.phase))
    # pod内のコンテナ
    for container in pod.spec.containers:
      # イメージ名
      print("  image: {}".format(container.image))
      # ポート
      if container.ports is not None:
        for port in container.ports:
          print("    container port: {}".format(port.container_port))
          print("    host port: {}".format(port.host_port))
    # restart policy
    print("restart policy: {}".format(pod.spec.restart_policy))
    # スケジューラ名
    print("scheduler_name: {}".format(pod.spec.scheduler_name))
    # サービスアカウント
    print("service_account_name: {}".format(pod.spec.service_account_name))
    # ボリューム
    for volume in pod.spec.volumes:
      # ボリューム名
      print("  volume name: {}".format(volume.name))
      # Persistent Volume Claim
      print("  PVC: {}".format(volume.persistent_volume_claim))

・実行コマンド
python3 list-pod.py

関連情報

・Kubernetes Python Clientのリポジトリ
https://github.com/kubernetes-client/python

2022年4月21日木曜日

PySimpleGUIとOpenCVでwebカメラ画像の明るさを変える

PySimpleGUIとOpenCVでwebカメラ画像の明るさを変えるには、以下の手順を実行します。
1. キャプチャしたBGRをHSVに変換
2. Hue/Saturation/Valueの各チャネルに分割
3. Valueチャネルの値を変更します。計算後の値は0-255の範囲に収まるようにします。
4. 処理後のHue/Saturation/Valueのチャネルを結合してHSVにする
5. 処理後のHSVを再びBGRに変換

サンプルコードの実行手順

1. PySimpleGUIとOpenCVがインストールされた環境の構築
以下のページを参照して、環境を構築します。
PySimpleGUIとOpenCVをインストールしてwebカメラの映像をウインドウを表示する

2. サンプルプログラムの作成と実行
以下のファイルを保存して、実行します。
psgui_opencv_value.py
import PySimpleGUI as sg
import cv2
import numpy as np

sg.theme('SystemDefault')
layout = [
  [
    sg.Text('value(%)'),
    sg.Slider(key='value', range=(0, 200), default_value=50, orientation='horizontal', expand_x=True)
  ],
  [sg.Image(key='img1'), sg.Image(key='img2')]
]

# webカメラをキャプチャー
capture = cv2.VideoCapture(0)

# webカメラの解像度を取得
width = int(capture.get(cv2.CAP_PROP_FRAME_WIDTH)/2)
height = int(capture.get(cv2.CAP_PROP_FRAME_HEIGHT)/2)
window = sg.Window("webカメラ画面", layout=layout, finalize=True)

# イベントループ
while True:
  event, values = window.read(timeout=50)
  if event == sg.WIN_CLOSED:
    break
  rv, frame = capture.read()
  if rv is True:
    # 左右に並べるために縦横のサイズを半分にリサイズ
    resized = cv2.resize(frame, (width, height))
    # hsvに変換
    hsv = cv2.cvtColor(resized, cv2.COLOR_BGR2HSV).astype("float32")
    # 各チャネルに分割
    h, s, v = cv2.split(hsv)
    # Valueを係数として、増減させる
    v2 = np.clip(v * values['value']/100, 0, 255)
    # 各チャネルを結合
    hsv2 = cv2.merge([h, s, v2]).astype("uint8")
    # BGRに変換
    bgr = cv2.cvtColor(hsv2, cv2.COLOR_HSV2BGR)
    # pngに変換して、Image更新
    img = cv2.imencode('.png', resized)[1].tobytes()
    img2 = cv2.imencode('.png', bgr)[1].tobytes()
    window['img1'].update(data=img)
    window['img2'].update(data=img2)


capture.release()
window.close()

・実行方法
以下のコマンドを実行します。
python3 psgui_opencv_value.py

関連情報

PySimpleGUIで画像を表示する

・PySimpleGUIに関する他の記事はこちらを参照してください。

・OpenCVに関する他の記事はこちらを参照してください。

MONOSTICKとTWELITE DIPと土壌水分センサーを使用して、水分を計測する

TWELITE製品を使用して、無線を活用した電子工作を簡単に行うことができます。MONOSTICKとTWELITE DIPと土壌水分センサーを使用して、水分を計測するには、以下の手順を実行します。
土壌水分センサーには、DFRobotの静電容量式土壌水分センサーを使用します。

〇MONOSTICKとTWELITE DIPと土壌水分センサーの写真

twelite側の手順

1. 部品の準備
MONOSTICK/TWELITE DIPの他、以下の部品を準備します(適宜単3電池2つが入る電池ボックス等も準備してください)

・静電容量式土壌水分センサー
https://akizukidenshi.com/catalog/g/gM-13550/

・片面ガラス・ユニバーサル基板 Cタイプ(72×47.5mm) めっき仕上げ
https://akizukidenshi.com/catalog/g/gP-00517/

・XCL103使用3.3V出力昇圧DCDCコンバーターキット
https://akizukidenshi.com/catalog/g/gK-16116/

・丸ピンICソケット (28P) 600mil 桟ありタイプ
https://akizukidenshi.com/catalog/g/gP-00033/
 ※tweliteを基盤に直にハンダ付けしたくない場合はこちらを使用します。

・ピンヘッダ 1×40 (40P)
https://akizukidenshi.com/catalog/g/gC-00167/
 ※静電容量式土壌水分センサーのコネクタに接続するために3つに切って使用します。

2. 配線
以下の回路図に基づいて、上記の部品を配線します。

3.以下のページからTWELITE STAGE SDKをダウンロード
https://mono-wireless.com/jp/products/stage/index.html

4.ダウンロードしたファイル名を/optなどに移動して、解凍します(以下はMWSTAGE-2021-12_linux-1.zipの場合)
unzip MWSTAGE-2021-12_linux-1.zip

5.以下のようなシェルを作成し、TWELITE STAGEを起動します。実行後/dev/ttyUSB0が消えますので、MONOSTICKやTWELITEを抜き差ししてください。
※/optにインストールした場合、適宜パスは読み替えてください(Ubuntu 20.04で動作確認)
runtw.sh
#!/bin/bash
sudo rmmod usbserial
sudo rmmod ftdi_sio
/opt/MWSTAGE/TWELITE_Stage.run

sudo chmod +x ./runtw.sh

sudo ./runtw.sh

TWELITE STAGE起動後は、各デバイスの初期設定を行います。
・MONOSTICK
アプリを出荷時から書き換えていた場合は、App_Wingsアプリのイメージに更新します。
Application IDを任意の数値に設定します(例: 0x11223344 -> 入力時は0xを省いて11223344)

・TWELITE DIP
アプリを出荷時から書き換えていた場合は、App_Tweliteアプリのイメージに更新します。
Application IDは通信するためにMONOSTICKと同じIDを指定します
Device ID: 任意の値(1や2など)

PC側の操作手順

1.pipenvのインストール
pipenvをインストール済みでない場合は、以下のコマンドでインストールします。
sudo apt-get -y install python3

sudo pip3 install --upgrade pip

sudo pip3 install --upgrade setuptools

sudo pip3 install pipenv

echo "export PIPENV_VENV_IN_PROJECT=true" >> ~/.bashrc

source ~/.bashrc

2. pyserialのインストール
以下のコマンドでpyserialをインストールした仮想環境を作成します
mkdir twelite
cd twelite
pipenv --python 3

pipenv install pyserial

pipenv shell

3. 以下のように相手端末からの状態通知データをシリアル通信で受信してパースするサンプルプログラムを作成して、実行します。
※データ構造についての詳細は以下を参照してください。
https://mono-wireless.com/jp/products/TWE-APPS/App_Twelite/step3-81.html

twelite_analog1.py
import serial
import time
import datetime

def parse_notification(line):
  if line[0:1] != ':'.encode('utf-8'):
    return []
  # 送信元のデバイスID(1byte)
  device_id = line[1:3]
  # コマンド(1byte)
  command = line[3:5]
  # パケット識別子(1byte)
  packet_id = line[5:7]
  # プロトコルバージョン(1byte)
  protocol_version = line[7:9]
  # LQI値(1byte)
  lqi = line[9:11]
  # 送信元の個体識別番号(4byte)
  source_id = line[11:19]
  # 宛先の論理デバイスID(1byte)
  logical_device_id = line[19:21]
  # タイムスタンプ(2byte)
  ts = line[21:25]
  # 中継フラグ(1byte)
  relay_flag = line[25:27]
  # 電源電圧mV(2byte)
  power_voltage = int(line[27:31],16)
  # 未使用(1byte)
  reserved = line[31:33]
  # DIの状態ビット(1byte)
  di1 = (True if int(line[33:35], 16) & 0x01 != 0 else False)
  di2 = (True if int(line[33:35], 16) & 0x02 != 0 else False)
  di3 = (True if int(line[33:35], 16) & 0x04 != 0 else False)
  di4 = (True if int(line[33:35], 16) & 0x08 != 0 else False)
  # 変更状態ビット(1byte)
  mf1 = (True if int(line[35:37], 16) & 0x01 != 0 else False)
  mf2 = (True if int(line[35:37], 16) & 0x02 != 0 else False)
  mf3 = (True if int(line[35:37], 16) & 0x04 != 0 else False)
  mf4 = (True if int(line[35:37], 16) & 0x08 != 0 else False)
  # AD1-AD4の変換値(各1byte)
  ad1 = int(line[37:39], 16)
  ad2 = int(line[39:41], 16)
  ad3 = int(line[41:43], 16)
  ad4 = int(line[43:45], 16)
  # AD1-AD4の補正値(1byte)
  cd = int(line[45:47], 16)
  adv1 = (ad1 * 4 + (cd & 0x03))*4
  adv2 = (ad2 * 4 + ((cd >> 2) & 0x03))*4
  adv3 = (ad3 * 4 + ((cd >> 4) & 0x03))*4
  adv4 = (ad4 * 4 + ((cd >> 6) & 0x03))*4
  # チェックサム(1byte)
  csv = line[47:49]
  cs = format(256-(sum([ int(line[li:li+2], 16) for li in range(1, len(line)-2, 2) ]) & 0x000000ff), '02x')
  csr = True if csv.lower() == cs else False
  result = {"device_id":device_id, "command":command, "packet_id":packet_id, "protocol_version":protocol_version, "lqi":lqi, "source_id":source_id, "logical_decice_id":logical_device_id,"ts":ts, "relay_flag":relay_flag, "power_voltage":power_voltage, "di1":di1, "di2":di2, "di3":di3, "di4":di4, "mf1":mf1, "mf2":mf2, "mf3":mf3, "mf4":mf4, "adv1":adv1, "adv2":adv2, "adv3":adv3, "adv4":adv4, "csr":csr}
  return result

ser = serial.Serial(port='/dev/ttyUSB0',baudrate=115200,timeout=10)
try:
  while True:
    rl = ser.readline()
    print(rl)
    result = parse_notification(rl)
    if "adv1" in result:
      print(datetime.datetime.now())
      print("AI1:{}".format(result["adv1"]))
      #print("AI2:{}".format(result["adv2"]))
except KeyboardInterrupt:
  # close
  print("stopped.")
finally:
  ser.close()

・実行コマンド
python twelite_analog1.py

コップの水などに水分センサーを入れ、アナログ値が低下する事を確認します。

2022年4月20日水曜日

PySimpleGUIとOpenCVでwebカメラ画像の彩度を変える

PySimpleGUIとOpenCVでwebカメラ画像の彩度を変えるには、以下の手順を実行します。
1. キャプチャしたBGRをHSVに変換
2. Hue/Saturation/Valueの各チャネルに分割
3. Saturationチャネルの値を変更します。計算後の値は0-255の範囲に収まるようにします。
4. 処理後のHue/Saturation/Valueのチャネルを結合してHSVにする
5. 処理後のHSVを再びBGRに変換

サンプルコードの実行手順

1. PySimpleGUIとOpenCVがインストールされた環境の構築
以下のページを参照して、環境を構築します。
PySimpleGUIとOpenCVをインストールしてwebカメラの映像をウインドウを表示する

2. サンプルプログラムの作成と実行
以下のファイルを保存して、実行します。
psgui_opencv_saturation.py
import PySimpleGUI as sg
import cv2
import numpy as np

sg.theme('SystemDefault')
layout = [
  [
    sg.Text('saturation(%)'),
    sg.Slider(key='saturation', range=(0, 200), default_value=50, orientation='horizontal', expand_x=True)
  ],
  [sg.Image(key='img1'), sg.Image(key='img2')]
]

# webカメラをキャプチャー
capture = cv2.VideoCapture(0)

# webカメラの解像度を取得
width = int(capture.get(cv2.CAP_PROP_FRAME_WIDTH)/2)
height = int(capture.get(cv2.CAP_PROP_FRAME_HEIGHT)/2)
window = sg.Window("webカメラ画面", layout=layout, finalize=True)

# イベントループ
while True:
  event, values = window.read(timeout=50)
  if event == sg.WIN_CLOSED:
    break
  rv, frame = capture.read()
  if rv is True:
    # 左右に並べるために縦横のサイズを半分にリサイズ
    resized = cv2.resize(frame, (width, height))
    # hsvに変換
    hsv = cv2.cvtColor(resized, cv2.COLOR_BGR2HSV).astype("float32")
    # 各チャネルに分割
    h, s, v = cv2.split(hsv)
    # Saturationを係数として、増減させる
    s2 = np.clip(s * values['saturation']/100, 0, 255)
    # 各チャネルを結合
    hsv2 = cv2.merge([h, s2, v]).astype("uint8")
    # BGRに変換
    bgr = cv2.cvtColor(hsv2, cv2.COLOR_HSV2BGR)
    # pngに変換して、Image更新
    img = cv2.imencode('.png', resized)[1].tobytes()
    img2 = cv2.imencode('.png', bgr)[1].tobytes()
    window['img1'].update(data=img)
    window['img2'].update(data=img2)


capture.release()
window.close()

・実行方法
以下のコマンドを実行します。
python3 psgui_opencv_saturation.py

関連情報

PySimpleGUIで画像を表示する

・PySimpleGUIに関する他の記事はこちらを参照してください。

・OpenCVに関する他の記事はこちらを参照してください。

Raspberry Pi PicoとSHT31センサーで温度と湿度を計測する

Raspberry Pi PicoとSHT31センサーで温度と湿度を計測するには、以下の手順を実行します。

実行手順

1. Raspberry Pi PicoとSHT31センサーモジュールの配線
SHT31は秋月電子さんのSHT31モジュールを使用します。

・SHT31使用 高精度温湿度センサモジュールキット
https://akizukidenshi.com/catalog/g/gK-12125/

Raspberry PicoとSHT31モジュールの端子を以下のように接続します。
Raspberry Pi Pico pin36 : 3V3(OUT) → SHT31モジュール pin1 : VDD
Raspberry Pi Pico pin26 : GP20 SDA → SHT31モジュール pin2 : SDA
Raspberry Pi Pico pin27 : GP21 SCL → SHT31モジュール pin3 : SCL
Raspberry Pi Pico pin28 : GND → SHT31モジュール pin5 : GND

・回路図

・配線例

2. Thonnyを使用してSHT31ドライバーの導入
以下のgithubリポジトリから、sht31.pyをダウンロードします。
micropython-sht31
https://github.com/kfricke/micropython-sht31

sht31.pyのURL
https://github.com/kfricke/micropython-sht31/blob/master/sht31.py

/libフォルダが無い場合は、Thonny IDEでRaspberry Pi Pico側の/直下にlibフォルダを作成します(/lib)。そのあと、/libフォルダにsht31.pyをアップロードします。

3. 温度・湿度計測を行うプログラムの導入
以下のMicroPythonをRaspberry Pi Picoに保存し、Thonnyから実行します。実行すると温度と湿度が表示されます。
main.py
from machine import Pin, I2C
import sht31

i2c = I2C(0, scl=Pin(21), sda=Pin(20), freq =400000)
sensor = sht31.SHT31(i2c, addr=0x45)

(temperature, humidity) = sensor.get_temp_humi()
print("temp: {}".format(temperature))
print("humidity: {}".format(humidity))

関連情報

Windows10にPython3.9とThonnyをインストールする

・DHT11センサーを使用して温度・湿度を計測することも出来ます。
Raspberry Pi PicoでDHT11センサーを使用して温度・湿度を取得する

2022年4月19日火曜日

PySimpleGUIとOpenCVでwebカメラ画像の色相をシフトする

PySimpleGUIとOpenCVでwebカメラ画像の色相をシフトするには、以下の手順を実行します。
1. キャプチャしたBGRをHSVに変換
2. Hue/Saturation/Valueの各チャネルに分割
3. Hueチャネルの値をシフトします。180の剰余で0-179の範囲になるようにします。
4. 処理後のHueとSaturation/Valueのチャネルを結合してHSVにする
5. 処理後のHSVを再びBGRに変換

サンプルコードの実行手順

1. PySimpleGUIとOpenCVがインストールされた環境の構築
以下のページを参照して、環境を構築します。
PySimpleGUIとOpenCVをインストールしてwebカメラの映像をウインドウを表示する

2. サンプルプログラムの作成と実行
以下のファイルを保存して、実行します。
psgui_opencv_shifthue.py
mport PySimpleGUI as sg
import cv2
import numpy as np

sg.theme('SystemDefault')
layout = [
  [
    sg.Text("hue"),
    sg.Slider(key='hue', range=(0, 179), default_value=60, orientation='horizontal', expand_x=True)
  ],
  [sg.Image(key='img1'), sg.Image(key='img2')]
]

# webカメラをキャプチャー
capture = cv2.VideoCapture(0)

# webカメラの解像度を取得
width = int(capture.get(cv2.CAP_PROP_FRAME_WIDTH)/2)
height = int(capture.get(cv2.CAP_PROP_FRAME_HEIGHT)/2)
window = sg.Window("webカメラ画面", layout=layout, finalize=True)

# イベントループ
while True:
  event, values = window.read(timeout=50)
  if event == sg.WIN_CLOSED:
    break
  rv, frame = capture.read()
  if rv is True:
    # 左右に並べるために縦横のサイズを半分にリサイズ
    resized = cv2.resize(frame, (width, height))
    # hsvに変換
    hsv = cv2.cvtColor(resized, cv2.COLOR_BGR2HSV).astype("float32")
    # 各チャネルに分割
    h, s, v = cv2.split(hsv)
    # hueをスライダ値の分だけシフト
    h2 = np.mod(h + values['hue'], 180)
    # 各チャネルを結合
    hsv2 = cv2.merge([h2, s, v]).astype("uint8")
    # BGRに変換
    bgr = cv2.cvtColor(hsv2, cv2.COLOR_HSV2BGR)
    # pngに変換して、Image更新
    img = cv2.imencode('.png', resized)[1].tobytes()
    img2 = cv2.imencode('.png', bgr)[1].tobytes()
    window['img1'].update(data=img)
    window['img2'].update(data=img2)


capture.release()
window.close()

・実行方法
以下のコマンドを実行します。
python3 psgui_opencv_shifthue.py

関連情報

PySimpleGUIで画像を表示する

・PySimpleGUIに関する他の記事はこちらを参照してください。

・OpenCVに関する他の記事はこちらを参照してください。

PythonでApache Supersetのデータセット一覧を取得する

PythonでApache Supersetのデータセット一覧を取得するには、以下のサンプルコードを実行します。

list-dataset.py
# coding: utf-8
import pprint
import json
import requests

host = 'xxx.xxx.xxx.xxx:8080' # Supersetのホスト名またはIPアドレスとポート
user = 'admin' # ユーザ名
password = 'adminpass' # ユーザパスワード

base = "http://{}".format(host)
# ユーザ名とパスワードでアクセストークンの取得
res_login = requests.post(base + "/api/v1/security/login",
  json = {
    "password": user,
    "provider": "db",
    "refresh": True,
    "username": password
  }
)
access_token = res_login.json()['access_token']
print(access_token)

# CSRFトークンの取得
res_csrf = requests.get(base + "/api/v1/security/csrf_token",
  headers = {
    'Authorization': "Bearer {}".format(access_token)
  }
)
csrf_token = res_csrf.json()['result']
print(csrf_token)

# API呼び出し用Request headers
api_headers = {
  'Referer': base,
  'Authorization': "Bearer {}".format(access_token),
  'X-CSRFToken': csrf_token
}

# データセット一覧
res_ds = requests.get(base + "/api/v1/dataset",
  headers = api_headers
)
pprint.pprint(res_ds.json())
for ds in res_ds.json()['result']:
  print("---")
  print("dataset name: {}".format(ds['table_name'])) # データセット名
  print("kind: {}".format(ds['kind'])) # 種別

・実行方法
python3 list-dataset.py

関連情報

・その他のApache Supersetの情報は、以下のまとめページを参照してください。
Apache Supersetのまとめ

2022年4月18日月曜日

PySimpleGUIとOpenCVでwebカメラ画像をLaplacianフィルタを使用して輪郭抽出する

PySimpleGUIとOpenCVでwebカメラ画像をLaplacianフィルタを使用して輪郭抽出するには、以下のサンプルプログラムのようにグレースケールに変換して、Lasplacian関数を使用します。

サンプルコードの実行手順

1. PySimpleGUIとOpenCVがインストールされた環境の構築
以下のページを参照して、環境を構築します。
PySimpleGUIとOpenCVをインストールしてwebカメラの映像をウインドウを表示する

2. サンプルプログラムの作成と実行
以下のファイルを保存して、実行します。
psgui_opencv_laplacian.py
import PySimpleGUI as sg
import cv2


sg.theme('SystemDefault')
layout = [
  [sg.Image(key='img1'), sg.Image(key='img2')]
]

# webカメラをキャプチャー
capture = cv2.VideoCapture(0)

# webカメラの解像度を取得
width = int(capture.get(cv2.CAP_PROP_FRAME_WIDTH)/2)
height = int(capture.get(cv2.CAP_PROP_FRAME_HEIGHT)/2)
window = sg.Window("webカメラ画面", layout=layout, finalize=True)
# イベントループ
while True:
  event, values = window.read(timeout=50)
  if event == sg.WIN_CLOSED:
    break
  rv, frame = capture.read()
  if rv is True:
    # 左右に並べるために縦横のサイズを半分にリサイズ
    resized = cv2.resize(frame, (width, height))
    # グレースケールに変換
    gray = cv2.cvtColor(resized, cv2.COLOR_BGR2GRAY)
    # Laplacianフィルタ
    li = cv2.Laplacian(gray, cv2.CV_64F, ksize=3)
    # pngに変換して、Image更新
    img = cv2.imencode('.png', resized)[1].tobytes()
    img2 = cv2.imencode('.png', li)[1].tobytes()
    window['img1'].update(data=img)
    window['img2'].update(data=img2)


capture.release()
window.close()

・実行方法
以下のコマンドを実行します。
python3 psgui_opencv_laplacian.py

関連情報

PySimpleGUIで画像を表示する

・PySimpleGUIに関する他の記事はこちらを参照してください。

・OpenCVに関する他の記事はこちらを参照してください。

PythonでApache Supersetのデータベース一覧を取得する

PythonでApache Supersetのデータベース一覧を取得するには、以下のサンプルコードを実行します。

list-database.py
# coding: utf-8
import pprint
import json
import requests

host = 'xxx.xxx.xxx.xxx:8080' # Supersetのホスト名またはIPアドレスとポート
user = 'admin' # ユーザ名
password = 'adminpass' # ユーザパスワード

base = "http://{}".format(host)
# ユーザ名とパスワードでアクセストークンの取得
res_login = requests.post(base + "/api/v1/security/login",
  json = {
    "password": user,
    "provider": "db",
    "refresh": True,
    "username": password
  }
)
access_token = res_login.json()['access_token']
print(access_token)

# CSRFトークンの取得
res_csrf = requests.get(base + "/api/v1/security/csrf_token",
  headers = {
    'Authorization': "Bearer {}".format(access_token)
  }
)
csrf_token = res_csrf.json()['result']
print(csrf_token)

# API呼び出し用Request headers
api_headers = {
  'Referer': base,
  'Authorization': "Bearer {}".format(access_token),
  'X-CSRFToken': csrf_token
}

# データベース一覧
res_db = requests.get(base + "/api/v1/database",
  headers = api_headers
)
pprint.pprint(res_db.json())
for db in res_db.json()['result']:
  print("---")
  print("database name: {}".format(db['database_name'])) # データベース名
  print("status: {}".format(db['backend'])) # バックエンド

・実行方法
python3 list-database.py

関連情報

・その他のApache Supersetの情報は、以下のまとめページを参照してください。
Apache Supersetのまとめ

2022年4月17日日曜日

PySimpleGUIとOpenCVでwebカメラの映像を左右反転・上下反転させる

PySimpleGUIとOpenCVでwebカメラの映像を左右反転・上下反転させるには、以下のサンプルプログラムのようにflip関数を使用します。
flip関数のflipCode引数には、以下を指定します。
・0: X軸反転→上下反転
・1: Y軸反転→左右反転
・-1: 上下・左右反転

サンプルコードの実行手順

1. PySimpleGUIとOpenCVがインストールされた環境の構築
以下のページを参照して、環境を構築します。
PySimpleGUIとOpenCVをインストールしてwebカメラの映像をウインドウを表示する

2. サンプルプログラムの作成と実行
以下のファイルを保存して、実行します。ラジオボタンをクリックすると回転角度が変化します。
psgui_opencv_flip.py
import PySimpleGUI as sg
import cv2


sg.theme('SystemDefault')
layout = [
  [
    sg.Radio(key = 'noflip', text='なし', group_id='f', default=True),
    sg.Radio(key = 'y-flip', text='左右反転', group_id='f'),
    sg.Radio(key = 'x-flip', text='上下反転', group_id='f'),
    sg.Radio(key = 'xy-flip', text='左右上下反転', group_id='f')
  ],
  [sg.Image(key='img1')]
]

# webカメラをキャプチャー
capture = cv2.VideoCapture(0)

# ウインドウのタイトルバーに解像度を表示
window = sg.Window("webカメラ画面", layout=layout, finalize=True)
# イベントループ
while True:
  event, values = window.read(timeout=50)
  if event == sg.WIN_CLOSED:
    break
  rv, frame = capture.read()
  if rv is True:
    flipped = frame
    if values is not None and values['x-flip'] == True:
      flipped = cv2.flip(frame, flipCode=0)
    if values is not None and values['y-flip'] == True:
      flipped = cv2.flip(frame, flipCode=1)
    if values is not None and values['xy-flip'] == True:
      flipped = cv2.flip(frame, flipCode=-1)
    # pngに変換してImage更新
    img = cv2.imencode('.png', flipped)[1].tobytes()
    window['img1'].update(data=img)

capture.release()
window.close()

・実行方法
以下のコマンドを実行します
python3 psgui_opencv_flip.py

関連情報

PySimpleGUIで画像を表示する

PySimpleGUIでラジオボタン要素の初期選択状態を設定する

・PySimpleGUIに関する他の記事はこちらを参照してください。

・OpenCVに関する他の記事はこちらを参照してください。

PythonでApache Supersetのダッシュボード一覧を取得する

PythonでApache Supersetのダッシュボード一覧を取得するには、以下のサンプルコードを実行します。

list-dashboards.py
# coding: utf-8
import pprint
import json
import requests

host = 'xxx.xxx.xxx.xxx:8080' # Supersetのホスト名またはIPアドレスとポート
user = 'admin' # ユーザ名
password = 'adminpass' # ユーザパスワード

base = "http://{}".format(host)
# ユーザ名とパスワードでアクセストークンの取得
res_login = requests.post(base + "/api/v1/security/login",
  json = {
    "password": user,
    "provider": "db",
    "refresh": True,
    "username": password
  }
)
access_token = res_login.json()['access_token']
print(access_token)

# CSRFトークンの取得
res_csrf = requests.get(base + "/api/v1/security/csrf_token",
  headers = {
    'Authorization': "Bearer {}".format(access_token)
  }
)
csrf_token = res_csrf.json()['result']
print(csrf_token)

# API呼び出し用Request headers
api_headers = {
  'Referer': base,
  'Authorization': "Bearer {}".format(access_token),
  'X-CSRFToken': csrf_token
}

# ダッシュボード一覧
res_dashboards = requests.get(base + "/api/v1/dashboard",
  headers = api_headers
)
#pprint.pprint(res_dashboards.json()['result'])
for dashboard in res_dashboards.json()['result']:
  print("---")
  print("dashboard title: {}".format(dashboard['dashboard_title'])) # 題名
  print("status: {}".format(dashboard['status'])) # ステータス
  print("url: {}".format(dashboard['url'])) # URLパス部分


・実行方法
python3 list-dashboards.py

関連情報

・その他のApache Supersetの情報は、以下のまとめページを参照してください。
Apache Supersetのまとめ

2022年4月16日土曜日

PySimpleGUIとOpenCVでwebカメラ画像をGaussianBlurでぼかして表示する

PySimpleGUIとOpenCVでwebカメラ画像をGaussianBlurでぼかして表示するには、以下のサンプルプログラムのようにGaussianBlur関数を使用します。
GaussianBlurの引数には以下を指定します。
・元画像
・ksize : Gaussianカーネルサイズ。奇数かつ正の値を指定します。
・sigmaX : X方向のガウスカーネル標準偏差。

サンプルコードの実行手順

1. PySimpleGUIとOpenCVがインストールされた環境の構築
以下のページを参照して、環境を構築します。
PySimpleGUIとOpenCVをインストールしてwebカメラの映像をウインドウを表示する

2. サンプルプログラムの作成と実行
以下のファイルを保存して、実行します。ksize, sigmaXはスライダーによって変更できます。
psgui_opencv_gaussian.py
import PySimpleGUI as sg
import cv2


sg.theme('SystemDefault')
layout = [
  [
    sg.Text("ksize"),
    sg.Slider(key='ksize', range=(1, 51), resolution=2, default_value=5, orientation='horizontal', expand_x=True)
  ],
  [
    sg.Text("sigma_x"),
    sg.Slider(key='sigma_x', range=(0, 50), resolution=0.1, default_value=3, orientation='horizontal', expand_x=True)
  ],
  [sg.Image(key='img1'), sg.Image(key='img2')]
]

# webカメラをキャプチャー
capture = cv2.VideoCapture(0)

# webカメラの解像度を取得
width = int(capture.get(cv2.CAP_PROP_FRAME_WIDTH)/2)
height = int(capture.get(cv2.CAP_PROP_FRAME_HEIGHT)/2)
window = sg.Window("webカメラ画面", layout=layout, finalize=True)

# イベントループ
while True:
  event, values = window.read(timeout=50)
  if event == sg.WIN_CLOSED:
    break
  rv, frame = capture.read()
  if rv is True:
    # 左右に並べるために縦横のサイズを半分にリサイズ
    resized = cv2.resize(frame, (width, height))
    # GaussianBlurでぼかす
    ksize = int(values['ksize'])
    sigma_x = values['sigma_x']
    gbi = cv2.GaussianBlur(resized, ksize=(ksize, ksize), sigmaX=sigma_x)
    # pngに変換して、Image更新
    img = cv2.imencode('.png', resized)[1].tobytes()
    img2 = cv2.imencode('.png', gbi)[1].tobytes()
    window['img1'].update(data=img)
    window['img2'].update(data=img2)

capture.release()
window.close()

・実行方法
以下のコマンドを実行します。
python3 psgui_opencv_gaussian.py

関連情報

PySimpleGUIで画像を表示する

・PySimpleGUIに関する他の記事はこちらを参照してください。

・OpenCVに関する他の記事はこちらを参照してください。

Apache Supersetの表のセルにHTMLリンクを表示する

Apache Supersetの表のセルにHTMLリンクを表示するには、以下の手順を実行します。

実行手順

1. 「SQL Lab」→「SQL Editor」でAnchorタグのリンク先とリンク表示を行うカラムを以下のようにHTMLリンク文字列を作成します。この例ではリンク先にentry_link列、リンク表示にentry_title列を使うようになっています。
select '<a href="' || entry_link || '" target="_blank">' || entry_title || '</a>' 
from rss_entries
where cast(entry_updated as date) = current_date

2. 下図の様に手順1で作成したデータセットを使用して、「テーブル」可視化方式でカラムがリンクになっている事を確認します。

関連情報

・Apache Supersetのインストール方法・ダッシュボードやチャートの作成方法は以下のページを参照してください。
Apache Supersetのまとめ

2022年4月15日金曜日

PySimpleGUIとOpenCVでwebカメラ画像をペンシルスケッチ調に加工する

PySimpleGUIとOpenCVでwebカメラ画像をペンシルスケッチ調に加工するには、以下のサンプルプログラムのpencilSketch関数を使用します。
pencilSketchの引数には以下を指定します。
・元画像
・sigma_s : 0-200の値
・sigma_r : 0-1の値
・shade_factor : 0-0.1の値

サンプルコードの実行手順

1. PySimpleGUIとOpenCVがインストールされた環境の構築
以下のページを参照して、環境を構築します。
PySimpleGUIとOpenCVをインストールしてwebカメラの映像をウインドウを表示する

2. サンプルプログラムの作成と実行
以下のファイルを保存して、実行します。sigma_s, sigma_r, shade_factorはスライダーによって変更できます。
psgui_opencv_pencil.py
import PySimpleGUI as sg
import cv2


sg.theme('SystemDefault')
layout = [
  [
    sg.Text("sigma_s"),
    sg.Slider(key='slider_s', range=(0, 200), default_value=60, orientation='horizontal', expand_x=True)
  ],
  [
    sg.Text("sigma_r"),
    sg.Slider(key='slider_r', range=(0, 1), resolution=0.01, default_value=0.07, orientation='horizontal', expand_x=True)
  ],
  [
    sg.Text("shade_factor"),
    sg.Slider(key='shade_factor', range=(0, 0.1), resolution=0.01, default_value=0.02, orientation='horizontal', expand_x=True)
  ],
  [sg.Image(key='img1'), sg.Image(key='img2')]
]

# webカメラをキャプチャー
capture = cv2.VideoCapture(0)

# webカメラの解像度を取得
width = int(capture.get(cv2.CAP_PROP_FRAME_WIDTH)/2)
height = int(capture.get(cv2.CAP_PROP_FRAME_HEIGHT)/2)
window = sg.Window("webカメラ画面", layout=layout, finalize=True)
# イベントループ
while True:
  event, values = window.read(timeout=50)
  if event == sg.WIN_CLOSED:
    break
  rv, frame = capture.read()
  if rv is True:
    # 左右に並べるために縦横のサイズを半分にリサイズ
    resized = cv2.resize(frame, (width, height))
    # ペンシルスケッチ加工
    sigma_s = values['slider_s']
    sigma_r = values['slider_r']
    shade_factor = values['shade_factor']
    psi = cv2.pencilSketch(resized, sigma_s=sigma_s, sigma_r=sigma_r, shade_factor=shade_factor)
    # pngに変換してImage更新
    img = cv2.imencode('.png', resized)[1].tobytes()
    img2 = cv2.imencode('.png', psi[1])[1].tobytes()
    window['img1'].update(data=img)
    window['img2'].update(data=img2)


capture.release()
window.close()

・実行方法
以下のコマンドを実行します。
python3 psgui_opencv_pencil.py

関連情報

PySimpleGUIで画像を表示する

・PySimpleGUIに関する他の記事はこちらを参照してください。

・OpenCVに関する他の記事はこちらを参照してください。