ラベル Redis の投稿を表示しています。 すべての投稿を表示

2023年1月9日月曜日

AlmaLinux 9/Rocky Linux 9にRedis Commanderをインストールする

Redis CommanderでブラウザからRedis Serverのコマンドを実行する事ができます。

〇Reddis Commanderの画面(AlmaLinux 9)

〇Reddis Commanderの画面(Rocky Linux 9)

ブラウザからhttp://<ホスト名またはIPアドレス>:8081/ にアクセスします。

インストール方法

以下の手順を実行します。

1. Redisのインストール
sudo dnf -y install redis

sudo systemctl enable redis

sudo systemctl start redis

動作確認は以下のコマンドを実行します。
redis-cli << EOF
ping
flushall
set mykey "hello world."
get mykey
EOF

2. node.jsとredis-commanderのインストール
以下のコマンドを実行して、nodeとredis-commanderをインストールします。
curl -sL https://rpm.nodesource.com/setup_14.x | sudo bash -

sudo dnf -y install nodejs

sudo npm install --no-optional -g redis-commander

cat << EOF | sudo tee /etc/systemd/system/rediscommander.service
[Unit]
Description=redis-commander

[Service]
Type=simple
ExecStart=/usr/bin/redis-commander

[Install]
WantedBy=multi-user.target
EOF

sudo systemctl enable rediscommander.service

sudo systemctl start rediscommander.service

3. ポート開放
firewallの8081番ポートを開けます
sudo firewall-cmd --add-port=8081/tcp --permanent

sudo firewall-cmd --reload

関連情報

・Redis Commanderに関する他の記事は、こちらを参照してください。

2022年12月3日土曜日

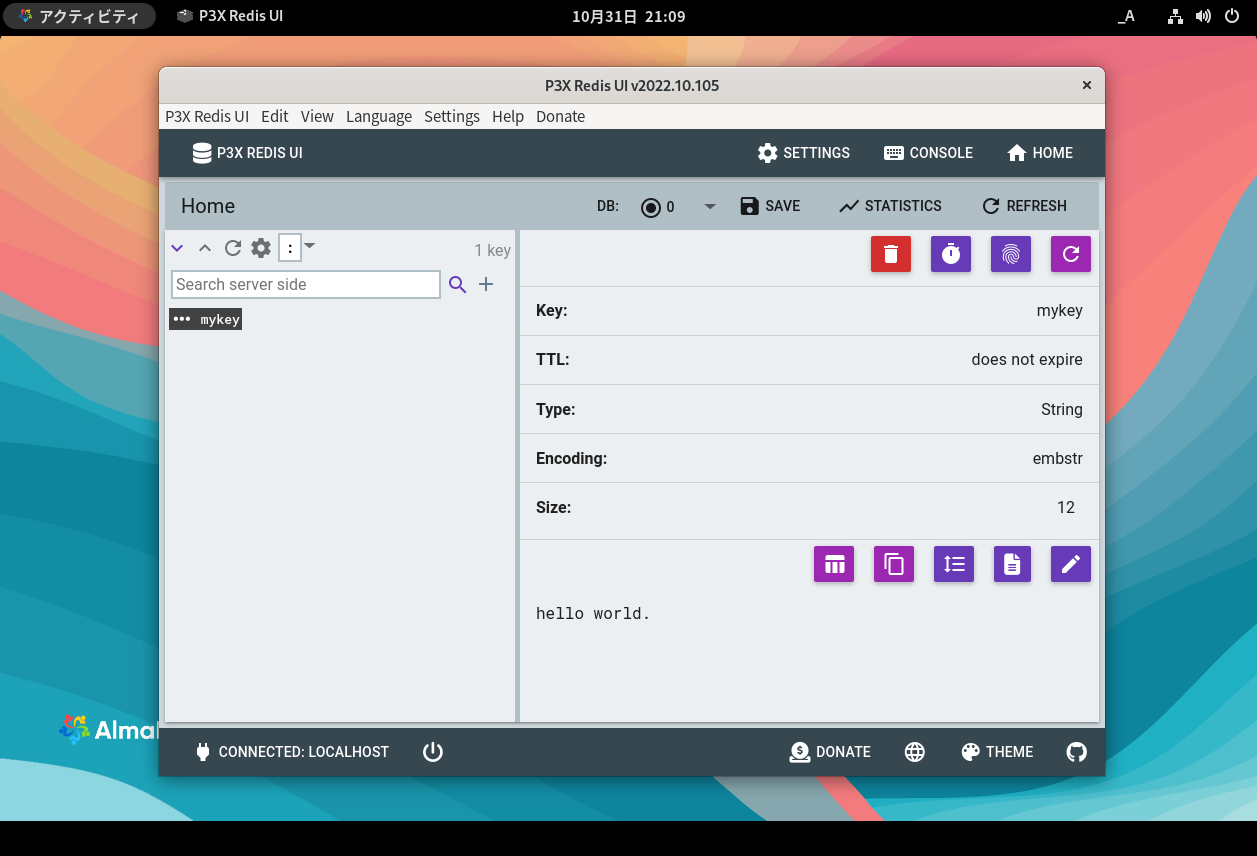
AlmaLinux 9/Rocky Linux 9にP3X Redis UIをインストールする

P3X Redis UIはオープンソースのRedisクライアントです。

〇P3X Redis UIの画面(AlmaLinux 9)

〇P3X Redis UIの画面(Rocky Linux 9)

インストール方法

以下のコマンドを実行します。
1. Redisのインストール(既にRedisサーバがある場合はインストールしなくても大丈夫です)
sudo dnf -y install redis

sudo systemctl enable redis

sudo systemctl start redis

# 動作確認は以下のコマンドを実行します。
redis-cli << EOF
ping
flushall
set mykey "hello world."
get mykey
EOF

2. P3X Redis UIのインストール
sudo mkdir -p /opt/redis-ui

cd /opt/redis-ui

sudo wget https://github.com/patrikx3/redis-ui/releases/download/v2022.10.105/P3X-Redis-UI-2022.10.105.AppImage

sudo chmod +x P3X-Redis-UI-2022.10.105.AppImage

cat << EOF | sudo tee /usr/share/applications/redis-ui.desktop
[Desktop Entry]
Version=1.0
Type=Application
Terminal=false
Exec=/opt/redis-ui/P3X-Redis-UI-2022.10.105.AppImage
Name=P3X Redis UI
Categories=Development;
EOF

関連情報

・P3X Redis UIのgithubリポジトリ
https://github.com/patrikx3/redis-ui

2022年7月13日水曜日

Another Redis Desktop ManagerをAlmaLinux 9にインストールする

Another Redis Desktop ManagerはElectronを使用したクロスプラットフォームで動作するオープンソースのRedis管理アプリケーションです。

〇Another Redis Desktop Managerの画面(AlmaLinux 9)

インストール手順

以下のコマンドを実行します。
1. snapのインストール(※既に導入済みの場合はスキップしてください)
sudo dnf -y install epel-release

sudo dnf -y install snapd

sudo systemctl enable --now snapd.socket

sudo ln -s /var/lib/snapd/snap /snap

2. Another Redis Desktop Managerのインストール
sudo snap install another-redis-desktop-manager
※「error: too early for operation, device not yet seeded or device model not acknowledged」というエラーメッセージが表示された場合は、少し待って再度実行します。

関連情報

・Another Redis Desktop Managerのリポジトリ
https://github.com/qishibo/AnotherRedisDesktopManager

2022年6月30日木曜日

Another Redis Desktop ManagerをAlmaLinux8/Rocky Linux 8にインストールする

Another Redis Desktop ManagerはElectronを使用したクロスプラットフォームで動作するオープンソースのRedis管理アプリケーションです。

〇Another Redis Desktop Managerの画面(AlmaLinux8)

〇Another Redis Desktop Managerの画面(Rocky Linux 8)

インストール手順

以下のコマンドを実行します。
1. snapのインストール(※既に導入済みの場合はスキップしてください)
sudo dnf -y install epel-release

sudo dnf -y install snapd

sudo systemctl enable --now snapd.socket

sudo ln -s /var/lib/snapd/snap /snap

2. Another Redis Desktop Managerのインストール
sudo snap install another-redis-desktop-manager

※「error: too early for operation, device not yet seeded or device model not acknowledged」というエラーメッセージが表示された場合は、少し待って再度実行します。

関連情報

・Another Redis Desktop Managerのリポジトリ
https://github.com/qishibo/AnotherRedisDesktopManager

2022年6月22日水曜日

AlmaLinux 8/Rocky Linux 8にP3X Redis UIをインストールする

P3X Redis UIはオープンソースのRedisクライアントです。

〇P3X Redis UIの画面(AlmaLinux 8)

〇P3X Redis UIの画面(Rocky Linux 8)

インストール方法

以下のコマンドを実行します。
sudo mkdir -p /opt/redis-ui

cd /opt/redis-ui

sudo wget https://github.com/patrikx3/redis-ui/releases/download/v2022.4.126/P3X-Redis-UI-2022.4.126.AppImage

sudo chmod +x P3X-Redis-UI-2022.4.126.AppImage

cat << EOF | sudo tee /usr/share/applications/redis-ui.desktop
[Desktop Entry]
Version=1.0
Type=Application
Terminal=false
Exec=/opt/redis-ui/P3X-Redis-UI-2022.4.126.AppImage
Name=P3X Redis UI
Categories=Development;
EOF

関連情報

・P3X Redis UIのgithubリポジトリ
https://github.com/patrikx3/redis-ui

2022年6月21日火曜日

Another Redis Desktop ManagerをDebian 11(Bullseye)にインストールする

Another Redis Desktop ManagerはElectronを使用したクロスプラットフォームで動作するオープンソースのRedis管理アプリケーションです。

〇Another Redis Desktop Managerの画面

インストール手順

以下のコマンドを実行します。
sudo apt-get update

sudo apt-get -y install snapd

sudo snap install another-redis-desktop-manager

関連情報

・Another Redis Desktop Managerのリポジトリ
https://github.com/qishibo/AnotherRedisDesktopManager

2022年6月15日水曜日

Ubuntu Desktop 22.04にP3X Redis UIをインストールする

P3X Redis UIはオープンソースのRedisクライアントです。

〇P3X Redis UIの画面

インストール方法

以下のコマンドを実行します。
sudo apt-get -y install libfuse2

sudo mkdir -p /opt/redis-ui

cd /opt/redis-ui

sudo wget https://github.com/patrikx3/redis-ui/releases/download/v2022.4.126/P3X-Redis-UI-2022.4.126.AppImage

sudo chmod +x P3X-Redis-UI-2022.4.126.AppImage

cat << EOF | sudo tee /usr/share/applications/redis-ui.desktop
[Desktop Entry]
Version=1.0
Type=Application
Terminal=false
Exec=/opt/redis-ui/P3X-Redis-UI-2022.4.126.AppImage
Name=P3X Redis UI
Categories=Development;
EOF

関連情報

・P3X Redis UIのgithubリポジトリ
https://github.com/patrikx3/redis-ui

2022年6月14日火曜日

Another Redis Desktop ManagerをUbuntu 22.04にインストールする

Another Redis Desktop ManagerはElectronを使用したクロスプラットフォームで動作するオープンソースのRedis管理アプリケーションです。

〇Another Redis Desktop Managerの画面

Ubuntu Softwareによるインストール方法

1. Ubuntu Softwareを起動して、another-redisを検索します。

2.another-redis-desktop-managerのインストールボタンをクリックします

コマンドによるインストール方法

以下のコマンドを実行します。
sudo apt-get update

sudo apt-get -y install snapd

sudo snap install another-redis-desktop-manager

関連情報

・Another Redis Desktop Managerのリポジトリ
https://github.com/qishibo/AnotherRedisDesktopManager

2021年8月27日金曜日

Rocky Linux 8.4にRedis Commanderをインストールする

Redis CommanderでブラウザからRedis Serverのコマンドを実行する事ができます。

〇Reddis Commanderの画面
ブラウザからhttp://<ホスト名またはIPアドレス>:8081/ にアクセスします。

インストール方法

以下の手順を実行します。

1. Redisのインストール
sudo dnf -y install redis

sudo systemctl enable redis

sudo systemctl start redis

動作確認は以下のコマンドを実行します。
redis-cli << EOF
ping
flushall
set mykey "hello world."
get mykey
EOF

2. node.jsとredis-commanderのインストール
以下のコマンドを実行して、nodeとredis-commanderをインストールします。
curl -sL https://rpm.nodesource.com/setup_12.x | sudo bash -

sudo dnf -y install nodejs

sudo npm install --no-optional -g redis-commander

cat << EOF | sudo tee /etc/systemd/system/rediscommander.service
[Unit]
Description=redis-commander

[Service]
Type=simple
ExecStart=/usr/bin/redis-commander

[Install]
WantedBy=multi-user.target
EOF

sudo systemctl enable rediscommander.service

sudo systemctl start rediscommander.service

3. ポート開放
firewallの8081番ポートを開けます
sudo firewall-cmd --add-port=8081/tcp --permanent

sudo firewall-cmd --reload

関連情報

・Redis Commanderに関する他の記事は、こちらを参照してください。

2021年5月24日月曜日

AlmaLinux8.3にRedis Commanderをインストールする

Redis CommanderでブラウザからRedis Serverのコマンドを実行する事ができます。

〇Reddis Commanderの画面
ブラウザからhttp://<ホスト名またはIPアドレス>:8081/ にアクセスします。

インストール方法

以下の手順を実行します。

1. Redisのインストール
sudo dnf -y install redis

sudo systemctl enable redis

sudo systemctl start redis

動作確認は以下のコマンドを実行します。
redis-cli << EOF
ping
flushall
set mykey "hello world."
get mykey
EOF

2. node.jsとredis-commanderのインストール
以下のコマンドを実行して、nodeとredis-commanderをインストールします。
curl -sL https://rpm.nodesource.com/setup_12.x | sudo bash -

sudo dnf -y install nodejs

sudo npm install --no-optional -g redis-commander

cat << EOF | sudo tee /etc/systemd/system/rediscommander.service
[Unit]
Description=redis-commander

[Service]
Type=simple
ExecStart=/usr/bin/redis-commander

[Install]
WantedBy=multi-user.target
EOF

sudo systemctl enable rediscommander.service

sudo systemctl start rediscommander.service

3. ポート開放
firewallの8081番ポートを開けます
sudo firewall-cmd --add-port=8081/tcp --permanent

sudo firewall-cmd --reload

関連情報

・Redis Commanderに関する他の記事は、こちらを参照してください。

2021年2月16日火曜日

CentOS8-StreamにRedis Commanderをインストールする

Redis CommanderでブラウザからRedis Serverのコマンドを実行する事ができます。

〇Reddis Commanderの画面
ブラウザからhttp://<ホスト名またはIPアドレス>:8081/ にアクセスします。

インストール方法

以下の手順を実行します。

1. Redisのインストール
sudo dnf -y install redis

sudo systemctl enable redis

sudo systemctl start redis

動作確認は以下のコマンドを実行します。
redis-cli << EOF
ping
flushall
set mykey "hello world."
get mykey
EOF

2. node.jsとredis-commanderのインストール
以下のコマンドを実行して、nodeとredis-commanderをインストールします。
curl -sL https://rpm.nodesource.com/setup_12.x | sudo bash -

sudo dnf -y install nodejs

sudo npm install --no-optional -g redis-commander

cat << EOF | sudo tee /etc/systemd/system/rediscommander.service
[Unit]
Description=redis-commander

[Service]
Type=simple
ExecStart=/usr/bin/redis-commander

[Install]
WantedBy=multi-user.target
EOF

sudo systemctl enable rediscommander.service

sudo systemctl start rediscommander.service

3. ポート開放
firewallの8081番ポートを開けます
sudo firewall-cmd --add-port=8081/tcp --permanent

sudo firewall-cmd --reload

関連情報

・Redis Commanderに関する他の記事は、こちらを参照してください。

2020年12月13日日曜日

CentOS8.2にRedis Commanderをインストールする

Redis CommanderでブラウザからRedis Serverのコマンドを実行する事ができます。

〇Reddis Commanderの画面
ブラウザからhttp://<ホスト名またはIPアドレス>:8081/ にアクセスします。

インストール方法

以下の手順を実行します。

1. Redisのインストール
sudo dnf -y install redis

sudo systemctl enable redis

sudo systemctl start redis

動作確認は以下のコマンドを実行します。
redis-cli << EOF
ping
flushall
set mykey "hello world."
get mykey
EOF

2. node.jsとredis-commanderのインストール
以下のコマンドを実行して、nodeとredis-commanderをインストールします。
curl -sL https://rpm.nodesource.com/setup_12.x | sudo bash -

sudo dnf -y install nodejs

sudo npm install --no-optional -g redis-commander

cat << EOF | sudo tee /etc/systemd/system/rediscommander.service
[Unit]
Description=redis-commander

[Service]
Type=simple
ExecStart=/usr/bin/redis-commander

[Install]
WantedBy=multi-user.target
EOF

sudo systemctl enable rediscommander.service

sudo systemctl start rediscommander.service

3. ポート開放
firewallの8081番ポートを開けます
sudo firewall-cmd --add-port=8081/tcp --permanent
sudo firewall-cmd --reload

関連情報

・Redisに関する他の記事はこちらを参照してください。

2020年5月18日月曜日

Raspberry Pi(Raspbian Buster)/Debian 10(Buster)/Ubuntu 20.04にRedis Commanderをインストールする

Redis CommanderでブラウザからRedis Serverのコマンドを実行する事ができます。

〇Reddis Commanderの画面
ブラウザからhttp://<ホスト名またはIPアドレス>:8081/ にアクセスします。

〇インストール方法
以下の手順を実行します。

1. Redisのインストール
sudo apt-get update

sudo apt-get -y install redis-server

# 動作確認
redis-cli << EOF
ping
flushall
set mykey "hello world."
get mykey
EOF

2. node.jsとredis-commanderのインストール
sudo apt-get -y install curl 

curl -sL https://deb.nodesource.com/setup_12.x | sudo bash -

sudo apt-get install -y nodejs

sudo npm install --no-optional -g redis-commander

cat << EOF | sudo tee /etc/systemd/system/rediscommander.service
[Unit]
Description=redis-commander

[Service]
Type=simple
ExecStart=/usr/bin/redis-commander

[Install]
WantedBy=multi-user.target
EOF

sudo systemctl enable rediscommander.service

sudo systemctl start rediscommander.service

2019年7月28日日曜日

VagrantでNode-RedとRedisをインストールした仮想マシン(Debian Buster/10)を構築する

Node-Redを使用してフロー図による開発を行うことができます。

〇Node-Redの画面


〇構築方法
以下のVagrantfileで、Node-RedとRedisをインストールした仮想マシン(Debian Buster/10)を構築する事ができます。

Vagrantfile
VAGRANTFILE_API_VERSION = "2"

Vagrant.configure(VAGRANTFILE_API_VERSION) do |config|
  config.vm.box = "bento/debian-10"
  config.vm.hostname = "db10noderedredis"
config.vm.network "public_network", ip:"192.168.1.103", :netmask => "255.255.255.0"
config.vm.network "private_network", ip: "192.168.55.103", :netmask => "255.255.255.0"
  config.vm.provider :virtualbox do |vbox|
     vbox.name = "db10noderedredis"
     vbox.gui = true
     vbox.cpus = 2
     vbox.memory = 2048
  end
  config.vm.provision "shell", inline: <<-SHELL
apt-get update
DEBIAN_FRONTEND=noninteractive apt-get -y -o Dpkg::Options::="--force-confdef" -o Dpkg::Options::="--force-confold" upgrade
apt-get -y install task-japanese gawk
sed -i -e 's/# ja_JP.UTF-8 UTF-8/ja_JP.UTF-8 UTF-8/' /etc/locale.gen
locale-gen
update-locale LANG=ja_JP.UTF-8
localectl set-locale LANG=ja_JP.UTF-8
localectl set-keymap jp106
timedatectl set-timezone Asia/Tokyo


# install redis serrver
apt-get -y install redis-server

# change bind address.
sed -i -e 's/bind 127.0.0.1 ::1/bind 0.0.0.0/' /etc/redis/redis.conf

systemctl restart redis

# wait until port 6379 is opened.
while netstat -lnt | awk '$4 ~ /:6379$/ {exit 1}'; do sleep 10; done
sleep 10


redis-cli -h 192.168.55.103 << EOF
publish mykey 'hello, world!'
EOF


# install nodejs
cd /opt
wget https://nodejs.org/dist/v10.16.0/node-v10.16.0-linux-x64.tar.xz
tar xf node-v10.16.0-linux-x64.tar.xz
export PATH=$PATH:/opt/node-v10.16.0-linux-x64/bin
echo 'export PATH=$PATH:/opt/node-v10.16.0-linux-x64/bin/' >> /root/.profile

sudo ln -s /opt/node-v10.16.0-linux-x64/bin/node /usr/bin/node
sudo ln -s /opt/node-v10.16.0-linux-x64/bin/npm /usr/bin/npm
sudo ln -s /opt/node-v10.16.0-linux-x64/bin/bin/npx /usr/bin/npx

# install Node-Red and Node-Red-Dashboard
npm install -g --unsafe-perm node-red
npm install node-red-dashboard
npm install node-red-contrib-redis

mkdir -p /root/.node-red
cat << EOF > /etc/systemd/system/node-red.service
[Unit]
Description=Node-Red
[Service]
Environment="NODE_OPTIONS=--max-old-space-size=128"
Environment="NODE_RED_OPTIONS=-v"
ExecStart=/opt/node-v10.16.0-linux-x64/bin/node $NODE_OPTIONS /opt/node-v10.16.0-linux-x64/lib/node_modules/node-red/red.js $NODE_RED_OPTIONS
WorkingDirectory=/root/.node-red/
User=root
Group=root
Restart=on-failure
KillSignal=SIGINT

[Install]
WantedBy=multi-user.target
EOF
systemctl enable node-red.service
systemctl start node-red.service

echo 'access to http://192.168.1.103:1880 or http://192.168.1.103:1880/ui'

SHELL
end

〇サンプルのワークフロー
指定されたチャネルをsubscribeして、メッセージを表示するサンプルです。
[{"id":"5b0ecbcc.d26de4","type":"redis-in","z":"82f74431.6f13d","server":"ea10aa06.b80e38","command":"subscribe","name":"redis","topic":"mykey","timeout":"0","x":110,"y":220,"wires":[["8e667b99.c15058"]]},{"id":"ea10aa06.b80e38","type":"redis-config","z":"","host":"192.168.1.103","port":"6379","dbase":"0","pass":""}]

2019年4月21日日曜日

DockerでRedash7.0.0, MySQL8.0, PostgreSQL11.2, Redis, Adminer4.7のコンテナを構築する

Redashでデータの可視化環境を提供する事ができます。AdminerはデータベースのWebインターフェイスで、開発・管理などに使用できます。

〇Redashの画面


〇Adminerの画面


〇構築方法
1.Redash7.0.0, MySQL8.0, PostgreSQL11.2, Redis, Adminer4.7のコンテナを以下のコマンドで構築して実行します。
docker-compose run --rm redashserver create_db
docker-compose up -d

docker-compose.yml
version: '2'
services:
  redashserver:
    image: redash/redash:7.0.0.b18042
    command: server
    depends_on:
      - db
      - redis
      - mysql
    ports:
      - "5000:5000"
    environment:
      PYTHONUNBUFFERED: 0
      REDASH_LOG_LEVEL: "INFO"
      REDASH_REDIS_URL: "redis://redis:6379/0"
      REDASH_DATABASE_URL: "postgresql://redash:redash@db/redash"
      REDASH_COOKIE_SECRET: "cookiesecret"
      REDASH_SECRET_KEY: "Mysecretkey123"
      REDASH_DATE_FORMAT: YYYY/MM/DD
      REDASH_RATELIMIT_ENABLED: "false"
  redashworker:
    image: redash/redash:7.0.0.b18042
    command: scheduler
    depends_on:
      - redashserver
    environment:
      PYTHONUNBUFFERED: 0
      REDASH_LOG_LEVEL: "INFO"
      REDASH_REDIS_URL: "redis://redis:6379/0"
      REDASH_DATABASE_URL: "postgresql://redash:redash@db/redash"
      QUEUES: "queries,scheduled_queries,celery,schemas"
      REDASH_SECRET_KEY: "Mysecretkey123"
      WORKERS_COUNT: 4
      REDASH_DATE_FORMAT: YYYY/MM/DD
  redis:
    image: redis:5.0-alpine
    restart: unless-stopped
  db:
    image: postgres:11.2-alpine
    environment:
      POSTGRES_DB: redash
      POSTGRES_USER: redash
      POSTGRES_PASSWORD: redash
    ports:
      - "5432:5432"
    container_name: postgres
    volumes:
      - "db-data:/var/lib/postgresql/data"
  mysql:
    image: mysql:8.0
    command: mysqld --character-set-server=utf8mb4 --collation-server=utf8mb4_unicode_ci --default-authentication-plugin=mysql_native_password
    container_name: "mysql-db"
    volumes:
      - "mysql-data:/var/lib/mysql"
    ports:
      - "3306:3306"
    environment:
        MYSQL_DATABASE: redash
        MYSQL_ROOT_PASSWORD: redash
  adminer:
    image: adminer:4.7
    container_name: "adminer"
    ports:
      - "8080:8080"
    depends_on:
      - db
      - mysql
volumes:
  db-data:
    driver: local
  mysql-data:
    driver: local

2.初期設定
ブラウザからhttp://<Dockerホスト名またはIP:5000/にアクセスして、管理者情報を入力します。


〇Redashのデータソース設定画面
MySQLをデータソースとして使用したい場合は、Datasourcesで以下のように情報を入力します。

Host: mysql
Port: 3306
User: root
Password: redash
Database name: redash


○関連情報
・Redashに関する他の記事はこちらを参照してください。

2018年11月5日月曜日

Vagrantでレプリケーション構成のRedisサーバ(マスタ・スレーブ)の仮想マシン(Ubuntu18.04)を構築する

Redisはオープンソースのキー・バリュー型のデータベースです。

〇構築方法
以下のVagrantfileを使用してレプリケーション構成のRedisサーバ(マスタ・スレーブ)の仮想マシン(Ubuntu18.04)を構築する事ができます。

Vagrantfile
VAGRANTFILE_API_VERSION = "2"

Vagrant.configure(VAGRANTFILE_API_VERSION) do |config|
  config.vm.define "redismaster" do |server|
    server.vm.box = "bento/ubuntu-18.04"
    server.vm.hostname = "redismater"
server.vm.network "private_network", ip: "192.168.55.115", :netmask => "255.255.255.0"
server.vm.network :public_network, ip:"192.168.1.115"
    server.vm.provider :virtualbox do |vbox|
      vbox.name = "redismaster"
      vbox.cpus = 2
      vbox.memory = 2048
      vbox.customize ["modifyvm", :id, "--nicpromisc2","allow-all"]
    end
    server.vm.provision "shell", inline: <<-SHELL
# update packages
apt-get update
DEBIAN_FRONTEND=noninteractive apt-get -y -o Dpkg::Options::="--force-confdef" -o Dpkg::Options::="--force-confold" upgrade
locale-gen ja_JP.UTF-8
localectl set-locale LANG=ja_JP.UTF-8

# install redis serrver
apt-get -y install redis-server

# change bind address.
sed -i -e 's/bind 127.0.0.1 ::1/bind 0.0.0.0/' /etc/redis/redis.conf

systemctl restart redis

# wait until port 6379 is opened.
while netstat -lnt | awk '$4 ~ /:6379$/ {exit 1}'; do sleep 10; done
sleep 10

# test execution
redis-cli -h 192.168.55.115 << EOF
ping
flushall
set mykey "hello world."
get mykey
EOF


SHELL
  end
  #----------------------------------------------------------------------------------------
  config.vm.define "redisslave" do |server|
    server.vm.box = "bento/ubuntu-18.04"
    server.vm.hostname = "redisslave"
server.vm.network "private_network", ip: "192.168.55.116", :netmask => "255.255.255.0"
server.vm.network :public_network, ip:"192.168.1.116"
    server.vm.provider :virtualbox do |vbox|
      vbox.name = "redisslave"
      vbox.cpus = 2
      vbox.memory = 2048
      vbox.customize ["modifyvm", :id, "--nicpromisc2","allow-all"]
    end
    server.vm.provision "shell", inline: <<-SHELL
# update packages
apt-get update
DEBIAN_FRONTEND=noninteractive apt-get -y -o Dpkg::Options::="--force-confdef" -o Dpkg::Options::="--force-confold" upgrade
locale-gen ja_JP.UTF-8
localectl set-locale LANG=ja_JP.UTF-8


# install redis serrver
apt-get -y install redis-server

# configure redis.conf
echo 'slaveof 192.168.55.115 6379' >> /etc/redis/redis.conf

# change bind address.
sed -i -e 's/bind 127.0.0.1 ::1/bind 0.0.0.0/' /etc/redis/redis.conf

systemctl restart redis

# wait until port 6379 is opened.
while netstat -lnt | awk '$4 ~ /:6379$/ {exit 1}'; do sleep 10; done
sleep 10

# test execution
redis-cli -h 192.168.55.116 << EOF
ping
get mykey
EOF


SHELL
  end
end

2018年7月20日金曜日

PortainerでJupyter LabとRedisのスタックを作成する

Jupyter Notebookでインタラクティブなコンピューティング環境を提供する事ができます。Portainerで簡単にwebブラウザからJupyter LabとRedisのスタックを作成する事ができます。

○Jupyter Labの画面


〇構築方法
1.Portainer画面横のImagesをクリックして、Image list画面からBuild a new imageボタンをクリック


2.Build image画面nameフィールドにmyjupyter-redisを入力

3.Web editorのテキストエリアに以下を貼り付け
FROM jupyter/scipy-notebook
ENV TZ=Asia/Tokyo
USER root
RUN pip install redis
USER $NB_UID


貼り付け後、build the image ボタンをクリックします。

4.画面横のStacksをクリック後、Stacks list画面でAdd a stackボタンをクリックします


5.Create stack画面で、Nameフィールドにjupyterlab-redis-stackを入力し、Web editorに以下を張り付ける
version: "3"
services:
  myjupyter:
    image: myjupyter-redis
    container_name: "myjupyter-redis"
    volumes:
      - "myjupyter-data:/home/jovyan/work"
    ports:
      - "8888:8888"
    environment:
      JUPYTER_TOKEN: jupyter
      JUPYTER_ENABLE_LAB: 1
    depends_on:
      - db
  db:
    image: redis:alpine
    container_name: "redis"
    volumes:
      - "redis-data:/data"
    ports:
      - "6379:6379"
volumes:
  redis-data:
    driver: local
  myjupyter-data:
    driver: local


貼り付け後、deploy stackボタンをクリックします。

6.ブラウザから以下のURLにアクセス
http://<Dockerホスト名またはIP>:8888/?token=jupyter

〇動作検証用コード
import redis

r = redis.StrictRedis(host='db', port=6379, db=0)
r.set("mykey", "hello world!")
print(r.get("mykey"))

○関連情報
・Portainerに関する他の記事はこちらを参照してください。

2018年7月13日金曜日

DockerでRedash4.0.1, Percona Server5.7, PostgreSQL10.4, Redis, Adminer4.6のコンテナを構築する

Redashでデータの可視化環境を提供する事ができます。AdminerはPercona Server/PostgreSQLのWebインターフェイスで、開発・管理などに使用できます。

〇Redashの画面


〇Adminerの画面

ブラウザからhttp://<Dockerホスト名またはIP:8080/にアクセスします。

〇構築方法
1.Redash4.0.1, Percona Server5.7, PostgreSQL10.4, Redis, Adminer4.6のコンテナを以下のコマンドで構築して実行します。
docker-compose run --rm redashserver create_db
docker-compose up -d

docker-compose.yml
version: '2'
services:
  redashserver:
    image: redash/redash:4.0.1.b4038
    command: server
    depends_on:
      - db
      - redis
      - percona
    ports:
      - "5000:5000"
    environment:
      PYTHONUNBUFFERED: 0
      REDASH_LOG_LEVEL: "INFO"
      REDASH_REDIS_URL: "redis://redis:6379/0"
      REDASH_DATABASE_URL: "postgresql://redash:redash@db/redash"
      REDASH_COOKIE_SECRET: "cookiesecret"
      REDASH_DATE_FORMAT: YYYY/MM/DD
  redashworker:
    image: redash/redash:4.0.1.b4038
    command: scheduler
    depends_on:
      - redashserver
    environment:
      PYTHONUNBUFFERED: 0
      REDASH_LOG_LEVEL: "INFO"
      REDASH_REDIS_URL: "redis://redis:6379/0"
      REDASH_DATABASE_URL: "postgresql://redash:redash@db/redash"
      QUEUES: "queries,scheduled_queries,celery"
      WORKERS_COUNT: 2
      REDASH_DATE_FORMAT: YYYY/MM/DD
  redis:
    image: redis:4.0-alpine
    restart: unless-stopped
  db:
    image: postgres:10.4-alpine
    environment:
      POSTGRES_DB: redash
      POSTGRES_USER: redash
      POSTGRES_PASSWORD: redash
    ports:
      - "5432:5432"
    container_name: postgres
    volumes:
      - "db-data:/var/lib/postgresql/data"
  percona:
    image: percona:5.7
    command: mysqld --character-set-server=utf8mb4 --collation-server=utf8mb4_unicode_ci
    container_name: "percona-db"
    volumes:
      - "percona-data:/var/lib/mysql"
    ports:
      - "3306:3306"
    environment:
        MYSQL_DATABASE: redash
        MYSQL_ROOT_PASSWORD: redash
  adminer:
    image: adminer:4.6
    container_name: "adminer"
    ports:
      - "8080:8080"
    depends_on:
      - db
      - percona
volumes:
  db-data:
    driver: local
  percona-data:
    driver: local

2.初期設定
ブラウザからhttp://<Dockerホスト名またはIP:5000/にアクセスして、管理者情報を入力します。


〇Redashのデータソース設定画面
Percona Serverをデータソースとして使用したい場合は、Datasourcesで以下のように情報を入力します。


○関連情報
・Adminerに関する他の記事はこちらを参照してください。

・Redashに関する他の記事はこちらを参照してください。

2018年6月28日木曜日

DockerでRedash4.0.1, MySQL5.7, PostgreSQL10.4, Redis, Adminer4.6のコンテナを構築する

Redashでデータの可視化環境を提供する事ができます。AdminerはMySQL/PostgreSQLのWebインターフェイスとして、開発・管理などに使用できます。

〇Redashの画面


〇Adminerの画面


〇構築方法
1.Redash4.0.1, MySQL5.7, PostgreSQL10.4, Redis, Adminer4.6のコンテナを以下のコマンドで構築して実行します。
docker-compose run --rm redashserver create_db
docker-compose up -d

docker-compose.yml
version: '2'
services:
  redashserver:
    image: redash/redash:4.0.1.b4038
    command: server
    depends_on:
      - db
      - redis
      - mysql
    ports:
      - "5000:5000"
    environment:
      PYTHONUNBUFFERED: 0
      REDASH_LOG_LEVEL: "INFO"
      REDASH_REDIS_URL: "redis://redis:6379/0"
      REDASH_DATABASE_URL: "postgresql://redash:redash@db/redash"
      REDASH_COOKIE_SECRET: "cookiesecret"
      REDASH_DATE_FORMAT: YYYY/MM/DD
  redashworker:
    image: redash/redash:4.0.1.b4038
    command: scheduler
    depends_on:
      - redashserver
    environment:
      PYTHONUNBUFFERED: 0
      REDASH_LOG_LEVEL: "INFO"
      REDASH_REDIS_URL: "redis://redis:6379/0"
      REDASH_DATABASE_URL: "postgresql://redash:redash@db/redash"
      QUEUES: "queries,scheduled_queries,celery"
      WORKERS_COUNT: 2
      REDASH_DATE_FORMAT: YYYY/MM/DD
  redis:
    image: redis:4.0-alpine
    restart: unless-stopped
  db:
    image: postgres:10.4-alpine
    environment:
      POSTGRES_DB: redash
      POSTGRES_USER: redash
      POSTGRES_PASSWORD: redash
    ports:
      - "5432:5432"
    container_name: postgres
    volumes:
      - "db-data:/var/lib/postgresql/data"
  mysql:
    image: mysql:5.7
    command: mysqld --character-set-server=utf8mb4 --collation-server=utf8mb4_unicode_ci
    container_name: "mysql-db"
    volumes:
      - "mysql-data:/var/lib/mysql"
    ports:
      - "3306:3306"
    environment:
        MYSQL_DATABASE: redash
        MYSQL_ROOT_PASSWORD: redash
  adminer:
    image: adminer:4.6
    container_name: "adminer"
    ports:
      - "8080:8080"
    depends_on:
      - db
      - mysql
volumes:
  db-data:
    driver: local
  mysql-data:
    driver: local

2.初期設定
ブラウザからhttp://<Dockerホスト名またはIP:5000/にアクセスして、管理者情報を入力します。


〇Redashのデータソース設定画面
MySQLをデータソースとして使用したい場合は、Datasourcesで以下のように情報を入力します。


○関連情報
・Adminerに関する他の記事はこちらを参照してください。

・Redashに関する他の記事はこちらを参照してください。

2018年5月23日水曜日

Dockerでwallabag、Percona Server、Redisのコンテナを構築する

wallabagはwebページをブックマークできるアプリケーションです。

○wallabagの画面

ブラウザからhttp://<DockerホストまたはIP>/にアクセスします。
デフォルトユーザ/パスワードはwallabag/wallabagです。

○構築方法
以下のdocker-compose.ymlを使用して、wallabag、Percona Server、Redisのコンテナを実行します。
docker-compose up -d

docker-compose.yml
version: '2'
services:
  wallabag:
    image: wallabag/wallabag
    container_name: "wallabag"
    environment:
      - SYMFONY__ENV__DOMAIN_NAME=http://192.168.55.129
      - MYSQL_ROOT_PASSWORD=wallabag
      - SYMFONY__ENV__DATABASE_DRIVER=pdo_mysql
      - SYMFONY__ENV__DATABASE_HOST=db
      - SYMFONY__ENV__DATABASE_PORT=3306
      - SYMFONY__ENV__DATABASE_NAME=wallabag
      - SYMFONY__ENV__DATABASE_USER=wallabag
      - SYMFONY__ENV__DATABASE_PASSWORD=wallabag
      - SYMFONY__ENV__MAILER_HOST=127.0.0.1
      - SYMFONY__ENV__MAILER_USER=~
      - SYMFONY__ENV__MAILER_PASSWORD=~
      - SYMFONY__ENV__FROM_EMAIL=wallabag@example.com
    ports:
      - "80:80"
    volumes:
      - "wallabag-data:/var/www/wallabag/web/assets/images"
    depends_on:
      - db
  db:
    image: percona:5.7
    container_name: "wallabag-db"
    command: mysqld --character-set-server=utf8mb4 --collation-server=utf8mb4_unicode_ci
    environment:
      - MYSQL_ROOT_PASSWORD=wallabag
    volumes:
      - "db-data:/var/lib/mysql"
    ports:
      - "3306:3306"
  redis:
    image: redis:alpine
    container_name: "redis"
    volumes:
      - "redis-data:/data"
    ports:
      - "6379:6379"
volumes:
  db-data:
    driver: local
  wallabag-data:
    driver: local
  redis-data:
    driver: local


○関連情報
・wallabagに関する他の記事はこちらを参照してください。