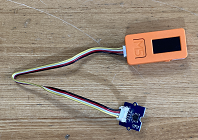
〇M5StickCとGrove温度センサーを接続した写真

開発手順
1. M5StickC上にlibフォルダを作成しMicroWebSrv2モジュールをアップロード以下のページのCodeメニューのDownload ZIPをクリックして、ソースをダウンロードします。ダウンロード後、ZIPファイルを解凍します。
MicroWebSrv2 ※ESP32上でも動作するMicro Web Serverのgithubリポジトリ
https://github.com/jczic/MicroWebSrv2
/libフォルダがない場合はThonnyのファイルペインのデバイスから右クリックしてNew directory...を選択して、フォルダ名libを入力して作成します。次にlibフォルダに移動後、PC側でZIPを解凍した中にあるMicroWebSrv2フォルダ上で右クリックメニューからUpload to /libを選択します。
2. プログラミングと実行
以下のコードのSSIDやWiFiのパスワード、固定IPアドレスを変更してmain.pyとして保存して、実行します。
import machine
import time
import math
from MicroWebSrv2 import *
import network

ssid = "WiFiのssid"
password = "WiFiのパスワード"

# Wifiの初期化
def connect_wifi():
    sta_if = network.WLAN(network.STA_IF)
    # 固定IPに設定する場合は以下の1行を有効化
    sta_if.ifconfig(('xxx.xxx.xxx.xxx','255.255.255.0','192.168.1.1','8.8.8.8'))
    if not sta_if.isconnected():
        print('connecting to network...')
        sta_if.active(True)
        sta_if.connect(ssid, password)
        while not sta_if.isconnected():
            pass
    print('network config:', sta_if.ifconfig())

connect_wifi()

# ADC初期化
pin33 = machine.ADC(machine.Pin(33))
pin33.atten(machine.ADC.ATTN_11DB)
pin33.width(machine.ADC.WIDTH_10BIT)

# 空のロギング関数
def no_logging(self, msg, msgType):
    return 0

# Webサーバーの初期化
mws2 = MicroWebSrv2()
mws2.SetEmbeddedConfig()
mws2.BufferSlotsCount = 2
mws2.OnLogging = no_logging
mws2.StartManaged()

# Routeの設定
@WebRoute(GET, '/temp')
def rest_temp(microWebSrv2, request) :
    # 5V=1023 -> 3.6V=1023
    value = pin33.read()*(3.6/5.0)
    # refer to https://wiki.seeedstudio.com/Grove-Temperature_Sensor_V1.2/
    r = 100000.0 * (1023.0 / value - 1.0)
    temperature = 1.0 / (math.log10(r / 100000.0) / 4275.0 + 1 / 298.15) - 273.15
    request.Response.ReturnOkJSON({
        'temp' : temperature
    })

# キー停止があるまで、無限ループ
try:
    while True :
        time.sleep(1)
except KeyboardInterrupt :
    mws2.Stop()
3. ブラウザからのアクセス
ブラウザから以下のURLにアクセスして、温度センサーの値がJSON形式で取得できることを確認します。
http://<設定したIPアドレス/temp
関連情報
・使用したMicroPython firmware: esp32-20210418-v1.15.binhttps://micropython.org/download/esp32/
・ADC (アナログ/デジタル変換)
※MicroPythonのDocumentation
・Groveデバイスまとめ
0 件のコメント:
コメントを投稿