ラベル H2Database の投稿を表示しています。 すべての投稿を表示

2019年7月24日水曜日

VagrantでH2 Database(1.4.199)とAdoptOpenJDK11をインストールした仮想マシン(CentOS7.6)を構築する

H2 Databaseはjava製のデータベースです。データベースエンジンのほかWebコンソール画面も備えています。

〇H2 Databaseのコンソール画面


〇構築方法
以下のVagrantfileを使用して、H2 Databaseがインストールされた仮想マシン(CentOS7.6)を構築する事ができます。

Vagrantfile
VAGRANTFILE_API_VERSION = "2"

Vagrant.configure(VAGRANTFILE_API_VERSION) do |config|
  config.vm.box = "bento/centos-7.6"
  config.vm.hostname = "co76h2dbadoptopenjdk11"
  config.vm.provider :virtualbox do |vbox|
     vbox.name = "co76h2dbadoptopenjdk11"
     vbox.gui = true
     vbox.cpus = 2
     vbox.memory = 2048
  end
config.vm.network "public_network", ip: "192.168.1.104", :netmask => "255.255.255.0"
  config.vm.provision "shell", inline: <<-SHELL
localectl set-locale LANG=ja_JP.UTF-8
yum install -y epel-release
yum check-update
yum -y update
timedatectl set-timezone Asia/Tokyo
yum -y install unzip

# install AdoptOpenJDK11
cd /opt
wget https://github.com/AdoptOpenJDK/openjdk11-binaries/releases/download/jdk-11.0.3%2B7/OpenJDK11U-jdk_x64_linux_hotspot_11.0.3_7.tar.gz
tar xvfz OpenJDK11U-jdk_x64_linux_hotspot_11.0.3_7.tar.gz
cat << EOF > /etc/profile.d/jdk.sh
export JAVA_HOME=/opt/jdk-11.0.3+7
export PATH=\\$PATH:\\$JAVA_HOME/bin
EOF

# download h2 database
export h2db=h2-2019-03-13.zip
wget http://www.h2database.com/$h2db

# install h2 database
unzip $h2db
echo 'webAllowOthers = true' > /root/.h2.server.properties
/opt/jdk-11.0.3+7/bin/java -cp /opt/h2/bin/h2-1.4.199.jar org.h2.tools.Shell -url "jdbc:h2:/opt/test" -user sa -password sa -driver org.h2.Driver -sql "create table test (testid int);"


# setup console as service
cat << EOF > /opt/h2/bin/h2env
JAVA_HOME=/opt/jdk-11.0.3+7
H2CUSTOMJARS=
EOF

cat << EOF > /etc/systemd/system/h2.service
[Unit]
Description=H2 database
After=syslog.target network.target

[Service]
Type=simple
EnvironmentFile=/opt/h2/bin/h2env
WorkingDirectory=/opt/h2
ExecStart=/opt/jdk-11.0.3+7/bin/java -cp "/opt/h2/bin/h2-1.4.199.jar:\\$H2CUSTOMJARS" org.h2.tools.Console -tcpAllowOthers
ExecStop=/usr/bin/kill -3 \\${MAINPID}

[Install]
WantedBy=multi-user.target
EOF
systemctl enable h2.service
systemctl start h2.service

echo 'access URL: http://192.168.1.104:8082/'
echo 'username: sa    default password: sa'
echo 'Driver class: org.h2.Driver'
echo 'JDBC URL: jdbc:h2:/opt/test'

SHELL
end

〇関連情報
・プロジェクトWebサイト
https://www.h2database.com/html/main.html

2019年6月4日火曜日

VagrantでH2 Database(1.4.199)とAdoptOpenJDK11をインストールした仮想マシン(Debian Stretch/9.6)を構築する

H2 Databaseはjava製のデータベースです。データベースエンジンのほかWebコンソール画面も備えています。

〇H2 Databaseのコンソール画面


〇構築方法
以下のVagrantfileを使用して、H2 Databaseがインストールされた仮想マシン(Debian Stretch/9.6)を構築する事ができます。

Vagrantfile
VAGRANTFILE_API_VERSION = "2"

Vagrant.configure(VAGRANTFILE_API_VERSION) do |config|
  config.vm.box = "bento/debian-9.6"
  config.vm.hostname = "db96h2dbadoptopenjdk11"
config.vm.network :public_network, ip:"192.168.1.107"
  config.vm.provider :virtualbox do |vbox|
     vbox.name = "db96h2dbadoptopenjdk11"
     vbox.cpus = 2
     vbox.memory = 2048
  end
  config.vm.provision "shell", inline: <<-SHELL
apt-get update
export DEBIAN_FRONTEND=noninteractive
apt-get -y -o Dpkg::Options::="--force-confdef" -o Dpkg::Options::="--force-confold" upgrade
apt-get -y install language-pack-ja
localectl set-locale LANG=ja_JP.UTF-8
localectl set-keymap jp106
apt-get update

# install AdoptOpenJDK11
cd /opt
wget https://github.com/AdoptOpenJDK/openjdk11-binaries/releases/download/jdk-11.0.3%2B7/OpenJDK11U-jdk_x64_linux_hotspot_11.0.3_7.tar.gz
tar xvfz OpenJDK11U-jdk_x64_linux_hotspot_11.0.3_7.tar.gz
cat << EOF > /etc/profile.d/jdk.sh
JAVA_HOME=/opt/jdk-11.0.3+7
PATH=\\$PATH:\\$JAVA_HOME/bin
EOF

# download h2 database
apt-get -y install unzip
export h2db=h2-2019-03-13.zip
wget http://www.h2database.com/$h2db

# install h2 database
unzip $h2db
echo 'webAllowOthers = true' > /root/.h2.server.properties
/opt/jdk-11.0.3+7/bin/java -cp /opt/h2/bin/h2-1.4.199.jar org.h2.tools.Shell -url "jdbc:h2:/opt/test" -user sa -password sa -driver org.h2.Driver -sql "create table test (testid int);"


# setup console as service
cat << EOF > /opt/h2/bin/h2env
JAVA_HOME=/opt/jdk-11.0.3+7
H2CUSTOMJARS=
EOF

cat << EOF > /etc/systemd/system/h2.service
[Unit]
Description=H2 database
After=syslog.target network.target

[Service]
Type=simple
EnvironmentFile=/opt/h2/bin/h2env
WorkingDirectory=/opt/h2
ExecStart=/opt/jdk-11.0.3+7/bin/java -cp "/opt/h2/bin/h2-1.4.199.jar:\\$H2CUSTOMJARS" org.h2.tools.Console -tcpAllowOthers
ExecStop=/usr/bin/kill -3 \\${MAINPID}

[Install]
WantedBy=multi-user.target
EOF
systemctl enable h2.service
systemctl start h2.service

echo 'access URL: http://192.168.1.107:8082/'
echo 'username: sa    default password: sa'
echo 'Driver class: org.h2.Driver'
echo 'JDBC URL: jdbc:h2:/opt/test'

init 5
SHELL
end

〇関連情報
・プロジェクトWebサイト
https://www.h2database.com/html/main.html

・H2 Databaseに関する他の記事はこちらを参照してください。

2019年5月18日土曜日

VagrantでH2 Database(1.4.199)とAdoptOpenJDK11をインストールした仮想マシン(Ubuntu18.04)を構築する

H2 Databaseはjava製のデータベースです。データベースエンジンのほかWebコンソール画面も備えています。

〇H2 Databaseのコンソール画面


〇構築方法
以下のVagrantfileを使用して、H2 Databaseがインストールされた仮想マシン(Ubuntu18.04)を構築する事ができます。

Vagrantfile
VAGRANTFILE_API_VERSION = "2"

Vagrant.configure(VAGRANTFILE_API_VERSION) do |config|
  config.vm.box = "bento/ubuntu-18.04"
  config.vm.hostname = "ub1804h2dbadoptopenjdk11"
config.vm.network :public_network, ip:"192.168.1.103"
  config.vm.provider :virtualbox do |vbox|
     vbox.name = "ub1804h2dbadoptopenjdk11"
     vbox.cpus = 2
     vbox.memory = 2048
  end
  config.vm.provision "shell", inline: <<-SHELL
apt-get update
export DEBIAN_FRONTEND=noninteractive
apt-get -y -o Dpkg::Options::="--force-confdef" -o Dpkg::Options::="--force-confold" upgrade
apt-get -y install language-pack-ja
localectl set-locale LANG=ja_JP.UTF-8
localectl set-keymap jp106
apt-get update

# install AdoptOpenJDK11
cd /opt
wget https://github.com/AdoptOpenJDK/openjdk11-binaries/releases/download/jdk-11.0.3%2B7/OpenJDK11U-jdk_x64_linux_hotspot_11.0.3_7.tar.gz
tar xvfz OpenJDK11U-jdk_x64_linux_hotspot_11.0.3_7.tar.gz
cat << EOF > /etc/profile.d/jdk.sh
JAVA_HOME=/opt/jdk-11.0.3+7
PATH=\\$PATH:\\$JAVA_HOME/bin
EOF

# download h2 database
apt-get -y install unzip
export h2db=h2-2019-03-13.zip
wget http://www.h2database.com/$h2db

# install h2 database
unzip $h2db
echo 'webAllowOthers = true' > /root/.h2.server.properties
/opt/jdk-11.0.3+7/bin/java -cp /opt/h2/bin/h2-1.4.199.jar org.h2.tools.Shell -url "jdbc:h2:/opt/test" -user sa -password sa -driver org.h2.Driver -sql "create table test (testid int);"


# setup console as service
cat << EOF > /opt/h2/bin/h2env
JAVA_HOME=/opt/jdk-11.0.3+7
H2CUSTOMJARS=
EOF

cat << EOF > /etc/systemd/system/h2.service
[Unit]
Description=H2 database
After=syslog.target network.target

[Service]
Type=simple
EnvironmentFile=/opt/h2/bin/h2env
WorkingDirectory=/opt/h2
ExecStart=/opt/jdk-11.0.3+7/bin/java -cp "/opt/h2/bin/h2-1.4.199.jar:\\$H2CUSTOMJARS" org.h2.tools.Console -tcpAllowOthers
ExecStop=/usr/bin/kill -3 \\${MAINPID}

[Install]
WantedBy=multi-user.target
EOF
systemctl enable h2.service
systemctl start h2.service

echo 'access URL: http://192.168.1.103:8082/'
echo 'username: sa    default password: sa'
echo 'Driver class: org.h2.Driver'
echo 'JDBC URL: jdbc:h2:/opt/test'

init 5
SHELL
end

〇関連情報
・プロジェクトWebサイト
https://www.h2database.com/html/main.html

・H2 Databaseに関する他の記事はこちらを参照してください。

2018年11月18日日曜日

VagrantでH2 Database(1.4.197)とJDK11をインストールした仮想マシン(Debian Stretch/9.5)を構築する

H2 Databaseはjava製のデータベースです。データベースエンジンのほかWebコンソール画面も備えています。

〇H2 Databaseのコンソール画面


〇構築方法
以下のVagrantfileを使用して、H2 Databaseがインストールされた仮想マシン(Debian Stretch/9.5)を構築する事ができます。

Vagrantfile
VAGRANTFILE_API_VERSION = "2"

Vagrant.configure(VAGRANTFILE_API_VERSION) do |config|
  config.vm.box = "bento/debian-9.5"
  config.vm.hostname = "db95h2dbjdk11"
  config.vm.provider :virtualbox do |vbox|
     vbox.name = "db95h2dbjdk11"
     vbox.cpus = 2
     vbox.memory = 2048
     vbox.customize ["modifyvm", :id, "--nicpromisc2","allow-all"]
  end
  config.vm.network "private_network", ip: "192.168.55.103", :netmask => "255.255.255.0"
  config.vm.network "public_network", ip:"192.168.1.103", :netmask => "255.255.255.0"
  config.vm.provision "shell", inline: <<-SHELL
apt-get -y install task-japanese
sed -i -e 's/# ja_JP.UTF-8 UTF-8/ja_JP.UTF-8 UTF-8/' /etc/locale.gen
locale-gen
update-locale LANG=ja_JP.UTF-8
localectl set-locale LANG=ja_JP.UTF-8
localectl set-keymap jp106
timedatectl set-timezone Asia/Tokyo
apt-get update
DEBIAN_FRONTEND=noninteractive apt-get -y -o Dpkg::Options::="--force-confdef" -o Dpkg::Options::="--force-confold" upgrade

# install java
cat <<EOF | sudo tee /etc/apt/sources.list.d/stretch-backports.list
deb http://http.debian.net/debian stretch-backports main contrib non-free
EOF
apt-get update
apt-get -y install openjdk-11-jdk

# download h2 database
apt-get -y install unzip
export h2db=h2-2018-03-18.zip
wget http://www.h2database.com/$h2db

# install h2 database
unzip $h2db
echo 'webAllowOthers = true' > /root/.h2.server.properties
mv h2 /opt

# setup console as service
cat << EOF > /opt/h2/bin/h2env
H2CUSTOMJARS=
EOF

cat << EOF > /etc/systemd/system/h2.service
[Unit]
Description=H2 database
After=syslog.target network.target

[Service]
Type=simple
EnvironmentFile=/opt/h2/bin/h2env
WorkingDirectory=/opt/h2
ExecStart=/usr/bin/java -cp "/opt/h2/bin/h2-1.4.197.jar:\\$H2CUSTOMJARS" org.h2.tools.Console -tcpAllowOthers
ExecStop=/usr/bin/kill -3 \\${MAINPID}

[Install]
WantedBy=multi-user.target
EOF
systemctl enable h2.service
systemctl start h2.service

echo 'access URL: http://192.168.55.103:8082/'
echo 'username: sa    default password: sa'
echo 'Driver class: org.h2.Driver'
echo 'JDBC URL: jdbc:h2:tcp://192.168.55.103/~/test'
SHELL
end


○関連情報
・H2 Databaseに関する他の記事はこちらを参照してください。

2018年4月29日日曜日

LXDでH2 Databaseがインストールされたコンテナ(Ubuntu18.04)を構築する

H2 Databaseはjava製のRDBです。

〇H2DBのコンソール画面

ブラウザからhttp://<ホストのIP>:8082/にアクセスします。
JDBCURLには、「jdbc:h2:tcp://<コンテナのIP>/test」を指定し
ユーザ名sa、パスワードなしを指定します。

〇コンテナの構築
LXDで以下のコマンドを実行して、CouchDBがインストールされたコンテナを構築します。
lxc init ubuntu:18.04 ub1804h2db
lxc config set ub1804h2db user.user-data - < config.yml
lxc start ub1804h2db

config.yml
#cloud-config

package_upgrade: true

hostname: h2db
manage_etc_hosts: true

write_files:
  - path: /etc/systemd/system/h2.service
    content: |
      [Unit]
      Description=H2 database
      After=syslog.target network.target
      [Service]
      Type=simple
      EnvironmentFile=/opt/h2/bin/h2env
      WorkingDirectory=/opt/h2
      ExecStart=/usr/bin/java -cp "/opt/h2/bin/h2-1.4.197.jar:\\$H2CUSTOMJARS" org.h2.tools.Server -tcp -tcpAllowOthers -web -webAllowOthers -pg -pgAllowOthers -baseDir /opt/h2/data
      ExecStop=/usr/bin/kill -3 \\${MAINPID}
      [Install]
      WantedBy=multi-user.target
runcmd:
  - 'apt-get update'
  - 'apt-get -y install openjdk-8-jdk'
  - 'apt-get -y install unzip'
  - 'wget http://www.h2database.com/h2-2018-03-18.zip'
  - 'unzip h2-2018-03-18.zip'
  - 'mv h2 /opt'
  - mkdir /opt/h2/data
  - 'echo "H2CUSTOMJARS=" >> /opt/h2/bin/h2env'
  - systemctl enable h2.service
  - systemctl start h2.service
final_message: "completed."

〇コンテナに入る
lxc exec ub1804h2db /bin/bash

〇ホストマシンの外部からコンテナにアクセスしたい場合
以下のコマンドを実行します。
PORT=9092 PUBLIC_IP=<ホストのIP> CONTAINER_IP=<コンテナのIP> sudo -E bash -c 'iptables -t nat -I PREROUTING -i eth0 -p TCP -d $PUBLIC_IP --dport $PORT -j DNAT --to-destination $CONTAINER_IP:$PORT -m comment --comment "container"'
PORT=5435 PUBLIC_IP=<ホストのIP> CONTAINER_IP=<コンテナのIP> sudo -E bash -c 'iptables -t nat -I PREROUTING -i eth0 -p TCP -d $PUBLIC_IP --dport $PORT -j DNAT --to-destination $CONTAINER_IP:$PORT -m comment --comment "container"'
PORT=8082 PUBLIC_IP=<ホストのIP> CONTAINER_IP=<コンテナのIP> sudo -E bash -c 'iptables -t nat -I PREROUTING -i eth0 -p TCP -d $PUBLIC_IP --dport $PORT -j DNAT --to-destination $CONTAINER_IP:$PORT -m comment --comment "container"'

〇コンテナのIPを調べる
コンテナのIPは以下のコマンドで調べることができます。
lxc list

〇コンテナの停止
lxc stop ub1804h2db

〇コンテナの削除
lxc delete ub1804h2db


○関連情報
・H2 Databaseに関する他の記事はこちらを参照してください。

2018年4月21日土曜日

LXDでH2 Databaseがインストールされたコンテナ(Ubuntu16.04)を構築する

H2 Databaseはjava製のRDBです。

〇H2DBのコンソール画面


〇コンテナの構築
LXDで以下のコマンドを実行して、CouchDBがインストールされたコンテナを構築します。
lxc init ubuntu:16.04 h2db
lxc config set h2db user.user-data - < config.yml
lxc start h2db

config.yml
#cloud-config

package_upgrade: true

hostname: h2db
manage_etc_hosts: true

write_files:
  - path: /etc/systemd/system/h2.service
    content: |
      [Unit]
      Description=H2 database
      After=syslog.target network.target
      [Service]
      Type=simple
      EnvironmentFile=/opt/h2/bin/h2env
      WorkingDirectory=/opt/h2
      ExecStart=/usr/bin/java -cp "/opt/h2/bin/h2-1.4.197.jar:\\$H2CUSTOMJARS" org.h2.tools.Server -tcp -tcpAllowOthers -web -webAllowOthers -pg -pgAllowOthers -baseDir /opt/h2/data
      ExecStop=/usr/bin/kill -3 \\${MAINPID}
      [Install]
      WantedBy=multi-user.target
runcmd:
  - 'apt-get update'
  - 'apt-get -y install openjdk-8-jdk'
  - 'apt-get -y install unzip'
  - 'wget http://www.h2database.com/h2-2018-03-18.zip'
  - 'unzip h2-2018-03-18.zip'
  - 'mv h2 /opt'
  - mkdir /opt/h2/data
  - 'echo "H2CUSTOMJARS=" >> /opt/h2/bin/h2env'
  - systemctl enable h2.service
  - systemctl start h2.service
final_message: "completed."

〇ホストマシンの外部からコンテナにアクセスしたい場合
以下のコマンドを実行します。
PORT=9092 PUBLIC_IP=<ホストのIP> CONTAINER_IP=<コンテナのIP> sudo -E bash -c 'iptables -t nat -I PREROUTING -i eth0 -p TCP -d $PUBLIC_IP --dport $PORT -j DNAT --to-destination $CONTAINER_IP:$PORT -m comment --comment "container"'
PORT=5435 PUBLIC_IP=<ホストのIP> CONTAINER_IP=<コンテナのIP> sudo -E bash -c 'iptables -t nat -I PREROUTING -i eth0 -p TCP -d $PUBLIC_IP --dport $PORT -j DNAT --to-destination $CONTAINER_IP:$PORT -m comment --comment "container"'
PORT=8082 PUBLIC_IP=<ホストのIP> CONTAINER_IP=<コンテナのIP> sudo -E bash -c 'iptables -t nat -I PREROUTING -i eth0 -p TCP -d $PUBLIC_IP --dport $PORT -j DNAT --to-destination $CONTAINER_IP:$PORT -m comment --comment "container"'

○コンソール画面へのアクセス
ブラウザからhttp://<ホストのIP>:8092/にアクセスします。
JDBCURLには、「jdbc:h2:tcp://<コンテナのIP>/test」を指定し
ユーザ名sa、パスワードなしを指定します。

〇コンテナのIPを調べる
コンテナのIPは以下のコマンドで調べることができます。
lxc list

〇コンテナの停止
lxc stop h2db

〇コンテナの削除
lxc delete h2db


○関連情報
・H2 Databaseに関する他の記事はこちらを参照してください。

2018年4月19日木曜日

VagrantでJupyter LabとH2 Databaseをインストールした仮想マシン(Ubuntu16.04)を構築する

Jupyter Labでインタラクティブなコンピューティング環境を提供する事ができます。
以下のVagrantfileで、Jupyter LabとH2 Databaseをインストールした仮想マシン(Ubuntu16.04)を構築できます。

Vagrantfile
VAGRANTFILE_API_VERSION = "2"

Vagrant.configure(VAGRANTFILE_API_VERSION) do |config|
  config.vm.box = "bento/ubuntu-16.04"
  config.vm.hostname = "ub1604jupyterlabh2db"
  config.vm.provider :virtualbox do |vbox|
     vbox.name = "ub1604jupyterlabh2db"
     vbox.cpus = 2
     vbox.memory = 2048
     vbox.customize ["modifyvm", :id, "--nicpromisc2","allow-all"]
  end
  config.vm.network "private_network", ip: "192.168.55.106", :netmask => "255.255.255.0"
  config.vm.network "public_network", ip:"192.168.1.106", :netmask => "255.255.255.0"
  config.vm.provision "shell", inline: <<-SHELL
# update packages
apt-get update
#DEBIAN_FRONTEND=noninteractive apt-get -y -o Dpkg::Options::="--force-confdef" -o Dpkg::Options::="--force-confold" upgrade
locale-gen ja_JP.UTF-8
localectl set-locale LANG=ja_JP.UTF-8

# install java
apt-get -y install openjdk-8-jdk

# download h2 database
apt-get -y install unzip
wget http://www.h2database.com/h2-2018-03-18.zip
unzip h2-2018-03-18.zip
mv h2 /opt
mkdir /opt/h2/data

# setup console as service
cat << EOF > /opt/h2/bin/h2env
H2CUSTOMJARS=
EOF

cat << EOF > /etc/systemd/system/h2.service
[Unit]
Description=H2 database
After=syslog.target network.target

[Service]
Type=simple
EnvironmentFile=/opt/h2/bin/h2env
WorkingDirectory=/opt/h2
ExecStart=/usr/bin/java -cp "/opt/h2/bin/h2-1.4.197.jar:\\$H2CUSTOMJARS" org.h2.tools.Console -tcp -tcpAllowOthers -web -webAllowOthers -pg -pgAllowOthers -baseDir /opt/h2/data

ExecStop=/usr/bin/kill -3 \\${MAINPID}

[Install]
WantedBy=multi-user.target
EOF
systemctl enable h2.service
systemctl start h2.service

# install anaconda & jupyterlab
wget https://repo.continuum.io/archive/Anaconda3-5.1.0-Linux-x86_64.sh
chmod +x Anaconda3-5.1.0-Linux-x86_64.sh
./Anaconda3-5.1.0-Linux-x86_64.sh -b -p /opt/anaconda
source /opt/anaconda/bin/activate
pip install --upgrade pip
pip install jupyterlab

# install psycopg2
apt-get -y install libpq-dev python-dev
pip install psycopg2-binary

useradd py
mkdir -p /home/py
chown -R py:py /home/py
sudo -u py bash -c "mkdir /home/py/.jupyter"
sudo -u py bash -c "cat << EOF > /home/py/.jupyter/jupyter_notebook_config.py
conf = get_config()
conf.NotebookApp.ip = '*'
conf.NotebookApp.open_browser = False
conf.NotebookApp.port = 8080
conf.NotebookApp.token = 'jupyter'
EOF"

cat << EOF > /etc/systemd/system/jupyter.service
[Unit]
Description=Jupyter notebook
[Service]
Type=simple
ExecStartPre=source /opt/anaconda/bin/activate
ExecStart=/opt/anaconda/bin/jupyter lab
User=py
Group=py
WorkingDirectory=/home/py
Restart=always
RestartSec=10
[Install]
WantedBy=multi-user.target
EOF
sudo systemctl enable jupyter
sudo systemctl start jupyter


echo '--------------------------------------------------'
echo 'access URL: http://192.168.55.106:8082/'
echo 'username: sa    default password: sa'
echo 'Driver class: org.h2.Driver'
echo 'JDBC URL: jdbc:h2:tcp://192.168.55.106/~/test'
echo '--------------------------------------------------'
echo 'access -> http://192.168.55.106:8080/?token=jupyter'

SHELL
end

〇動作検証用コード
import psycopg2

con = psycopg2.connect("dbname=test host=localhost port=5435 user=sa password=sa")

try:
  cur= con.cursor()
  cur.execute("create table messages (message_id integer, message varchar(100))")
  cur.execute("insert into messages values (1, 'Hello world!')")
  sql = "select message_id, message from messages"
  cur.execute(sql)

  for row in cur.fetchall():
    print(row)

except psycopg2.Error as er:
    print('psycopg2.Error:', er)
cur.close
con.close

〇Jupyter Labの画面


○関連情報
・H2 Databaseに関する他の記事はこちらを参照してください。

・psycopg2に関する他の記事はこちらを参照してください。

2018年4月7日土曜日

VagrantでH2 Databaseをインストールした仮想マシン(Debian Stretch/9.3)を構築する

H2 Databaseはjava製のデータベースです。
以下のVagrantfileを使用して、H2 Databaseがインストールされた仮想マシン(Debian Stretch/9.3)を構築する事ができます。

Vagrantfile
VAGRANTFILE_API_VERSION = "2"
Vagrant.configure(VAGRANTFILE_API_VERSION) do |config|
  config.vm.box = "bento/debian-9.3"
  config.vm.hostname = "db93h2db"
  config.vm.provider :virtualbox do |vbox|
     vbox.name = "db93h2db"
     vbox.cpus = 2
     vbox.memory = 2048
     vbox.customize ["modifyvm", :id, "--nicpromisc2","allow-all"]
  end
config.vm.network "private_network", ip: "192.168.55.107", :netmask => "255.255.255.0"
config.vm.network "public_network", ip:"192.168.1.107", :netmask => "255.255.255.0"
  config.vm.provision "shell", inline: <<-SHELL
apt-get -y install task-japanese
sed -i -e 's/# ja_JP.UTF-8 UTF-8/ja_JP.UTF-8 UTF-8/' /etc/locale.gen
locale-gen
update-locale LANG=ja_JP.UTF-8
localectl set-locale LANG=ja_JP.UTF-8
localectl set-keymap jp106
apt-get update
#DEBIAN_FRONTEND=noninteractive apt-get -y -o Dpkg::Options::="--force-confdef" -o Dpkg::Options::="--force-confold" upgrade

# install java
apt-get -y install openjdk-8-jdk

# download h2 database
apt-get -y install unzip
wget http://www.h2database.com/h2-2018-03-18.zip
unzip h2-2018-03-18.zip
mv h2 /opt
mkdir /opt/h2/data

# setup console as service
cat << EOF > /opt/h2/bin/h2env
H2CUSTOMJARS=
EOF

cat << EOF > /etc/systemd/system/h2.service
[Unit]
Description=H2 database
After=syslog.target network.target

[Service]
Type=simple
EnvironmentFile=/opt/h2/bin/h2env
WorkingDirectory=/opt/h2
ExecStart=/usr/bin/java -cp "/opt/h2/bin/h2-1.4.197.jar:\\$H2CUSTOMJARS" org.h2.tools.Console -tcp -tcpAllowOthers -web -webAllowOthers -pg -pgAllowOthers -baseDir /opt/h2/data

ExecStop=/usr/bin/kill -3 \\${MAINPID}

[Install]
WantedBy=multi-user.target
EOF
systemctl enable h2.service
systemctl start h2.service

echo '--------------------------------------------------'
echo 'access URL: http://192.168.55.107:8082/'
echo 'username: sa    default password: sa'
echo 'Driver class: org.h2.Driver'
echo 'JDBC URL: jdbc:h2:tcp://192.168.55.107/opt/h2/test'
SHELL
end

〇H2 Databaseの画面


○関連情報
・H2 Databaseに関する他の記事はこちらを参照してください。

2018年2月22日木曜日

DockerでH2 Databaseのイメージ・コンテナを構築する

H2 Databaseはjava製のRDBです。
以下の手順で、H2 Databaseのイメージ・コンテナを構築する事ができます。

○構築方法
1. H2DBイメージの作成(Dockerfileがあるフォルダで実行)
docker build -t h2db .

Dockerfile
FROM alpine:3.7
RUN  apk update \
  && apk add --no-cache openjdk8 \
  && rm -rf /var/cache/apk/* \
  && mkdir -p /opt \
  && wget http://www.h2database.com/h2-2017-06-10.zip \
  && unzip h2-*.zip \
  && rm -f h2-*.zip \
  && mv h2 /opt \
  && mkdir -p /opt/h2/data
EXPOSE 9092 5435 8082
VOLUME /opt/h2/data
CMD ["java", "-cp", "/opt/h2/bin/h2-1.4.196.jar", "org.h2.tools.Server", "-tcp", "-tcpAllowOthers", "-web", "-webAllowOthers", "-pg", "-pgAllowOthers", "-baseDir", "/opt/h2/data"]

2. H2DBコンテナの構築・実行(docker-compose.ymlがあるフォルダで実行)
docker-compose up -d

docker-compose.yml
version: "2"
services:
  h2db:
    image: h2db
    container_name: "h2db"
    volumes:
      - "h2db-data:/opt/h2/data"
    ports:
      - "9092:9092"
      - "5435:5435"
      - "8082:8082"
volumes:
  h2db-data:
    driver: local

3.ブラウザからhttp://<Dockerホスト名またはIP>:8092/にアクセス
ログイン時にGeneric H2 (Server)を選択し、JDBC URLでjdbc:h2:tcp:///testを入力し、ユーザ名sa、パスワードなしを指定します。

○H2DBのwebインターフェイス画面


○関連情報
・H2 Databaseに関する他の記事はこちらを参照してください。

2018年1月6日土曜日

VagrantでH2 Databaseをインストールした仮想マシン(Debian Stretch/9.2)を構築する

以下のVagrantfileを使用して、H2 Databaseをインストールした仮想マシンを構築できます。
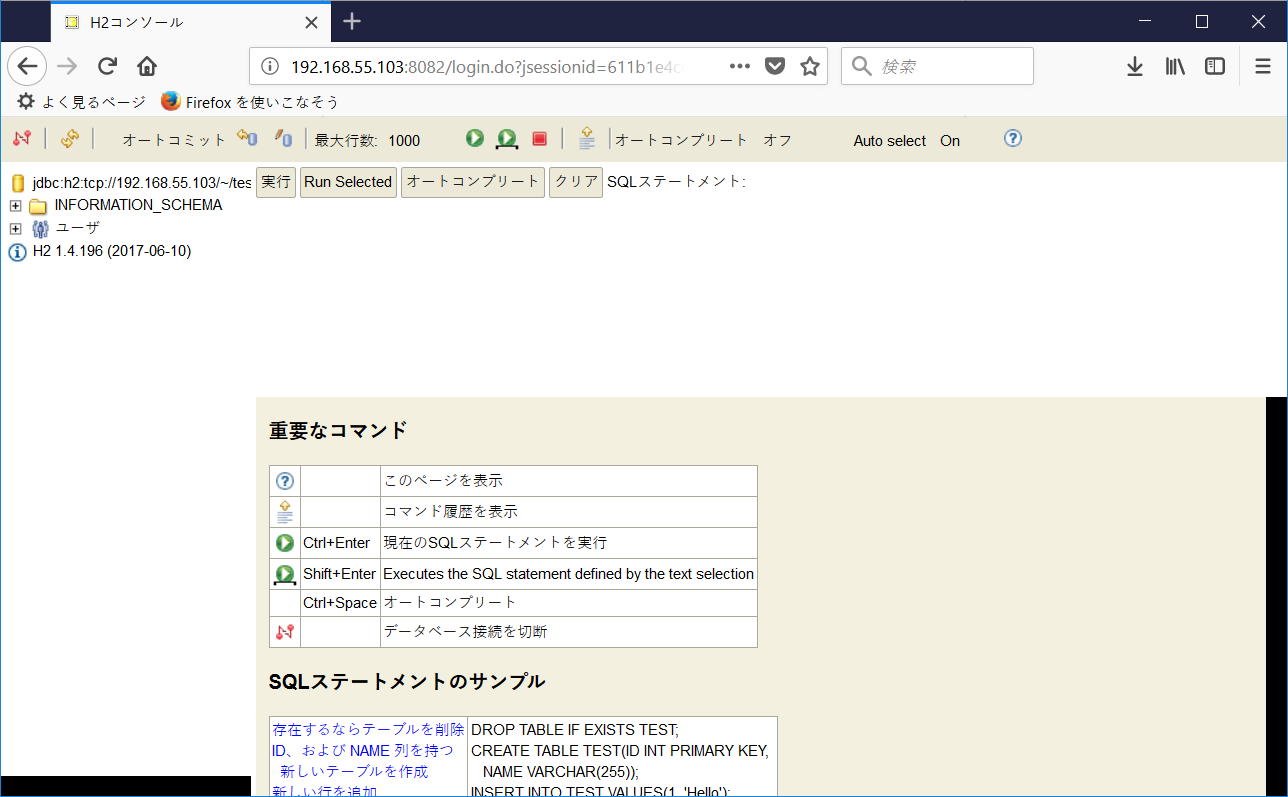
仮想マシン構築後、ブラウザからhttp://192.168.55.103:8082/でH2コンソールにアクセスできます。

Vagrantfile
VAGRANTFILE_API_VERSION = "2"

Vagrant.configure(VAGRANTFILE_API_VERSION) do |config|
  config.vm.box = "bento/debian-9.2"
  config.vm.hostname = "db92h2db"
  config.vm.provider :virtualbox do |vbox|
     vbox.name = "db92h2db"
     vbox.cpus = 2
     vbox.memory = 2048
     vbox.customize ["modifyvm", :id, "--nicpromisc2","allow-all"]
  end
  config.vm.network "private_network", ip: "192.168.55.103", :netmask => "255.255.255.0"
  config.vm.network "public_network", ip:"192.168.1.103", :netmask => "255.255.255.0"
  config.vm.provision "shell", inline: <<-SHELL
# update packages
apt-get update
#DEBIAN_FRONTEND=noninteractive apt-get -y -o Dpkg::Options::="--force-confdef" -o Dpkg::Options::="--force-confold" upgrade
locale-gen ja_JP.UTF-8
localectl set-locale LANG=ja_JP.UTF-8

# install java
apt-get -y install openjdk-8-jdk

# download h2 database
apt-get -y install unzip
export h2db=h2-2017-06-10.zip
wget http://www.h2database.com/$h2db

# install h2 database
unzip $h2db
echo 'webAllowOthers = true' > /root/.h2.server.properties
mv h2 /opt

# setup console as service
cat << EOF > /opt/h2/bin/h2env
H2CUSTOMJARS=
EOF

cat << EOF > /etc/systemd/system/h2.service
[Unit]
Description=H2 database
After=syslog.target network.target

[Service]
Type=simple
EnvironmentFile=/opt/h2/bin/h2env
WorkingDirectory=/opt/h2
ExecStart=/usr/bin/java -cp "/opt/h2/bin/h2-1.4.196.jar:\\$H2CUSTOMJARS" org.h2.tools.Console -tcpAllowOthers
ExecStop=/usr/bin/kill -3 \\${MAINPID}

[Install]
WantedBy=multi-user.target
EOF
systemctl enable h2.service
systemctl start h2.service

echo 'access URL: http://192.168.55.103:8082/'
echo 'username: sa    default password: sa'
echo 'Driver class: org.h2.Driver'
echo 'JDBC URL: jdbc:h2:tcp://192.168.55.103/~/test'
SHELL
end

〇H2コンソールのスクリーンショット


○関連情報
・H2 Databaseに関する他の記事はこちらを参照してください。

2017年12月2日土曜日

VagrantでH2 Databaseをインストールした仮想マシン(Ubuntu16.04)を構築する

H2 DatabaseはJavaで作られたRDBです。
以下のVagrantfileを使用して、H2 Databaseをインストールした仮想マシンを構築する事ができます。
仮想マシン構築後、ブラウザからhttp://192.168.55.105:8082/でコンソール画面にアクセスできます。

Vagrantfile
VAGRANTFILE_API_VERSION = "2"

Vagrant.configure(VAGRANTFILE_API_VERSION) do |config|
  config.vm.box = "bento/ubuntu-16.04"
  config.vm.hostname = "ub1604h2db"
  config.vm.provider :virtualbox do |vbox|
     vbox.name = "ub1604h2db"
     vbox.cpus = 2
     vbox.memory = 2048
     vbox.customize ["modifyvm", :id, "--nicpromisc2","allow-all"]
  end
  config.vm.network "private_network", ip: "192.168.55.105", :netmask => "255.255.255.0"
  config.vm.network "public_network", ip:"192.168.1.105", :netmask => "255.255.255.0"
  config.vm.provision "shell", inline: <<-SHELL
# update packages
apt-get update
#DEBIAN_FRONTEND=noninteractive apt-get -y -o Dpkg::Options::="--force-confdef" -o Dpkg::Options::="--force-confold" upgrade
locale-gen ja_JP.UTF-8
localectl set-locale LANG=ja_JP.UTF-8

# install java
apt-get -y install openjdk-8-jdk

# download h2 database
apt-get -y install unzip
export h2db=h2-2017-06-10.zip
wget http://www.h2database.com/$h2db

# install h2 database
unzip $h2db
echo 'webAllowOthers = true' > /root/.h2.server.properties
mv h2 /opt

# setup console as service
cat << EOF > /opt/h2/bin/h2env
H2CUSTOMJARS=
EOF

cat << EOF > /etc/systemd/system/h2.service
[Unit]
Description=H2 database
After=syslog.target network.target

[Service]
Type=simple
EnvironmentFile=/opt/h2/bin/h2env
WorkingDirectory=/opt/h2
ExecStart=/usr/bin/java -cp "/opt/h2/bin/h2-1.4.196.jar:\\$H2CUSTOMJARS" org.h2.tools.Console -tcpAllowOthers
ExecStop=/usr/bin/kill -3 \\${MAINPID}

[Install]
WantedBy=multi-user.target
EOF
systemctl enable h2.service
systemctl start h2.service

echo 'access URL: http://192.168.55.105:8082/'
echo 'username: sa    default password: sa'
echo 'Driver class: org.h2.Driver'
echo 'JDBC URL: jdbc:h2:tcp://192.168.55.105/~/test'
SHELL
end

○H2 Databaseのコンソール画面


○関連情報
・H2 Databaseに関する他の記事はこちらを参照してください。

2017年8月19日土曜日

Vagrantを使用してH2 databaseがインストールされた仮想マシン(CentOS7.3)を構築する

以下のVagrantfileを使用して、h2 databaseがインストールされた仮想マシン(CentOS7.3)を構築できます。Webコンソールをサービスとして登録しているので、仮想マシン起動時に自動的にコンソールも利用可能になります。 Vagrantfile

VAGRANTFILE_API_VERSION = "2"

Vagrant.configure(VAGRANTFILE_API_VERSION) do |config|
  config.vm.box = "bento/centos-7.3"
  config.vm.hostname = "h2db"
  config.vm.provider :virtualbox do |vbox|
     vbox.name = "h2db"
     vbox.cpus = 4
     vbox.memory = 4096
     vbox.customize ["modifyvm", :id, "--nicpromisc2","allow-all"]
  end
  # private network
  config.vm.network "private_network", ip: "192.168.55.86", :netmask => "255.255.255.0"
  # bridge netwrok
  config.vm.network "public_network", ip: "192.168.1.86", :netmask => "255.255.255.0"
  config.vm.network "forwarded_port", guest:22, host:19022, id:"ssh"
  config.vm.provision "shell", inline: <<-SHELL
yum -y install unzip

# install JDK
yum -y install java-1.8.0-openjdk

# download h2 database
export h2db=h2-2017-06-10.zip
wget http://www.h2database.com/$h2db

# install h2 database
unzip $h2db
echo 'webAllowOthers = true' > ~root/.h2.server.properties
mv h2 /opt

# setup console as service
cp /vagrant/h2 /etc/sysconfig
cp /vagrant/h2.service /etc/systemd/system
systemctl enable h2.service
systemctl start h2.service

echo 'access URL: http://192.168.55.86:8082/'
echo 'username: sa    default password: sa'
echo 'Driver class: org.h2.Driver
echo 'JDBC URL: jdbc:h2:tcp://192.168.55.86/~/test'

SHELL
end
h2.service

[Unit]
Description=H2 database
After=syslog.target network.target

[Service]
Type=simple
EnvironmentFile=/etc/sysconfig/h2
WorkingDirectory=/opt/h2
ExecStart=/bin/java -cp "/opt/h2/bin/h2-1.4.196.jar:$H2CUSTOMJARS" org.h2.tools.Console
ExecStop=/bin/kill -3 ${MAINPID}

[Install]
WantedBy=multi-user.target
h2

H2CUSTOMJARS=

○関連情報
・H2 Databaseに関する他の記事はこちらを参照してください。

2011年4月4日月曜日

H2 DatabaseとSchemaCrawlerでテーブルのカラムを列挙する関数を作成する

H2 DatabaseとSchemaCrawlerでテーブルのカラムを列挙する関数を作成するには、以下のスクリプトを実行します。

create alias if not exists sc_get_columns as $$ 
import java.io.*;
import java.util.*;
import java.sql.*;
import org.h2.tools.*;
import java.net.*;
import schemacrawler.schema.*;
import schemacrawler.schemacrawler.*;
import schemacrawler.utility.*;
@CODE
ResultSet sc_get_columns(String jdbcDriver, String url,
String user, String password, String schemaName,
String tableName)
throws Exception
{
if( jdbcDriver == null ){
throw new Exception("jdbcDriver is not specified.");
}
if( url == null ){
throw new Exception("url is not specified.");
}
if( user == null ){
throw new Exception("user is not specified.");
}
if( password == null ){
throw new Exception("password is not specified.");
}
if( schemaName == null ){
throw new Exception("schemaName is not specified.");
}
if( tableName == null ){
throw new Exception("tableName is not specified.");
}
Class.forName(jdbcDriver);
Connection conn = null;
SimpleResultSet rs = new SimpleResultSet();
rs.addColumn("POS", Types.NUMERIC, 4, 0);
rs.addColumn("NAME", Types.VARCHAR, 4096, 0);
rs.addColumn("TYPENAME", Types.VARCHAR, 4096, 0);
rs.addColumn("DECIMAL_DIGITS", Types.NUMERIC, 4, 0);
rs.addColumn("SIZE", Types.NUMERIC, 10, 0);
rs.addColumn("WIDTH", Types.VARCHAR, 4096, 0);
rs.addColumn("NULLABLE", Types.BOOLEAN, 1, 0);
try
{
conn = DriverManager.getConnection(url, user, password);
SchemaCrawlerOptions options = new SchemaCrawlerOptions();
options.setSchemaInfoLevel(SchemaInfoLevel.maximum());
Database db = SchemaCrawlerUtility.getDatabase(conn, options);
Schema schema = db.getSchema(schemaName);
if( schema != null ){
Table table = schema.getTable(tableName);
if( table != null ){
Column columns[] = table.getColumns();
for(int li=0;li<columns.length;li++){
rs.addRow(columns[li].getOrdinalPosition(),
columns[li].getName(),
columns[li].getType().getTypeName(),
columns[li].getDecimalDigits(),
columns[li].getSize(),
columns[li].getWidth(),
columns[li].isNullable());
}
}
}
}
finally
{
if( conn != null )conn.close();
}
return rs;
}
$$

実行例
select * from
sc_get_columns('org.postgresql.Driver',
'jdbc:postgresql://localhost:5432/postgres',
'postgres', 'postgres', 'public', 'test1');

※以下のjarをCLASSPATH環境変数に追加
schemacrawler-8.5.1.jar, schemacrawler-postgresql-8.5.1.jar

○動作環境
JDK6 Update23, H2 Database 1.2.149 (2011-01-07), SchemaCrawler 8.5.1

○関連情報
・SchemaCrawlerのウェブサイト
http://schemacrawler.sourceforge.net/
・H2 Databaseに関する他の記事はこちらを参照してください。

2011年4月3日日曜日

H2 DatabaseとJRedisでキー値が存在しない場合のみ値を設定する関数を作成する

H2 DatabaseとJRedisでキー値が存在しない場合のみ値を設定する関数を作成するには、以下のスクリプトを実行します。

create alias if not exists jredis_setnx as $$ 
import java.io.*;
import java.util.*;
import java.sql.*;
import org.h2.tools.*;
import java.net.*;
import org.jredis.ri.alphazero.*;
import org.jredis.ri.alphazero.support.*;
@CODE
Boolean jredis_setnx(String host, Integer intPort,
String key, String value)
throws Exception
{
if( host == null ){
throw new Exception("host is not specified.");
}
int port = 6379;
if( intPort != null ){
port = intPort.intValue();
}
if( key == null ){
throw new Exception("key is not specified.");
}
if( value == null ){
throw new Exception("value is not specified.");
}

JRedisClient jrc = new JRedisClient(host, port);
return jrc.setnx(key, value);
}
$$

実行例
select jredis_del('192.168.1.25', 6379, 'key1');
select jredis_del('192.168.1.25', 6379, 'key2');
select jredis_set('192.168.1.25', 6379, 'key1', 'value1');
select jredis_setnx('192.168.1.25', 6379, 'key1', 'modified');
select jredis_setnx('192.168.1.25', 6379, 'key2', 'modified');
select jredis_get('192.168.1.25', 6379, 'key1');
select jredis_get('192.168.1.25', 6379, 'key2');

※以下のjarをCLASSPATH環境変数に追加
jredis-core-all-a.0-SNAPSHOT-jar-with-dependencies.jar

○動作環境
JDK6 Update23, H2 Database 1.3.149 (2011-01-07), JRedis2.0.0
○関連情報
・H2 Databaseに関する他の記事はこちらを参照してください。

2011年4月2日土曜日

H2 DatabaseとSchemaCrawlerでテーブルを列挙する関数を作成する

H2 DatabaseとSchemaCrawlerでテーブルを列挙する関数を作成するには、以下のスクリプトを実行します。

create alias if not exists sc_get_tables as $$ 
import java.io.*;
import java.util.*;
import java.sql.*;
import org.h2.tools.*;
import java.net.*;
import schemacrawler.schema.*;
import schemacrawler.schemacrawler.*;
import schemacrawler.utility.*;
@CODE
ResultSet sc_get_tables(String jdbcDriver, String url,
String user, String password, String schemaName)
throws Exception
{
if( jdbcDriver == null ){
throw new Exception("jdbcDriver is not specified.");
}
if( url == null ){
throw new Exception("url is not specified.");
}
if( user == null ){
throw new Exception("user is not specified.");
}
if( password == null ){
throw new Exception("password is not specified.");
}
if( schemaName == null ){
throw new Exception("schemaName is not specified.");
}
Class.forName(jdbcDriver);
Connection conn = null;
SimpleResultSet rs = new SimpleResultSet();
rs.addColumn("NAME", Types.VARCHAR, 4096, 0);
rs.addColumn("FULLNAME", Types.VARCHAR, 4096, 0);
rs.addColumn("REMARKS", Types.VARCHAR, 4096, 0);
try
{
conn = DriverManager.getConnection(url, user, password);
SchemaCrawlerOptions options = new SchemaCrawlerOptions();
Database db = SchemaCrawlerUtility.getDatabase(conn, options);
Schema schema = db.getSchema(schemaName);
if( schema != null ){
Table tables[] = schema.getTables();
for(int li=0;li<tables.length;li++){
rs.addRow(tables[li].getName(),
tables[li].getFullName(),
tables[li].getRemarks());
}
}
}
finally
{
if( conn != null )conn.close();
}
return rs;
}
$$

実行例
select * from
sc_get_tables('org.postgresql.Driver',
'jdbc:postgresql://localhost:5432/postgres',
'postgres', 'postgres', 'public');

※以下のjarをCLASSPATH環境変数に追加
schemacrawler-8.5.1.jar, schemacrawler-postgresql-8.5.1.jar

○動作環境
JDK6 Update23, H2 Database 1.2.149 (2011-01-07), SchemaCrawler 8.5.1

○関連情報
・SchemaCrawlerのウェブサイト
http://schemacrawler.sourceforge.net/
・H2 Databaseに関する他の記事はこちらを参照してください。

2011年4月1日金曜日

H2 DatabaseとJRedisで新しい値を設定して古い値を返す関数を作成する

H2 DatabaseとJRedisで新しい値を設定して古い値を返す関数を作成するには、以下のスクリプトを実行します。

create alias if not exists jredis_getset as $$ 
import java.io.*;
import java.util.*;
import java.sql.*;
import org.h2.tools.*;
import java.net.*;
import org.jredis.ri.alphazero.*;
import org.jredis.ri.alphazero.support.*;
@CODE
String jredis_getset(String host, Integer intPort,
String key, String value)
throws Exception
{
if( host == null ){
throw new Exception("host is not specified.");
}
int port = 6379;
if( intPort != null ){
port = intPort.intValue();
}
if( key == null ){
throw new Exception("key is not specified.");
}
if( value == null ){
throw new Exception("value is not specified.");
}

JRedisClient jrc = new JRedisClient(host, port);
byte result[] = jrc.getset(key, value);
return result==null?null:DefaultCodec.toStr(result);
}
$$

実行例
select jredis_del('192.168.1.25', 6379, 'key1');
select jredis_set('192.168.1.25', 6379, 'key1', 'value1');
select jredis_getset('192.168.1.25', 6379, 'key1', 'modified');
select jredis_get('192.168.1.25', 6379, 'key1');

※以下のjarをCLASSPATH環境変数に追加
jredis-core-all-a.0-SNAPSHOT-jar-with-dependencies.jar

○動作環境
JDK6 Update23, H2 Database 1.3.149 (2011-01-07), JRedis2.0.0
○関連情報
・H2 Databaseに関する他の記事はこちらを参照してください。

2011年3月31日木曜日

H2 DatabaseとJRedisでSorted Setの値のスコアを取得する関数を作成する

H2 DatabaseとJRedisでSorted Setの値のスコアを取得する関数を作成するには、以下のスクリプトを実行します。

create alias if not exists jredis_zscore as $$ 
import java.io.*;
import java.util.*;
import java.sql.*;
import org.h2.tools.*;
import java.net.*;
import org.jredis.ri.alphazero.*;
import org.jredis.ri.alphazero.support.*;
@CODE
Double jredis_zscore(String host, Integer intPort,
String key, String value)
throws Exception
{
if( host == null ){
throw new Exception("host is not specified.");
}
int port = 6379;
if( intPort != null ){
port = intPort.intValue();
}
if( key == null ){
throw new Exception("key is not specified.");
}
if( value == null ){
throw new Exception("value is not specified.");
}

JRedisClient jrc = new JRedisClient(host, port);
return jrc.zscore(key, value);
}
$$

実行例
select jredis_del('192.168.1.25', 6379, 'sset1');
select jredis_zadd('192.168.1.25', 6379, 'sset1', 100, 'value1');
select jredis_zadd('192.168.1.25', 6379, 'sset1', 200, 'value2');
select jredis_zadd('192.168.1.25', 6379, 'sset1', 300, 'value3');
select jredis_zscore('192.168.1.25', 6379, 'sset1', 'value3');

※以下のjarをCLASSPATH環境変数に追加
jredis-core-all-a.0-SNAPSHOT-jar-with-dependencies.jar

○動作環境
JDK6 Update23, H2 Database 1.3.149 (2011-01-07), JRedis2.0.0
○関連情報
・H2 Databaseに関する他の記事はこちらを参照してください。

2011年3月30日水曜日

H2 DatabaseとJRedisでSorted Setから値を削除する関数を作成する

H2 DatabaseとJRedisでSorted Setから値を削除する関数を作成するには、以下のスクリプトを実行します。

create alias if not exists jredis_zrem as $$ 
import java.io.*;
import java.util.*;
import java.sql.*;
import org.h2.tools.*;
import java.net.*;
import org.jredis.ri.alphazero.*;
import org.jredis.ri.alphazero.support.*;
@CODE
Boolean jredis_zrem(String host, Integer intPort,
String key, String value)
throws Exception
{
if( host == null ){
throw new Exception("host is not specified.");
}
int port = 6379;
if( intPort != null ){
port = intPort.intValue();
}
if( key == null ){
throw new Exception("key is not specified.");
}
if( value == null ){
throw new Exception("value is not specified.");
}

JRedisClient jrc = new JRedisClient(host, port);
return jrc.zrem(key, value);
}
$$

実行例
select jredis_del('192.168.1.25', 6379, 'sset1');
select jredis_zadd('192.168.1.25', 6379, 'sset1', 100, 'value1');
select jredis_zadd('192.168.1.25', 6379, 'sset1', 200, 'value2');
select jredis_zadd('192.168.1.25', 6379, 'sset1', 300, 'value3');
select jredis_zrem('192.168.1.25', 6379, 'sset1', 'value3');
select * from jredis_zrange('192.168.1.25', 6379, 'sset1', 0, -1);

※以下のjarをCLASSPATH環境変数に追加
jredis-core-all-a.0-SNAPSHOT-jar-with-dependencies.jar

○動作環境
JDK6 Update23, H2 Database 1.3.149 (2011-01-07), JRedis2.0.0
○関連情報
・H2 Databaseに関する他の記事はこちらを参照してください。

2011年3月29日火曜日

H2 DatabaseとJRedisでSorted Setからインデックスの範囲で逆順で値を取得する関数を作成する

H2 DatabaseとJRedisでSorted Setからインデックスの範囲で逆順で値を取得する関数を作成するには、以下のスクリプトを実行します。

create alias if not exists jredis_zrevrange as $$ 
import java.io.*;
import java.util.*;
import java.sql.*;
import org.h2.tools.*;
import java.net.*;
import org.jredis.ri.alphazero.*;
import org.jredis.ri.alphazero.support.*;
@CODE
ResultSet jredis_zrevrange(String host, Integer intPort,
String key, Long from, Long to)
throws Exception
{
if( host == null ){
throw new Exception("host is not specified.");
}
int port = 6379;
if( intPort != null ){
port = intPort.intValue();
}
if( key == null ){
throw new Exception("key is not specified.");
}
if( from == null ){
throw new Exception("from is not specified.");
}
if( to == null ){
throw new Exception("to is not specified.");
}
SimpleResultSet rs = new SimpleResultSet();
rs.addColumn("ELEMENT", Types.VARCHAR, 4096, 0);

JRedisClient jrc = new JRedisClient(host, port);
for(byte elem[] : jrc.zrevrange(key, from, to)){
rs.addRow(elem==null?null:DefaultCodec.toStr(elem));
}
return rs;
}
$$

実行例
select jredis_del('192.168.1.25', 6379, 'sset1');
select jredis_zadd('192.168.1.25', 6379, 'sset1', 100, 'value1');
select jredis_zadd('192.168.1.25', 6379, 'sset1', 200, 'value2');
select jredis_zadd('192.168.1.25', 6379, 'sset1', 300, 'value3');
select * from jredis_zrevrange('192.168.1.25', 6379, 'sset1', 0, -1);

※以下のjarをCLASSPATH環境変数に追加
jredis-core-all-a.0-SNAPSHOT-jar-with-dependencies.jar

○動作環境
JDK6 Update23, H2 Database 1.3.149 (2011-01-07), JRedis2.0.0
○関連情報
・H2 Databaseに関する他の記事はこちらを参照してください。

2011年3月28日月曜日

H2 DatabaseとJRedisでスコアの範囲でSorted Setの値を取得する

H2 DatabaseとJRedisでスコアの範囲でSorted Setの値を取得するには、以下のスクリプトを実行します。

create alias if not exists jredis_zrangebyscore as $$ 
import java.io.*;
import java.util.*;
import java.sql.*;
import org.h2.tools.*;
import java.net.*;
import org.jredis.ri.alphazero.*;
import org.jredis.ri.alphazero.support.*;
@CODE
ResultSet jredis_zrangebyscore(String host, Integer intPort,
String key, Double from, Double to)
throws Exception
{
if( host == null ){
throw new Exception("host is not specified.");
}
int port = 6379;
if( intPort != null ){
port = intPort.intValue();
}
if( key == null ){
throw new Exception("key is not specified.");
}
if( from == null ){
throw new Exception("from is not specified.");
}
if( to == null ){
throw new Exception("to is not specified.");
}
SimpleResultSet rs = new SimpleResultSet();
rs.addColumn("ELEMENT", Types.VARCHAR, 4096, 0);

JRedisClient jrc = new JRedisClient(host, port);
for(byte elem[] : jrc.zrangebyscore(key, from, to)){
rs.addRow(elem==null?null:DefaultCodec.toStr(elem));
}
return rs;
}
$$

実行例
select jredis_del('192.168.1.25', 6379, 'sset1');
select jredis_zadd('192.168.1.25', 6379, 'sset1', 100, 'value1');
select jredis_zadd('192.168.1.25', 6379, 'sset1', 200, 'value2');
select jredis_zadd('192.168.1.25', 6379, 'sset1', 300, 'value3');
select * from jredis_zrangebyscore('192.168.1.25', 6379, 'sset1', 200, 300);

※以下のjarをCLASSPATH環境変数に追加
jredis-core-all-a.0-SNAPSHOT-jar-with-dependencies.jar

○動作環境
JDK6 Update23, H2 Database 1.3.149 (2011-01-07), JRedis2.0.0
○関連情報
・H2 Databaseに関する他の記事はこちらを参照してください。