今回は単にRaspberry Pi Picoでの値をカウントするメッセージをRaspberry Pi Zeroで受信します。
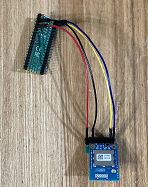
〇Raspberry Pi PicoとLazurite MJ2001を接続した写真
開発手順
1. 必要部品の準備・MJ2001(Lazurite Miniシリーズ、920J後継品)
https://www.switch-science.com/catalog/7162/
※Raspberry Pi Pico/Raspberry Pi Zeroそれぞれに接続するので2台必要です。
・Lazurite Mini writer Type B(Lazurite Miniシリーズ)
https://www.switch-science.com/catalog/2956/
※MJ2001にプログラムを書き込むのに必要です。これは1台でOKです。
・ピッチ変換基板 2×5⇔1×10
https://akizukidenshi.com/catalog/g/gP-14224/
※ハーフピッチ(1.27mm)を2.54mmピッチに変換してくれる基板です。変換基板を2枚用意します。
・ピンソケット 1.27mm 2×5(10P)
https://akizukidenshi.com/catalog/g/gC-13806/
※こちらも2個用意します。
・分割ロングピンソケット 1×42 (42P)
https://akizukidenshi.com/catalog/g/gC-05779/
※10ピン分に切っておきます。
2. 2台分の変換基板の作成&Lazurite MJ2001にtest920jプログラムを書き込み
LazuriteとRaspberry Pi Pico/Raspberry Pi Zeroを接続するための変換基板を2枚作成します。変換基板の作成方法は以下を参照してください。
Raspberry Pi ZeroとLazurite MJ2001を接続して、Lazurite上の青LEDをLチカする
3. Raspberry Pi Zero側: MJ2001の接続&Serialのraspi-configでSerial Portの有効化&pipenvのインストール&pyserialのインストールされた仮想環境の作成
以下の記事を参照して、Raspberry Pi Zero側の環境を整えます。
Raspberry Pi ZeroとLazurite MJ2001を接続して、Lazurite上の青LEDをLチカする
4. Raspberry Pi Zero側: 受信プログラムの作成と実行
以下のプログラムをmj2001_recv.pyとして保存して実行します。受信側のMJ2001のアドレスを表示するので控えておきます(sggma:で始まる表示の後の16進数が受信機のアドレスです)。
import serial
import time

PANID="0x1111"

try:
    ser = serial.Serial(port='/dev/serial0',baudrate=115200,timeout=None)

    # initialize subGHz
    ser.write("sgi\n".encode("utf-8"))
    ser.flush()
    line = ser.readline()
    print("result:{}".format(line.decode('utf-8').strip()))

    # start with ch=36 and PANID=0x1111
    ser.write(("sgb,36,"+PANID+",100,20\n").encode("utf-8"))
    ser.flush()
    line = ser.readline()
    print("result:{}".format(line.decode('utf-8').strip()))

    # get my address
    ser.write("sggma\n".encode("utf-8"))
    ser.flush()
    myaddress = ser.readline().decode('utf-8').strip().split(',')[1]
    print("sggma:{}".format(myaddress))

    # get send mode
    ser.write("sggsm\n".encode("utf-8"))
    ser.flush()
    line = ser.readline()
    print("result:{}".format(line.decode('utf-8').strip()))

    # Enable Rx
    #ser.write("sgre\n".encode("utf-8"))
    ser.write("sgra\r\n".encode("utf-8"))
    ser.flush()
    line = ser.readline()
    print("result:{}".format(line.decode('utf-8').strip()))

    try:
        while True:
            rl = ser.readline()
            #print(rl)
            recv = rl.decode('utf-8').strip().split(',')
            if len(recv) >= 8 and len(recv[8]) > 0:
                print("result:{}".format(recv[8]))
    except KeyboardInterrupt:
        # close
        ser.write("sgc\n".encode("utf-8"))
        ser.flush()
        line = ser.readline()
        print("result:{}".format(line.decode('utf-8').strip()))
finally:
    ser.close()
・実行コマンド
以下のコマンドで受信プログラムを実行します。
python3 mj2001_recv.py5. Raspberry Pi Pico側: Raspberry Pi PicoとLazurite MJ2001の接続
Raspberry Pi Picoと変換基板を以下の様に接続します。
Raspberry Pi Pico 3V3ピン(Picoを裏側・USBを上にした時、左列の上から5番目) -> 変換ピンの10番ピン
Raspberry Pi Pico GNDピン(Picoを裏側・USBを上にした時、左列の上から3番目) -> 変換ピンの8番ピン
Raspberry Pi Pico GP0/UART0 Txピン(Picoを裏側・USBを上にした時、右列の上から1番目) -> 変換ピンの1番ピン
Raspberry Pi Pico GP1/UART0 Rxピン(Picoを裏側・USBを上にした時、右列の上から2番目) -> 変換ピンの2番ピン
変換コネクタとMJ2001は2x5ピンを合わせて接続します。ピンの位置などがずれないように合わせます。
6.Raspberry Pi Pico側: MicroPythonのプログラム書き込みと実行
Thonnyで以下のMicroPythonプログラムを書き込んで実行します。dest_addrは手順4で控えた受信機のアドレスを設定します。受信側のRaspberry Pi Zeroに「count:N」のメッセージが表示されることを確認します。
import machine
import time

PANID="0x11111"
dest_addr="0xABCD"

# initialize UART.
uart = machine.UART(0, 115200)

ct = 0
# initialize subGHz
uart.write('sgi\n')
print(uart.readline())


while True:
    # begin with ch=36,PANID=0x1111
    uart.write("sgb,36,"+PANID+",100,20\n")
    print(uart.readline())

    # send count message
    uart.write("w,count:{}    \n".format(ct))
    print(uart.readline())
    uart.write("sgs,"+PANID+","+dest_addr+"\n")
    print(uart.readline())

    # close
    uart.write("sgc\n")
    print(uart.readline())

    ct=ct+1
    time.sleep(1)
関連情報
・Raspberry Pi ZeroとLazurite MJ2001を接続して、Lazurite上の青LEDをLチカする・Windows10にPython3.9とThonnyをインストールする
0 件のコメント:
コメントを投稿