2019年12月31日火曜日

Bluetooth経由でmicro:bitの温度を取得してM5Stackに表示する

Bluetooth経由でmicro:bitの温度を取得してM5Stackに表示するには、以下の手順を実行します。

1. micro:bitでbluetoothサービスを使用するプログラム作成
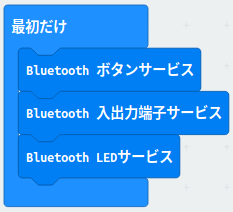
以下のような感じで一通りのbluetoothサービスを最初に追加します
また、ペアリングをしなくても利用できるようにします
2. microbitの温度を取得するプログラム
Arduino IDEから以下のプログラムをM5Stackに書き込みます。microbitのADDRESSは適宜書き換えてください。

#include <M5Stack.h>
#include "BLEDevice.h"

// Address of microbit
#define MYSERVER_ADDRESS "XX:XX:XX:XX:XX:XX"

// Temperature Service
static BLEUUID svcUUID("e95d6100-251d-470a-a062-fa1922dfa9a8");

// Temperature Service - Characteristics
static BLEUUID chUUID("e95d9250-251d-470a-a062-fa1922dfa9a8");

static BLEAddress *pServerAddress;
static BLERemoteCharacteristic* pRemoteCharacteristic;
static BLEClient*  pClient;

void setup()
{
  M5.begin(true, false, true);
  M5.Power.begin();

  M5.Lcd.clear(BLACK);
  M5.Lcd.setTextColor(GREEN);
  M5.Lcd.setTextSize(2);
  M5.Lcd.println(F("Starting..."));

  // init the device.
  BLEDevice::init("");
  pServerAddress = new BLEAddress(MYSERVER_ADDRESS);

  // connect to microbit
  BLEClient* pClient = BLEDevice::createClient();
  pClient->connect(*pServerAddress, BLE_ADDR_TYPE_RANDOM);
  if( pClient->isConnected() == false ){
    M5.Lcd.println("failed to connect the server...");
    delay(2000);
    return;
  }

  // get Service
  BLERemoteService* pRemoteService = pClient->getService(svcUUID);
  if( pRemoteService == nullptr ){
    M5.Lcd.println(F("failed to get service UUID..."));
    delay(2000);
    pClient->disconnect();
    return;
  }

  // get Characteristic
  pRemoteCharacteristic = pRemoteService->getCharacteristic(chUUID);
  if( pRemoteCharacteristic == nullptr ){
    M5.Lcd.println(F("failed to get characteristic UUID..."));
    pClient->disconnect();
    delay(2000);
    return;
  }
}

void loop()
{
  M5.Lcd.clear(BLACK);
  M5.Lcd.setTextSize(4);
  M5.Lcd.setTextColor(YELLOW);
  M5.Lcd.setCursor(80, 100);

  M5.update();
  if( pRemoteCharacteristic->canRead()) {
    // read temperature
    uint8_t value = pRemoteCharacteristic->readUInt8();
      
    M5.Lcd.print("temp:");
    M5.Lcd.println(value);
  }
  delay(2000);
}

3. microbitの温度を取得するプログラムの実行結果

〇参考情報
Bluetooth Developer Studio Level 3 Profile Report


2019年12月30日月曜日

microbitのGrove Shieldに接続したブザーを、USBシリアル通信を通して鳴らす

microbitのGrove Shieldに接続したブザーを、USBシリアル通信を通して鳴らすには、以下の手順を実行します(制御側はRaspberry Pi)。

1. microbitで以下のようにMakeコードでプログラムを作成して、microbitに転送しておきます。

2. Raspberry Piでpyserialのインストール
※pipの場合
pip install pyserial

※pipenvの場合は、以下の手順を実行します
sudo apt-get -y install pipenv

mkdir serial-usb
cd serial-usb
pipenv --python 3.7
pipenv install
pipenv install pyserial
pipenv shell

3. Raspberry Piでプログラムの実行

serial-usb-buzzer.py
import serial
import time

try:
  ser = serial.Serial('/dev/ttyACM0',115200,timeout=None)
  while True:
    ser.write(b"beep_on\n")
    time.sleep(2)
    ser.write(b"beep_off\n")
    time.sleep(4)
finally:
  ser.close()

プログラムの実行
python3 serial-usb-buzzer.py

microbitに接続したGrove ShieldとBuzzer

関連情報

Groveデバイスまとめ

2019年12月29日日曜日

microbitのGrove Shieldに接続した音センサーの値を、USBシリアル通信を通して取得する

microbitのGrove Shieldに接続した音センサーの値を、USBシリアル通信を通して取得するには、以下の手順を実行します(受け側はRaspberry Pi)。

1. microbitで以下のようにMakeコードでプログラムを作成して、microbitに転送しておきます。

2. Raspberry Piでpyserialのインストール
※pipの場合
pip install pyserial

※pipenvの場合は、以下の手順を実行します
sudo apt-get -y install pipenv

mkdir serial-usb
cd serial-usb
pipenv --python 3.7
pipenv install
pipenv install pyserial
pipenv shell

3. Raspberry Piでプログラムの実行

serial-usb-sound-sensor.py
import serial

try:
  ser = serial.Serial('/dev/ttyACM0',115200,timeout=None)
  while True:
    line = ser.readline()
    print("sound sensor:{}".format(line.decode('utf-8').strip()))
finally:
  ser.close()

プログラムの実行
python3 serial-usb-sound-sensor.py

microbitに接続したGrove ShieldとSound Sensor

関連情報

Groveデバイスまとめ

2019年12月28日土曜日

microbitのGrove Shieldに接続した光センサーの値を、USBシリアル通信を通して取得する

microbitのGrove Shieldに接続した光センサーの値を、USBシリアル通信を通して取得するには、以下の手順を実行します(受け側はRaspberry Pi)。

実行手順

1. microbitで以下のようにMakeコードでプログラムを作成して、microbitに転送しておきます。

2. Raspberry Piでpyserialのインストール
※pipの場合
pip install pyserial

※pipenvの場合は、以下の手順を実行します
sudo apt-get -y install pipenv

mkdir serial-usb
cd serial-usb
pipenv --python 3.7
pipenv install
pipenv install pyserial
pipenv shell

3. Raspberry Piでプログラムの実行

serial-usb-light-sensor.py
import serial

try:
  ser = serial.Serial('/dev/ttyACM0',115200,timeout=None)
  while True:
    line = ser.readline()
    print("light sensor:{}".format(line.decode('utf-8').strip()))
finally:
  ser.close()

プログラムの実行
python3 serial-usb-light-sensor.py

microbitに接続したGrove ShieldとLight Sensor

関連情報

・基板を見えないようにするためにGrove Light Sensorのケースを作成する場合は以下の記事を参照してください。
OpenSCADとUltimaker Curaを使用してGrove Light Sensorのケースを作成する

・Raspberry Pi ZeroとGrove Base HATを利用してGrove Light Sensorを接続する場合は、以下の記事を参照してください。
Raspberry Pi ZeroとGrove Base HAT for Raspberry Piと光センサーで、明るさを取得する

Groveデバイスまとめ

2019年12月27日金曜日

microbitのGrove Shieldに接続したボタンの状態を、USBシリアル通信を通して取得する

microbitのGrove Shieldに接続したボタンの状態を、USBシリアル通信を通して取得するには、以下の手順を実行します(受け側はRaspberry Pi)。

1. microbitで以下のようにMakeコードでプログラムを作成して、microbitに転送しておきます。

2. Raspberry Piでpyserialのインストール
※pipの場合
pip install pyserial

※pipenvの場合は、以下の手順を実行します
sudo apt-get -y install pipenv

mkdir serial-usb
cd serial-usb
pipenv --python 3.7
pipenv install
pipenv install pyserial
pipenv shell

3. Raspberry Piでプログラムの実行

serial-usb-button.py
import serial

try:
  ser = serial.Serial('/dev/ttyACM0',115200,timeout=None)
  while True:
    line = ser.readline()
    print("button:{}".format(line.decode('utf-8').strip()))
finally:
  ser.close()

プログラムの実行
python3 serial-usb-button.py

microbitに接続したGrove ShieldとButton

関連情報

Groveデバイスまとめ

2019年12月26日木曜日

microbitのGrove Shieldに接続したタッチセンサーの値を、USBシリアル通信を通して取得する

microbitのGrove Shieldに接続したタッチセンサーの値を、USBシリアル通信を通して取得するには、以下の手順を実行します(受け側はRaspberry Pi)。

1. microbitで以下のようにMakeコードでプログラムを作成して、microbitに転送しておきます。

2. Raspberry Piでpyserialのインストール
※pipの場合
pip install pyserial

※pipenvの場合は、以下の手順を実行します
sudo apt-get -y install pipenv

mkdir serial-usb
cd serial-usb
pipenv --python 3.7
pipenv install
pipenv install pyserial
pipenv shell

3. Raspberry Piでプログラムの実行

serial-usb-touch-sensor.py
import serial

try:
  ser = serial.Serial('/dev/ttyACM0',115200,timeout=None)
  while True:
    line = ser.readline()
    print("touch sensor:{}".format(line.decode('utf-8').strip()))
finally:
  ser.close()

プログラムの実行
python3 serial-usb-touch-sensor.py

microbitに接続したGrove ShieldとTouch Sensor

関連情報

Groveデバイスまとめ

2019年12月25日水曜日

microbitのGrove Shieldに接続したRotary Angleセンサーの値を、USBシリアル通信を通して取得する

microbitのGrove Shieldに接続したRotary Angleセンサーの値を、USBシリアル通信を通して取得するには、以下の手順を実行します(受け側はRaspberry Pi)。

1. microbitで以下のようにMakeコードでプログラムを作成して、microbitに転送しておきます。

2. Raspberry Piでpyserialのインストール
※pipの場合
pip install pyserial

※pipenvの場合は、以下の手順を実行します
sudo apt-get -y install pipenv

mkdir serial-usb
cd serial-usb
pipenv --python 3.7
pipenv install
pipenv install pyserial
pipenv shell

3. Raspberry Piでプログラムの実行

serial-usb-rotary-angle.py
import serial

try:
  ser = serial.Serial('/dev/ttyACM0',115200,timeout=None)
  while True:
    line = ser.readline()
    print("grove rotary angle sensor:{}".format(line.decode('utf-8').strip()))
finally:
  ser.close()

プログラムの実行
python3 serial-usb-rotary-angle.py

microbitに接続したGrove ShieldとRotary Agnle Sensor

関連情報

Groveデバイスまとめ

2019年12月24日火曜日

microbitとRaspberry PiでUSBシリアル通信を通して地磁気センサーの値を取得する

microbitとRaspberry PiでUSBシリアル通信を通して地磁気センサーの値を取得するには、以下の手順を実行します。

1. microbitで以下のようにMakeコードでプログラムを作成して、microbitに転送しておきます。

2. Raspberry Piでpyserialのインストール
※pipの場合
pip install pyserial

※pipenvの場合は、以下の手順を実行します
sudo apt-get -y install pipenv

mkdir serial-usb
cd serial-usb
pipenv --python 3.7
pipenv install
pipenv install pyserial
pipenv shell

3. Raspberry Piでプログラムの実行

serial-usb-magnetometer.py
import serial

try:
  ser = serial.Serial('/dev/ttyACM0',115200,timeout=None)
  while True:
    line = ser.readline()
    ary = line.decode('utf-8').strip().split(',')
    if len(ary) == 3:
      print(ary)
finally:
  ser.close()

プログラムの実行
python3 serial-usb-magnetometer.py

2019年12月23日月曜日

microbitとRaspberry PiでUSBシリアル通信を通して加速度センサーの値を取得する

microbitとRaspberry PiでUSBシリアル通信を通して加速度センサーの値を取得するには、以下の手順を実行します。

1. microbitで以下のようにMakeコードでプログラムを作成して、microbitに転送しておきます。

2. Raspberry Piでpyserialのインストール
※pipの場合
pip install pyserial

※pipenvの場合は、以下の手順を実行します
sudo apt-get -y install pipenv

mkdir serial-usb
cd serial-usb
pipenv --python 3.7
pipenv install
pipenv install pyserial
pipenv shell

3. Raspberry Piでプログラムの実行

serial-usb-accelerometer.py
import serial

try:
  ser = serial.Serial('/dev/ttyACM0',115200,timeout=None)
  while True:
    line = ser.readline()
    ary = line.decode('utf-8').strip().split(',')
    if len(ary) == 3:
      print(ary)
finally:
  ser.close()

プログラムの実行
python3 serial-usb-accelerometer.py

2019年12月22日日曜日

microbitとRaspberry PiでUSBシリアル通信を通して温度を取得する

microbitとRaspberry PiでUSBシリアル通信を通して温度を取得するには、以下の手順を実行します。

1. microbitで以下のようにMakeコードでプログラムを作成して、microbitに転送しておきます。

2. Raspberry Piでpyserialのインストール
※pipの場合
pip install pyserial

※pipenvの場合は、以下の手順を実行します
sudo apt-get -y install pipenv

mkdir serial-usb
cd serial-usb
pipenv --python 3.7
pipenv install
pipenv install pyserial
pipenv shell

3. Raspberry Piでプログラムの実行

serial-usb-temp.py
import serial

try:
  ser = serial.Serial('/dev/ttyACM0',115200,timeout=None)
  while True:
    line = ser.readline()
    print(line.decode('utf-8'))
finally:
  ser.close()

プログラムの実行
python3 serial-usb-temp.py

2019年12月21日土曜日

Raspberry PiからBluetooth経由でmicrobitに接続したGrove超音波距離センサーの値を取得する

Groveシールドで様々なデバイスを利用するすることができます。
以下の手順でmicrobitのP0に接続したGrove超音波距離センサーの値をBluetooth経由でRaspberry Pi上のPythonプログラムで取得する事ができます。

1. Raspberry Piにbluepyをインストール
bluepyをRaspberry Piにインストールするの手順で、bluepyをインストールします

2. micro:bitでbluetoothサービスを使用するプログラム作成
以下のような感じでUART bluetoothサービスを最初に追加します
また、ペアリングをしなくても利用できるようにします
※6桁キーでペアリングしたい場合は「6桁のキーでmicrobitとRaspberry PiをBluetoothペアリングする」を参照してください。

3. Grove超音波距離センサーの値を取得するプログラム

uart_ultrasonic.py
from bluepy import btle

class MyDelegate(btle.DefaultDelegate):
  def __init__(self, TX, RX):
    btle.DefaultDelegate.__init__(self)
    self.TX = TX
    self.RX = RX

  def handleNotification(self, hd, data):
    print("distance: {},{}".format(hd,data.decode('utf-8')))

per = btle.Peripheral("XX:XX:XX:XX:XX:XX", btle.ADDR_TYPE_RANDOM)

# UART Service
svcUART = per.getServiceByUUID("6E400001-B5A3-F393-E0A9-E50E24DCCA9E")
# TX Characteristics
chTX = svcUART.getCharacteristics("6E400002-B5A3-F393-E0A9-E50E24DCCA9E")[0]
ch_cccd=chTX.getDescriptors(forUUID=0x2902)[0]
ch_cccd.write(b"\x03\x00", False)

# RX Characteristics
chRX = svcUART.getCharacteristics("6E400003-B5A3-F393-E0A9-E50E24DCCA9E")[0]

dg = MyDelegate(chTX, chRX)
per.setDelegate( dg )

while True:
  if per.waitForNotifications(0.1):
    continue

4. Grove超音波距離センサーの値を取得するプログラムの実行
python3 uart_ultrasonic.py
distance: 39,102

distance: 39,340

distance: 39,103

〇GroveシールドとGrove超音波距離センサーを接続したmicrobit

関連情報

Groveデバイスまとめ

Bluetooth Developer Studio Level 3 Profile Report


2019年12月20日金曜日

Raspberry PiからBluetooth経由でmicrobitに接続したポテンションメーターの値を取得する

以下の手順でmicrobitのP0に接続したポテンションメーターの値をBluetooth経由でRaspberry Pi上のPythonプログラムで取得する事ができます。 ポテンションメーターを裏側(=つまみがない側)にして端子を上側にしたとき、
・左側から1番目の端子を、microbitのGND
・真ん中の端子を、microbitのP0
・右側から1番目の端子を、microbitの3V
に接続します。

1. Raspberry Piにbluepyをインストール
bluepyをRaspberry Piにインストールするの手順で、bluepyをインストールします

2. micro:bitでbluetoothサービスを使用するプログラム作成
以下のような感じで入出力端子bluetoothサービスを最初に追加します
また、ペアリングをしなくても利用できるようにします
※6桁キーでペアリングしたい場合は「6桁のキーでmicrobitとRaspberry PiをBluetoothペアリングする」を参照してください。

3. ポテンションメーターの値を取得するプログラム

iopin_potentionmeter.py
from bluepy import btle

per = btle.Peripheral("XX:XX:XX:XX:XX:XX", btle.ADDR_TYPE_RANDOM)

class MyDelegate(btle.DefaultDelegate):
  def __init__(self):
    btle.DefaultDelegate.__init__(self)

  def handleNotification(self, hd, data):
    print("Pin{}={}".format(str(data[0]), str(data[1])))

# Without this, the reading of the temperature characteristic fails
#p.setSecurityLevel("medium")

# IO Pin Service
svcIOPIN = per.getServiceByUUID("E95D127B-251D-470A-A062-FA1922DFA9A8")
# pin0 as Analog
chADC = svcIOPIN.getCharacteristics("E95D5899-251D-470A-A062-FA1922DFA9A8")[0]
chADC.write(b"\x01\x00\x00\x00")
# pin0 as Input
chPIOC = svcIOPIN.getCharacteristics("E95DB9FE-251D-470A-A062-FA1922DFA9A8")[0]
chPIOC.write(b"\x01\x00\x00\x00")
# Pin Data
chDATA = svcIOPIN.getCharacteristics("E95D8D00-251D-470A-A062-FA1922DFA9A8")[0]
ch_cccd=chDATA.getDescriptors(forUUID=0x2902)[0]
ch_cccd.write(b"\x01\x00", False)

per.setDelegate(MyDelegate() )

while True:
  if per.waitForNotifications(0.1):
    continue

4. ポテンションメーターの値を取得するプログラムの実行
python3 iopin_potentionmeter.py
Pin0=254
Pin0=255

〇microbit用コネクターブレイクアウトボードとポテンションメーターを接続したmicrobit

〇参考情報
Bluetooth Developer Studio Level 3 Profile Report


2019年12月19日木曜日

Raspberry PiからBluetooth経由でmicrobitに接続したGrove水分センサーの値を取得する

Groveシールドで様々なデバイスを利用するすることができます。
以下の手順でmicrobitのP0に接続したGrove水分センサーの値をBluetooth経由でRaspberry Pi上のPythonプログラムで取得する事ができます。

1. Raspberry Piにbluepyをインストール
bluepyをRaspberry Piにインストールするの手順で、bluepyをインストールします

2. micro:bitでbluetoothサービスを使用するプログラム作成
以下のような感じで入出力端子bluetoothサービスを最初に追加します
また、ペアリングをしなくても利用できるようにします
※6桁キーでペアリングしたい場合は「6桁のキーでmicrobitとRaspberry PiをBluetoothペアリングする」を参照してください。

3. Grove水分センサーの値を取得するプログラム

iopin_moisture_sensor.py
from bluepy import btle

per = btle.Peripheral("XX:XX:XX:XX:XX:XX", btle.ADDR_TYPE_RANDOM)

class MyDelegate(btle.DefaultDelegate):
  def __init__(self):
    btle.DefaultDelegate.__init__(self)

  def handleNotification(self, hd, data):
    print("Pin{}={}".format(str(data[0]), str(data[1])))

# IO Pin Service
svcIOPIN = per.getServiceByUUID("E95D127B-251D-470A-A062-FA1922DFA9A8")
# pin0 as Angle
chADC = svcIOPIN.getCharacteristics("E95D5899-251D-470A-A062-FA1922DFA9A8")[0]
chADC.write(b"\x01\x00\x00\x00")
# pin0 as Input
chPIOC = svcIOPIN.getCharacteristics("E95DB9FE-251D-470A-A062-FA1922DFA9A8")[0]
chPIOC.write(b"\x01\x00\x00\x00")
# Pin Data
chDATA = svcIOPIN.getCharacteristics("E95D8D00-251D-470A-A062-FA1922DFA9A8")[0]
ch_cccd=chDATA.getDescriptors(forUUID=0x2902)[0]
ch_cccd.write(b"\x01\x00", False)

per.setDelegate(MyDelegate() )

while True:
  if per.waitForNotifications(0.1):
    continue

4. Grove水分センサーの値を取得するプログラムの実行
python3 iopin_moisture_sensor.py
Pin0=11
Pin0=10
Pin0=12
Pin0=8

〇GroveシールドとGrove水分センサーを接続したmicrobit

関連情報

Groveデバイスまとめ

Bluetooth Developer Studio Level 3 Profile Report


2019年12月18日水曜日

Raspberry PiからBluetooth経由でmicrobitに接続したGrove LEDを点滅させる

Groveシールドで様々なデバイスを利用するすることができます。
以下の手順でmicrobitのP0に接続したLEDをBluetooth経由でRaspberry Pi上のPythonプログラムから点滅させる事ができます。

1. Raspberry Piにbluepyをインストール
bluepyをRaspberry Piにインストールするの手順で、bluepyをインストールします

2. micro:bitでbluetoothサービスを使用するプログラム作成
以下のような感じで入出力端子bluetoothサービスを最初に追加します
また、ペアリングをしなくても利用できるようにします
※6桁キーでペアリングしたい場合は「6桁のキーでmicrobitとRaspberry PiをBluetoothペアリングする」を参照してください。

3. Grove LEDを点滅させるプログラム

iopin_led.py
from bluepy import btle
import time

per = btle.Peripheral("XX:XX:XX:XX:XX:XX", btle.ADDR_TYPE_RANDOM)

# IO Pin Service
svcIOPIN = per.getServiceByUUID("E95D127B-251D-470A-A062-FA1922DFA9A8")
# pin0 as Digital
chADC = svcIOPIN.getCharacteristics("E95D5899-251D-470A-A062-FA1922DFA9A8")[0]
chADC.write(b"\x00\x00\x00\x00")
# pin0 as Output
chPIOC = svcIOPIN.getCharacteristics("E95DB9FE-251D-470A-A062-FA1922DFA9A8")[0]
chPIOC.write(b"\x00\x00\x00\x00")

# Pin Data
chDATA = svcIOPIN.getCharacteristics("E95D8D00-251D-470A-A062-FA1922DFA9A8")[0]
while True:
  chDATA.write(b"\x00\x01")
  time.sleep(2)
  chDATA.write(b"\x00\x00")
  time.sleep(1)
4.Grove LEDを点滅させるプログラムの実行
python3 iopin_led.py

〇GroveシールドとLEDを接続したmicrobit

関連情報

Groveデバイスまとめ

Bluetooth Developer Studio Level 3 Profile Report


2019年12月17日火曜日

Raspberry PiからBluetooth経由でmicrobitに接続したGrove音センサーの値を取得する

Groveシールドで様々なデバイスを利用するすることができます。
以下の手順でmicrobitのP0に接続したGrove音センサーの値をBluetooth経由でRaspberry Pi上のPythonプログラムから取得する事ができます。

1. Raspberry Piにbluepyをインストール
bluepyをRaspberry Piにインストールするの手順で、bluepyをインストールします

2. micro:bitでbluetoothサービスを使用するプログラム作成
以下のような感じで入出力端子bluetoothサービスを最初に追加します
また、ペアリングをしなくても利用できるようにします
※6桁キーでペアリングしたい場合は「6桁のキーでmicrobitとRaspberry PiをBluetoothペアリングする」を参照してください。

3. Grove音センサーの値を取得するプログラム

iopin_sound_sensor.py
from bluepy import btle

per = btle.Peripheral("XX:XX:XX:XX:XX:XX", btle.ADDR_TYPE_RANDOM)

class MyDelegate(btle.DefaultDelegate):
  def __init__(self):
    btle.DefaultDelegate.__init__(self)

  def handleNotification(self, hd, data):
    print("Pin{}={}".format(str(data[0]), str(data[1])))

# IO Pin Service
svcIOPIN = per.getServiceByUUID("E95D127B-251D-470A-A062-FA1922DFA9A8")
# pin0 as Angle
chADC = svcIOPIN.getCharacteristics("E95D5899-251D-470A-A062-FA1922DFA9A8")[0]
chADC.write(b"\x01\x00\x00\x00")
# pin0 as Input
chPIOC = svcIOPIN.getCharacteristics("E95DB9FE-251D-470A-A062-FA1922DFA9A8")[0]
chPIOC.write(b"\x01\x00\x00\x00")
# Pin Data
chDATA = svcIOPIN.getCharacteristics("E95D8D00-251D-470A-A062-FA1922DFA9A8")[0]
ch_cccd=chDATA.getDescriptors(forUUID=0x2902)[0]
ch_cccd.write(b"\x01\x00", False)

per.setDelegate(MyDelegate() )

while True:
  if per.waitForNotifications(0.1):
    continue

4. Grove音センサーの値を取得するプログラムの実行
python3 iopin_sound_sensor.py
Pin0=166
Pin0=165
Pin0=189

〇GroveシールドとGrove音センサーを接続したmicrobit

関連情報

Groveデバイスまとめ

Bluetooth Developer Studio Level 3 Profile Report


2019年12月16日月曜日

Raspberry PiからBluetooth経由でmicrobitに接続したGroveのブザーを鳴らす

Groveシールドで様々なデバイスを利用するすることができます。
以下の手順でmicrobitのP0に接続したブザーをBluetooth経由でRaspberry Pi上のPythonプログラムから鳴らすことができます。

1. Raspberry Piにbluepyをインストール
bluepyをRaspberry Piにインストールするの手順で、bluepyをインストールします

2. micro:bitでbluetoothサービスを使用するプログラム作成
以下のような感じで入出力端子bluetoothサービスを最初に追加します
また、ペアリングをしなくても利用できるようにします
※6桁キーでペアリングしたい場合は「6桁のキーでmicrobitとRaspberry PiをBluetoothペアリングする」を参照してください。

3. Groveのブザーを3秒間鳴らすプログラム

iopin_buzzer.py
from bluepy import btle
import time

per = btle.Peripheral("XX:XX:XX:XX:XX:XX", btle.ADDR_TYPE_RANDOM)

# IO Pin Service
svcIOPIN = per.getServiceByUUID("E95D127B-251D-470A-A062-FA1922DFA9A8")
# pin0 as Digital
chADC = svcIOPIN.getCharacteristics("E95D5899-251D-470A-A062-FA1922DFA9A8")[0]
chADC.write(b"\x00\x00\x00\x00")
# pin0 as Output
chPIOC = svcIOPIN.getCharacteristics("E95DB9FE-251D-470A-A062-FA1922DFA9A8")[0]
chPIOC.write(b"\x00\x00\x00\x00")

# Pin Data
chDATA = svcIOPIN.getCharacteristics("E95D8D00-251D-470A-A062-FA1922DFA9A8")[0]
chDATA.write(b"\x00\x01")
time.sleep(3)
chDATA.write(b"\x00\x00")

4.Groveのブザーを鳴らすプログラムの実行
python3 iopin_buzzer.py.py

〇Groveシールドとブザーを接続したmicrobit

関連情報

Groveデバイスまとめ

Bluetooth Developer Studio Level 3 Profile Report


2019年12月15日日曜日

Raspberry PiからBluetooth経由でmicrobitに接続したGrove Rotary Angleセンサーの値を取得する

Groveシールドで様々なデバイスを利用するすることができます。
以下の手順でmicrobitのP0に接続したRotary Angleセンサーの値をBluetooth経由でRaspberry Pi上のPythonプログラムから取得する事ができます。

1. Raspberry Piにbluepyをインストール
bluepyをRaspberry Piにインストールするの手順で、bluepyをインストールします

2. micro:bitでbluetoothサービスを使用するプログラム作成
以下のような感じで入出力端子bluetoothサービスを最初に追加します
また、ペアリングをしなくても利用できるようにします
※6桁キーでペアリングしたい場合は「6桁のキーでmicrobitとRaspberry PiをBluetoothペアリングする」を参照してください。

3. Rotary Angleセンサーの値を取得するプログラム

iopin_rotary_angle.py
from bluepy import btle

per = btle.Peripheral("XX:XX:XX:XX:XX:XX", btle.ADDR_TYPE_RANDOM)

class MyDelegate(btle.DefaultDelegate):
  def __init__(self):
    btle.DefaultDelegate.__init__(self)

  def handleNotification(self, hd, data):
    print("Pin{}={}".format(str(data[0]), str(data[1])))

# Without this, the reading of the temperature characteristic fails
#p.setSecurityLevel("medium")

# IO Pin Service
svcIOPIN = per.getServiceByUUID("E95D127B-251D-470A-A062-FA1922DFA9A8")
# pin0 as Angle
chADC = svcIOPIN.getCharacteristics("E95D5899-251D-470A-A062-FA1922DFA9A8")[0]
chADC.write(b"\x01\x00\x00\x00")
# pin0 as Input
chPIOC = svcIOPIN.getCharacteristics("E95DB9FE-251D-470A-A062-FA1922DFA9A8")[0]
chPIOC.write(b"\x01\x00\x00\x00")
# Pin Data
chDATA = svcIOPIN.getCharacteristics("E95D8D00-251D-470A-A062-FA1922DFA9A8")[0]
ch_cccd=chDATA.getDescriptors(forUUID=0x2902)[0]
ch_cccd.write(b"\x01\x00", False)

per.setDelegate(MyDelegate() )

while True:
  if per.waitForNotifications(0.1):
    continue
4. Rotary Angleセンサーの値を取得するプログラムの実行
python3 iopin_rotary_angle.py
Pin0=254
Pin0=255

〇GroveシールドとRotary Angleセンサーを接続したmicrobit

関連情報

Groveデバイスまとめ

Bluetooth Developer Studio Level 3 Profile Report


2019年12月14日土曜日

Raspberry PiからBluetooth経由でmicrobitに接続したGroveタッチセンサーの値を取得する

Groveシールドで様々なデバイスを利用するすることができます。
以下の手順でmicrobitのP0に接続したタッチセンサーの値をBluetooth経由でRaspberry Pi上のPythonプログラムから取得する事ができます。

1. Raspberry Piにbluepyをインストール
bluepyをRaspberry Piにインストールするの手順で、bluepyをインストールします

2. micro:bitでbluetoothサービスを使用するプログラム作成
以下のような感じで入出力端子bluetoothサービスを最初に追加します
また、ペアリングをしなくても利用できるようにします
※6桁キーでペアリングしたい場合は「6桁のキーでmicrobitとRaspberry PiをBluetoothペアリングする」を参照してください。

3. Groveタッチセンサーの値を取得するプログラム

iopin_touch_sensor.py
from bluepy import btle

per = btle.Peripheral("XX:XX:XX:XX:XX:XX", btle.ADDR_TYPE_RANDOM)

class MyDelegate(btle.DefaultDelegate):
  def __init__(self):
    btle.DefaultDelegate.__init__(self)

  def handleNotification(self, hd, data):
    print("Pin{}={}".format(str(data[0]), str(data[1])))

# IO Pin Service
svcIOPIN = per.getServiceByUUID("E95D127B-251D-470A-A062-FA1922DFA9A8")
# pin0 as Digital
chADC = svcIOPIN.getCharacteristics("E95D5899-251D-470A-A062-FA1922DFA9A8")[0]
chADC.write(b"\x00\x00\x00\x00")
# pin0 as Input
chPIOC = svcIOPIN.getCharacteristics("E95DB9FE-251D-470A-A062-FA1922DFA9A8")[0]
chPIOC.write(b"\x01\x00\x00\x00")
# Pin Data
chDATA = svcIOPIN.getCharacteristics("E95D8D00-251D-470A-A062-FA1922DFA9A8")[0]
ch_cccd=chDATA.getDescriptors(forUUID=0x2902)[0]
ch_cccd.write(b"\x01\x00", False)

per.setDelegate(MyDelegate() )

while True:
  if per.waitForNotifications(0.1):
    continue

4. Groveタッチセンサーの値を取得するプログラムの実行
python3 iopin_touch_sensor.py
Pin0=1
Pin0=0

〇Groveシールドとタッチセンサーを接続したmicrobit

関連情報

Groveデバイスまとめ

Bluetooth Developer Studio Level 3 Profile Report


2019年12月13日金曜日

Raspberry PiからBluetooth経由でmicrobitに接続したGroveボタンの値を取得する

Groveシールドで様々なデバイスを利用するすることができます。
以下の手順でmicrobitのP0に接続したGroveボタンの値をBluetooth経由でRaspberry Pi上のPythonプログラムから取得する事ができます。

1. Raspberry Piにbluepyをインストール
bluepyをRaspberry Piにインストールするの手順で、bluepyをインストールします

2. micro:bitでbluetoothサービスを使用するプログラム作成
以下のような感じで入出力端子bluetoothサービスを最初に追加します
また、ペアリングをしなくても利用できるようにします
※6桁キーでペアリングしたい場合は「6桁のキーでmicrobitとRaspberry PiをBluetoothペアリングする」を参照してください。

3. Groveボタンの値を取得するプログラム

iopin_button.py
from bluepy import btle

per = btle.Peripheral("XX:XX:XX:XX:XX:XX", btle.ADDR_TYPE_RANDOM)

class MyDelegate(btle.DefaultDelegate):
  def __init__(self):
    btle.DefaultDelegate.__init__(self)

  def handleNotification(self, hd, data):
    print("Pin{}={}".format(str(data[0]), str(data[1])))

# IO Pin Service
svcIOPIN = per.getServiceByUUID("E95D127B-251D-470A-A062-FA1922DFA9A8")
# pin0 as Digital
chADC = svcIOPIN.getCharacteristics("E95D5899-251D-470A-A062-FA1922DFA9A8")[0]
chADC.write(b"\x00\x00\x00\x00")
# pin0 as Input
chPIOC = svcIOPIN.getCharacteristics("E95DB9FE-251D-470A-A062-FA1922DFA9A8")[0]
chPIOC.write(b"\x01\x00\x00\x00")
# Pin Data
chDATA = svcIOPIN.getCharacteristics("E95D8D00-251D-470A-A062-FA1922DFA9A8")[0]
ch_cccd=chDATA.getDescriptors(forUUID=0x2902)[0]
ch_cccd.write(b"\x01\x00", False)

per.setDelegate(MyDelegate() )

while True:
  if per.waitForNotifications(0.1):
    continue
4. Groveボタンの値を取得するプログラムの実行
python3 iopin_button.py
Pin0=1
Pin0=0

〇Groveシールドとボタンを接続したmicrobit

関連情報

Bluetooth Developer Studio Level 3 Profile Report


Groveデバイスまとめ

2019年12月12日木曜日

Raspberry PiからBluetooth経由でmicrobitに接続したGrove光センサーの値を取得する

Groveシールドで様々なデバイスを利用するすることができます。
以下の手順でmicrobitのP0に接続した光センサーの値をBluetooth経由でRaspberry Pi上のPythonプログラムから取得する事ができます。

1. Raspberry Piにbluepyをインストール
bluepyをRaspberry Piにインストールするの手順で、bluepyをインストールします

2. micro:bitでbluetoothサービスを使用するプログラム作成
以下のような感じで入出力端子bluetoothサービスを最初に追加します
また、ペアリングをしなくても利用できるようにします
※6桁キーでペアリングしたい場合は「6桁のキーでmicrobitとRaspberry PiをBluetoothペアリングする」を参照してください。

3. 光センサーの値を取得するプログラム

iopin-light-sensor.py
from bluepy import btle

per = btle.Peripheral("XX:XX:XX:XX:XX:XX", btle.ADDR_TYPE_RANDOM)

# IO Pin Service
svcIOPIN = per.getServiceByUUID("E95D127B-251D-470A-A062-FA1922DFA9A8")

# pin0 as Analog
chADC = svcIOPIN.getCharacteristics("E95D5899-251D-470A-A062-FA1922DFA9A8")[0]
chADC.write(b"\x01\x00\x00\x00")

# pin0 as Input
chPIOC = svcIOPIN.getCharacteristics("E95DB9FE-251D-470A-A062-FA1922DFA9A8")[0]
chPIOC.write(b"\x01\x00\x00\x00")

# Pin Data
chDATA = svcIOPIN.getCharacteristics("E95D8D00-251D-470A-A062-FA1922DFA9A8")[0]
ba = chDATA.read()
print("Pin{}={}".format(str(ba[0]), str(ba[1])))
4. 光センサーの値を取得するプログラムの実行
$ python3 iopin-light-sensor.py
Pin0=60

〇Groveシールドと光センサーを接続したmicrobit

〇参考情報
Bluetooth Developer Studio Level 3 Profile Report

・基板を見えないようにするためにGrove Light Sensorのケースを作成する場合は以下の記事を参照してください。
OpenSCADとUltimaker Curaを使用してGrove Light Sensorのケースを作成する

・Raspberry Pi ZeroとGrove Base HATを利用してGrove Light Sensorを接続する場合は、以下の記事を参照してください。
Raspberry Pi ZeroとGrove Base HAT for Raspberry Piと光センサーで、明るさを取得する

Groveデバイスまとめ

2019年12月11日水曜日

Raspberry PiからBluetooth経由のUARTでmicrobitと通信する

Raspberry PiからBluetooth経由でUARTでmicrobitと通信するには、以下の手順を実行します。

1. Raspberry Piにbluepyをインストール
bluepyをRaspberry Piにインストールするの手順で、bluepyをインストールします

2. micro:bitでbluetoothサービスを使用するプログラム作成
以下のような感じでUARTサービスを最初に追加します
また、ペアリングをしなくても利用できるようにします
※6桁キーでペアリングしたい場合は「6桁のキーでmicrobitとRaspberry PiをBluetoothペアリングする」を参照してください。

3. 地磁気センサーの値を取得するプログラム
uart.py
from bluepy import btle

class MyDelegate(btle.DefaultDelegate):
  def __init__(self, TX, RX):
    btle.DefaultDelegate.__init__(self)
    self.TX = TX
    self.RX = RX

  def handleNotification(self, hd, data):
    print("notification: {},{}".format(hd,ord(data)))
    chRX.write("pressed!\n".encode("utf-8"))

per = btle.Peripheral("XX:XX:XX:XX:XX:XX", btle.ADDR_TYPE_RANDOM)

# UART Service
svcUART = per.getServiceByUUID("6E400001-B5A3-F393-E0A9-E50E24DCCA9E")
# TX Characteristics
chTX = svcUART.getCharacteristics("6E400002-B5A3-F393-E0A9-E50E24DCCA9E")[0]
ch_cccd=chTX.getDescriptors(forUUID=0x2902)[0]
ch_cccd.write(b"\x03\x00", False)

# RX Characteristics
chRX = svcUART.getCharacteristics("6E400003-B5A3-F393-E0A9-E50E24DCCA9E")[0]

dg = MyDelegate(chTX, chRX)
per.setDelegate( dg )

chRX.write("start!\n".encode("utf-8"))
while True:
  if per.waitForNotifications(0.1):
    continue

4. Bluetooth経由のUARTでmicrobitと通信するプログラムの実行
$ python3  python3 uart.py
notification: 39,66
notification: 39,65

〇参考情報
Bluetooth Developer Studio Level 3 Profile Report