2018年6月4日月曜日

DokcerでphpMyAdmin、Percona Serverのコンテナを構築する

phpMyAdminでPercona Serverをwebインターフェイスから操作することができます。

○phpMyAdminの画面

コンテナ構築後、ブラウザからhttp://<dokcerホスト>:8080/にアクセスします。ユーザ名/ホスト名にはroot/ROOT_PASSWORDまたはAPP_USER/APP_PASSWORDを指定します。

○構築方法
以下のdocker-compose.ymlファイルを使用して、phpMyAdmin、MariaDBのコンテナを構築する事ができます。
docker-compose up -d

docker-compose.yml
version: '2'
services:
  db:
    image: percona:5.7
    container_name: db
    command: mysqld --character-set-server=utf8mb4 --collation-server=utf8mb4_unicode_ci
    environment:
      MYSQL_DATABASE: APP_DB
      MYSQL_USER: APP_USER
      MYSQL_PASSWORD: APP_PASSWORD
      MYSQL_ROOT_PASSWORD: ROOT_PASSWORD
    ports:
      - "3306:3306"
    volumes:
      - db-data:/var/lib/mysql
  phpmyadmin:
    image: phpmyadmin/phpmyadmin:4.7
    container_name: phpmyadmin
    ports:
      - 8080:80
    environment:
      PMA_HOST: db
      PMA_VERBOSE: APP_DB
      PMA_PORT: 3306
    depends_on:
      - db
volumes:
  db-data:
    driver: local


〇関連情報
・phpMyAdminに関する他の情報はこちらを参照してください。

・プロジェクトwebサイト
https://www.phpmyadmin.net/

2018年6月3日日曜日

VagrantでDocker CEとDocker Composeをインストールした仮想マシン(Ubuntu18.04)を構築する

DockerとDocker Composeで、コンテナの構築・管理を行うことができます。

○構築方法
以下のVagrantfileを使用して、Docker CEとDocker Composeをインストールした仮想マシンを構築できます。

Vagrantfile
VAGRANTFILE_API_VERSION = "2"

Vagrant.configure(VAGRANTFILE_API_VERSION) do |config|
  config.vm.box = "bento/ubuntu-18.04"
  config.vm.hostname = "ub1804docker"
  config.vm.provider :virtualbox do |vbox|
     vbox.name = "ub1804docker"
     vbox.cpus = 4
     vbox.memory = 4096
     vbox.customize ["modifyvm", :id, "--nicpromisc2","allow-all"]
  end
config.vm.network "private_network", ip: "192.168.55.108", :netmask => "255.255.255.0"
config.vm.network "public_network", ip:"192.168.1.108", :netmask => "255.255.255.0"
  config.vm.provision "shell", inline: <<-SHELL
# update packages
apt-get update
#DEBIAN_FRONTEND=noninteractive apt-get -y -o Dpkg::Options::="--force-confdef" -o Dpkg::Options::="--force-confold" upgrade
locale-gen ja_JP.UTF-8
localectl set-locale LANG=ja_JP.UTF-8

# install docker-ce
apt-get -y install apt-transport-https ca-certificates curl gnupg2 software-properties-common
curl -fsSL https://download.docker.com/linux/$(. /etc/os-release; echo "$ID")/gpg | sudo apt-key add -
apt-key fingerprint 0EBFCD88
add-apt-repository \
   "deb [arch=amd64] https://download.docker.com/linux/$(. /etc/os-release; echo "$ID") \
   $(lsb_release -cs) \
   stable test edge"
apt-get update
apt-get -y install docker-ce

groupadd docker
adduser vagrant docker
systemctl enable docker
docker version

# install docker compose
curl -L https://github.com/docker/compose/releases/download/1.21.2/docker-compose-`uname -s`-`uname -m` -o /usr/local/bin/docker-compose
chmod +x /usr/local/bin/docker-compose
docker-compose --version

SHELL
end

LXDでApache Cassandraをインストールしたコンテナ(Ubuntu18.04)を構築する

Apache Cassandraはjava製の分散データベースです。

〇構築方法
以下のコマンドを実行して1ノード構成のCassandraを構築することができます。
インストールと合わせて認証の設定とテストテーブルの作成・選択も実行します。
lxc init ubuntu:18.04 ub1804cassandra
lxc config set ub1804cassandra user.user-data - < config.yml
lxc start ub1804cassandra

config.yml
#cloud-config

package_upgrade: true

hostname: ub1804cassandra
manage_etc_hosts: true

write_files:
  - path: /tmp/sample.cql
    content: |
      create keyspace mykeyspace with replication = {'class':'SimpleStrategy', 'replication_factor':1};
      use mykeyspace;
      create table mytable (
      name text PRIMARY KEY,
      value text
      );
      insert into mytable (name, value) values ('test1', 'cassandra');
      select * from mytable;

runcmd:
  - "apt-get update"
  - "apt-get -y install curl"
  - 'echo "deb http://www.apache.org/dist/cassandra/debian 311x main" >> /etc/apt/sources.list.d/cassandra.sources.list'
  - 'curl https://www.apache.org/dist/cassandra/KEYS | apt-key add -'
  - 'apt-get update'
  - 'apt-get -y install cassandra'
  - 'sed -i -e "s/authenticator: AllowAllAuthenticator/authenticator: PasswordAuthenticator/" /etc/cassandra/cassandra.yaml'
  - "systemctl enable cassandra.service"
  - "systemctl start cassandra.service"
  - "while netstat -lnt | awk '$4 ~ /:9042$/ {exit 1}'; do sleep 10; done"
  - "sleep 10"
  - "cqlsh -u cassandra -p cassandra -f /tmp/sample.cql >> /tmp/output.log"

final_message: "completed."

〇コンテナのIPを調べる
コンテナのIPは以下のコマンドで調べることができます。
lxc list

〇ホストマシンの外部からコンテナにアクセスしたい場合
以下のコマンドを実行します。
PORT=9042 PUBLIC_IP=<ホストのIP> CONTAINER_IP=<コンテナのIP> sudo -E bash -c 'iptables -t nat -I PREROUTING -i eth0 -p TCP -d $PUBLIC_IP --dport $PORT -j DNAT --to-destination $CONTAINER_IP:$PORT -m comment --comment "container"'

〇コンテナに入る
lxc exec ub1804cassandra /bin/bash

〇コンテナの停止
lxc stop ub1804cassandra

〇コンテナの削除
lxc delete ub1804cassandra


○関連情報
・Apache Cassandraに関する他の記事はこちらを参照してください。

VagrantでApache SupersetとPercona Serverをインストールした仮想マシン(CentOS7.4)を構築する

Apache SupersetはPython製のデータ可視化ツールです。

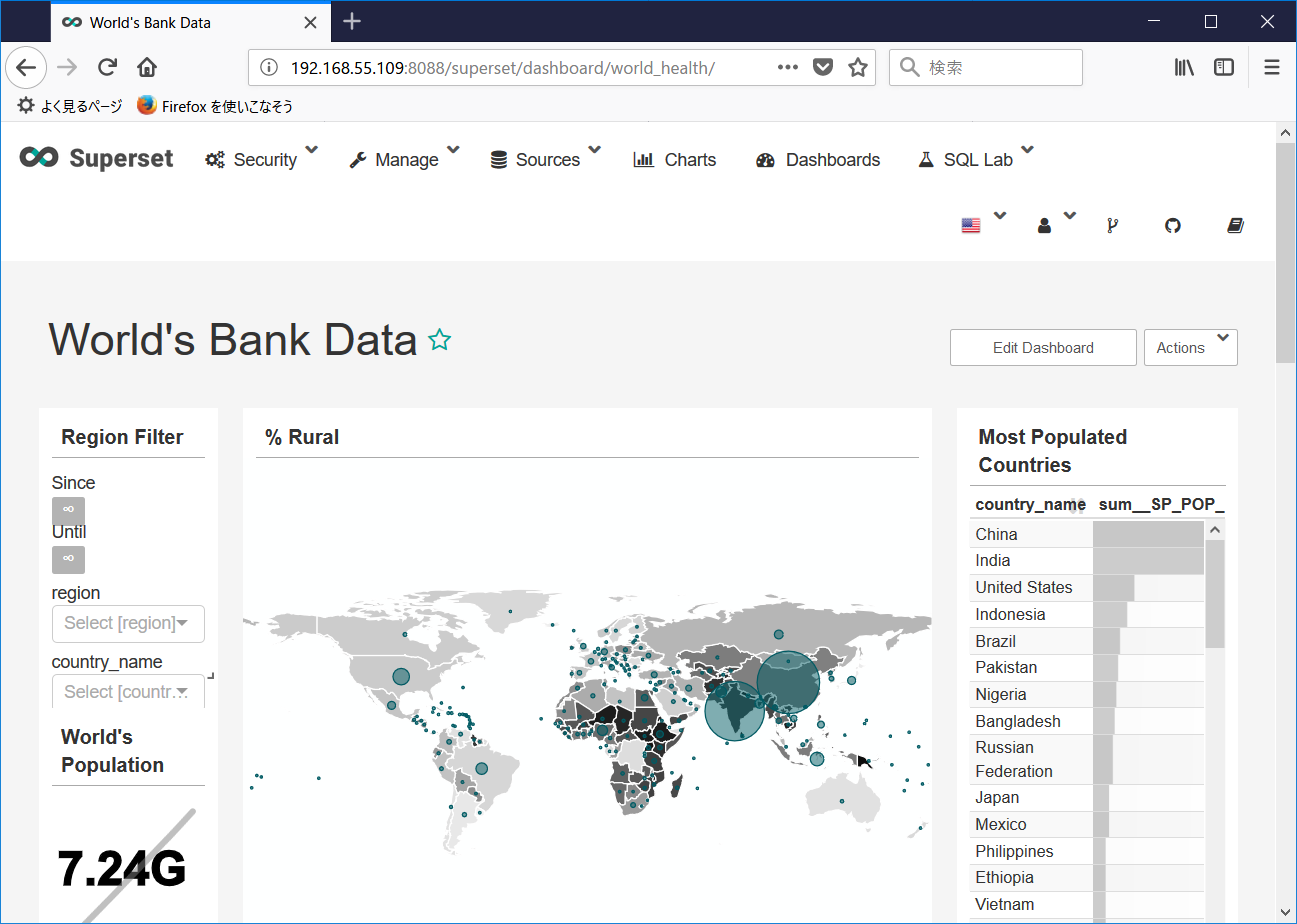
○Apache Supersetの画面


○構築方法
以下のVagrantfileを使用して、Apache SupersetとPercona Serverをインストールした仮想マシン(CentOS7.4)を構築する事ができます。
仮想マシンが構築された後、ブラウザからhttp://192.168.55.109:8088/にアクセスします。
デフォルトユーザ名はadmin、パスワードもadminです。

Vagrantfile
VAGRANTFILE_API_VERSION = "2"

Vagrant.configure(VAGRANTFILE_API_VERSION) do |config|
  config.vm.box = "bento/centos-7.4"
  config.vm.hostname = "co74supersetpercona"
  config.vm.provider :virtualbox do |vbox|
     vbox.name = "co74supersetpercona"
     vbox.cpus = 2
     vbox.memory = 2048
     vbox.customize ["modifyvm", :id, "--nicpromisc2","allow-all"]
  end
config.vm.network "private_network", ip: "192.168.55.109", :netmask => "255.255.255.0"
config.vm.network "public_network", ip:"192.168.1.109", :netmask => "255.255.255.0"
  config.vm.provision "shell", inline: <<-SHELL
localectl set-locale LANG=ja_JP.UTF-8

# install Percona Server
yum -y install http://www.percona.com/downloads/percona-release/redhat/0.1-4/percona-release-0.1-4.noarch.rpm
yum -y install Percona-Server-server-57
service mysql start

export MYSQL_ROOTPWD='Root123#'
export MYSQL_PWD=`cat /var/log/mysqld.log | awk '/temporary password/ {print $NF}'`
mysql -uroot -p$MYSQL_PWD --connect-expired-password -e "SET PASSWORD = PASSWORD('$MYSQL_ROOTPWD');"
mysql -uroot -p$MYSQL_ROOTPWD --connect-expired-password -e "UNINSTALL PLUGIN validate_password;"
mysql -uroot -p$MYSQL_ROOTPWD --connect-expired-password -e "SET PASSWORD = PASSWORD('root'); FLUSH PRIVILEGES;"

mysql -uroot -proot -e "CREATE DATABASE test DEFAULT CHARACTER SET utf8;"
mysql -uroot -proot -e "CREATE USER test@localhost IDENTIFIED BY 'test';"
mysql -uroot -proot -e "GRANT ALL PRIVILEGES ON test.* TO 'test'@'localhost';"
mysql -uroot -proot -e "FLUSH PRIVILEGES;"
mysql -utest -ptest test -e "create table messages (message_id integer not null, message varchar(100));"
mysql -utest -ptest test -e "insert into messages value (1, 'hello world.');"
mysql -utest -ptest test -e "insert into messages value (2, 'test message.');"

# install anaconda
wget https://repo.continuum.io/archive/Anaconda3-5.1.0-Linux-x86_64.sh
chmod +x Anaconda3-5.1.0-Linux-x86_64.sh
./Anaconda3-5.1.0-Linux-x86_64.sh -b -p /opt/anaconda
source /opt/anaconda/bin/activate
#pip install --upgrade pip

# install dependencies
yum -y install epel-release python-devel gcc-c++ openldap-devel openssl-devel mysql-devel

# install mysqlclient
pip install mysqlclient

pip install --upgrade setuptools
pip install superset
pip install cryptography --upgrade
mkdir -p /opt/superset
cd /opt/superset
fabmanager create-admin --app superset --username admin --firstname admin --lastname user --email admin@localhost.localdomain --password admin
superset db upgrade
superset load_examples
superset init
superset runserver -a 0.0.0.0 &
echo 'access http://192.168.55.109:8088/'
echo 'user:admin, password: admin'

SHELL
end

○データソースの追加
同じ仮想マシンにインストールされたPercona Serverに接続するには、以下の画面のようにSQLAlchemy URIにmysql://test:test@localhost/testを指定します。


2018年6月2日土曜日

VagrantでBluefish、Gnomeデスクトップ環境、XRDPがインストールされた仮想マシン(Ubuntu18.04)を構築する

Bluefishは様々なマークアップ/コンピュータ言語に対応したエディタです。

○Bluefishの画面


構築方法

以下のVagrantfileを使用して、Bluefish 、Gnomeデスクトップ環境、XRDPをインストールした仮想マシン(Ubuntu18.04) を構築できます。
XRDPがインストールされているので、Windowsのリモートデスクトップで接続することができます。ユーザ名はvagrant、パスワードもvagrantでログオンできます。

Vagrantfile
VAGRANTFILE_API_VERSION = "2"

Vagrant.configure(VAGRANTFILE_API_VERSION) do |config|
  config.vm.box = "bento/ubuntu-18.04"
  config.vm.hostname = "ub1804gnomebluefish"
  config.vm.provider :virtualbox do |vbox|
     vbox.name = "ub1804gnomebluefish"
     vbox.cpus = 4
     vbox.memory = 4096
     vbox.gui = true
  end
  # bridge netwrok
config.vm.network "public_network", ip: "192.168.1.103", :netmask => "255.255.255.0"
  config.vm.provision "shell", inline: <<-SHELL
sed -i.bak -e "s#http://archive.ubuntu.com/ubuntu#http://ftp.riken.jp/pub/Linux/ubuntu#g" /etc/apt/sources.list
apt-get update
DEBIAN_FRONTEND=noninteractive apt-get -y -o Dpkg::Options::="--force-confdef" -o Dpkg::Options::="--force-confold" upgrade
apt-get -y install language-pack-ja
localectl set-locale LANG=ja_JP.UTF-8
localectl set-keymap jp106

apt-get -y install xrdp fcitx-mozc ubuntu-desktop  virtualbox-guest-dkms virtualbox-guest-utils virtualbox-guest-x11
im-config -n fcitx

sed -i -e "s/allowed_users=console/allowed_users=anybody/" /etc/X11/Xwrapper.config

cat << EOF >> /etc/polkit-1/localauthority/50-local.d/allow-colord.pkla
[Allow colord for all users]
Identity=unix-user:*
Action=org.freedesktop.color-manager.create-device;org.freedesktop.color-manager.create-profile;org.freedesktop.color-manager.delete-device;org.freedesktop.color-manager.delete-profile;org.freedesktop.color-manager.modify-device;org.freedesktop.color-manager.modify-profile
ResultAny=no
ResualtInactive=no
ResultActive=yes
EOF
systemctl restart polkit

# install Bluefish
apt-get -y install bluefish

init 5
SHELL
end

関連情報

・Bluefishに関する他の記事はこちらを参照してください。

VagrantでApache SupersetとPostgreSQLをインストールした仮想マシン(CentOS7.4)を構築する

Apache SupersetはPython製のデータ可視化ツールです。

○Apache Supersetの画面


○構築方法
以下のVagrantfileを使用して、Apache SupersetとPostgreSQLをインストールした仮想マシン(CentOS7.4)を構築する事ができます。
仮想マシンが構築された後、ブラウザからhttp://192.168.55.109:8088/にアクセスします。
デフォルトユーザ名はadmin、パスワードもadminです。

Vagrantfile
VAGRANTFILE_API_VERSION = "2"

Vagrant.configure(VAGRANTFILE_API_VERSION) do |config|
  config.vm.box = "bento/centos-7.4"
  config.vm.hostname = "co74supersetpg"
  config.vm.provider :virtualbox do |vbox|
     vbox.name = "co74supersetpg"
     vbox.cpus = 2
     vbox.memory = 2048
     vbox.customize ["modifyvm", :id, "--nicpromisc2","allow-all"]
  end
config.vm.network "private_network", ip: "192.168.55.109", :netmask => "255.255.255.0"
config.vm.network "public_network", ip:"192.168.1.109", :netmask => "255.255.255.0"
  config.vm.provision "shell", inline: <<-SHELL
localectl set-locale LANG=ja_JP.UTF-8

# download and install postgresql.
wget https://download.postgresql.org/pub/repos/yum/9.6/redhat/rhel-7-x86_64/pgdg-centos96-9.6-3.noarch.rpm
rpm -Uvh pgdg-centos96-9.6-3.noarch.rpm
yum -y update
yum -y install postgresql96-server postgresql96-devel postgresql96-contrib
systemctl enable postgresql-9.6

# initialize postgresql server
/usr/pgsql-9.6/bin/postgresql96-setup initdb
echo "listen_addresses='*'" >> /var/lib/pgsql/9.6/data/postgresql.conf
sed -i 's/host.*all.*all.*127.0.0.1/#host    all             all             127.0.0.1/g' /var/lib/pgsql/9.6/data/pg_hba.conf
sed -i 's|host.*all.*all.*::1/128|#host    all             all             ::1/128|g' /var/lib/pgsql/9.6/data/pg_hba.conf
echo "host    all         all         127.0.0.1/32          password" >> /var/lib/pgsql/9.6/data/pg_hba.conf
echo "host    all         all         192.168.1.0/24          password" >> /var/lib/pgsql/9.6/data/pg_hba.conf
echo "host    all         all         192.168.55.0/24          password" >> /var/lib/pgsql/9.6/data/pg_hba.conf
systemctl start postgresql-9.6.service
su - postgres << EOF
createdb -T template0 --locale=ja_JP.UTF-8 --encoding=UTF8 test
psql -c "
alter user postgres with password 'postgres';
create user test with password 'test';
grant all privileges on database test to test;
"
export PGPASSWORD=test
psql -h 192.168.55.109 -U test -c "
create table messages (message_id integer not null, message varchar(100));
insert into messages values (1, 'hello world.');
insert into messages values (2, 'test message.');
" test
EOF
echo "postgres:postgres" | chpasswd
systemctl restart postgresql-9.6.service

# install anaconda
wget https://repo.continuum.io/archive/Anaconda3-5.1.0-Linux-x86_64.sh
chmod +x Anaconda3-5.1.0-Linux-x86_64.sh
./Anaconda3-5.1.0-Linux-x86_64.sh -b -p /opt/anaconda
source /opt/anaconda/bin/activate

# install psycopg2
yum -y install gcc gcc-c++ openldap-devel openssl-devel
pip install psycopg2-binary

pip install --upgrade setuptools
pip install superset
pip install cryptography --upgrade
mkdir -p /opt/superset
cd /opt/superset
fabmanager create-admin --app superset --username admin --firstname admin --lastname user --email admin@localhost.localdomain --password admin
superset db upgrade
superset load_examples
superset init
superset runserver -a 0.0.0.0 &
echo 'access http://192.168.55.109:8088/'
echo 'user:admin, password: admin'

SHELL
end

○データソースの追加
同じ仮想マシンにインストールされたPostgreSQLに接続するには、以下の画面のようにSQLAlchemy URIにpostgresql+psycopg2://test:test@localhost/testを指定します。


○関連情報
・psycopg2に関する他の記事はこちらを参照してください。

VagrantでPercona ToolkitとMariaDBがインストールされた仮想マシン(Ubuntu16.04)を構築する

Percona ToolkitはMySQLを管理・メンテナンスするのに役立つコマンド群です。

○構築方法
以下のVagrantfileを使用して、Percona ToolkitとMariaDBをインストールした仮想マシンを構築する事ができます。

Vagrantfile
VAGRANTFILE_API_VERSION = "2"

Vagrant.configure(VAGRANTFILE_API_VERSION) do |config|
  config.vm.box = "bento/ubuntu-16.04"
  config.vm.hostname = "ub1604mariadbperconatoolkit"
  config.vm.provider :virtualbox do |vbox|
     vbox.name = "ub1604mariadbperconatoolkit"
     vbox.cpus = 4
     vbox.memory = 4096
     vbox.customize ["modifyvm", :id, "--nicpromisc2","allow-all"]
  end
  # private network
config.vm.network "private_network", ip: "192.168.55.103", :netmask => "255.255.255.0"
  # bridge netwrok
config.vm.network "public_network", ip: "192.168.1.103", :netmask => "255.255.255.0"
  config.vm.provision "shell", inline: <<-SHELL
sed -i.bak -e "s#http://archive.ubuntu.com/ubuntu/#http://ftp.riken.jp/pub/Linux/ubuntu/#g" /etc/apt/sources.list
#localectl set-locale LANG=ja_JP.UTF-8
#localectl set-keymap jp106
apt-get update
#DEBIAN_FRONTEND=noninteractive apt-get -y -o Dpkg::Options::="--force-confdef" -o Dpkg::Options::="--force-confold" upgrade

# install mariadb
echo "mariadb-server-10.0 mysql-server/root_password password root" | sudo debconf-set-selections
echo "mariadb-server-10.0 mysql-server/root_password_again password root" | sudo debconf-set-selections
apt-get -y install mariadb-server
mysql -uroot -proot -e "GRANT ALL PRIVILEGES ON root.* TO 'root'@'localhost' identified by 'root';"
mysql -uroot -proot -e "CREATE DATABASE test DEFAULT CHARACTER SET utf8mb4;"
mysql -uroot -proot -e "CREATE USER test@localhost IDENTIFIED BY 'test';"
mysql -uroot -proot -e "GRANT ALL PRIVILEGES ON test.* TO 'test'@'localhost';"
mysql -uroot -proot -e "FLUSH PRIVILEGES;"

# install percona toolkit
wget https://repo.percona.com/apt/percona-release_0.1-4.$(lsb_release -sc)_all.deb
dpkg -i percona-release_0.1-4.$(lsb_release -sc)_all.deb
apt-get update
apt-get -y install percona-toolkit

# display summary information
pt-mysql-summary --user root --password root

SHELL
end


○関連情報
・Percona Toolkitに関する他の記事はこちらを参照してください。